Re-vamped Micro Mini Scooter (just for fun).

A Micro Mini Scooter repair, just for fun!

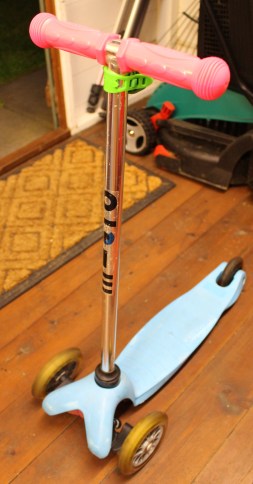
I really had no idea that Micro Scooters have been a ‘thing’ for the last few years and as a result, there are lots to choose from on the second-hand market.  We picked up a ‘bargain’ for our oldest daughter for a princely sum of £5.00 via a local Facebook For Sale page.  With hindsight, it was overpriced.

Just about every part of the scooter was either nasty or plain broken.  The handle bar grips were missing, the wheel bearings were all shot to pieces, the steering mechanism seized and the rear brake was missing.  The back brake on this scooter type, I’ve since found out, have a habit of snapping off with hard use, so that should have been the clue to the low, low price.  But if you read these pages, you know me, I like a challenge.

First step was to address the static wheels.  An Allen key holds the wheels on to the stub-axels at the front of the scooter and there’s something similar on the trailing wheel.  The bearings on our wheels were beyond a re-grease as they’d appeared to have spent their entire life at the bottom of The Channel.

This slideshow requires JavaScript.

Luckily, the bearings are easy to replace and good-quality generic items are available on eBay for under £5.00 for a whole set (6 bearings, 2 per wheel).

Next came the handlebar grips.  Ours were missing and again, generic ‘copy’ grips are available on eBay which are perfect for the job and are half the price of the original equipment.  While I was shopping on eBay, I also found an original Micro Scooter bell.  Just the job.

IMG_5715
FixItWorkshop, May’18, Micro Mini Scooter, new handlebar grips and bell fitted, prior to painting.

The steering mechanism was next and all it needed was a good clean up and light lubrication with some plastic-friendly white PTFE grease, readily available from Toolstation.

This slideshow requires JavaScript.

The shabby foot plate area was once baby-blue but had since faded and had evidence of scrapes.  It looked a bit sorry for itself.  I decided to address this by giving surfaces a good clean up and then key with wire wool.  A couple of coats of good quality plastic primer and then a couple of coats of vinyl black paint, which now gave the scooter quite a ‘presence’.  I then decided to improve the foot plate ‘grippy-ness’ by applying a custom grip tape design.

This slideshow requires JavaScript.

Before re-attaching the foot plate back to the chassis, the brake needed to be replaced.  As with some of the other fixings on the scooter, the brake’s fixings were so rusty, they needed to be drilled out and replaced.  Luckily the new original equipment brake came with new improved fixings which fitted perfectly.

This slideshow requires JavaScript.

Thanks to the cool dudes at Alleyoops, Worthing for their help and advice www.alleyoopsskates.co.uk.  The UK Micro website is also very good as it lists spare parts www.micro-scooters.co.uk/spares-support.

Micro Mini Scooter (AKA ‘Triggers Broom’) renovation spend, May’18:

New good quality bearings                                                        eBay                      £4.15

Generic copy Micro Scooter handlebar grips                         eBay                      £9.75

Genuine Micro Scooter bell                                                        eBay                      £7.78

Paint and sundries                                                                        Shed                      £2.00 (approx.)

Grip Tape (customised to fit)                                                       Alleyoops            £8.00

Genuine Micro rear brake                                                            Alleyoops            £8.99


Total                      £40.67

I know what you’re thinking… for £40 more, I could have bought a brand-new scooter and saved myself the bother.  At times, I did question my own sanity.  But what we now have is a perfectly serviceable, one-off that no one else will have.  Can you put a price on that?!

Very quiet Bauhn DAB Radio from Aldi

A little DAB radio, repaired at the workshop.

A colleague of mine brought this cool little DAB radio in to the workshop as it’s once crisp DAB tones were now no more and all life from the little device, had seemed to have ceased.  It was, very much, a dead radio.  When working, it picked up every station available, really clearly and seemed to out-perform the much more expensive devices my colleague also owned.  However, after a few months in the hands of his son, the radio would no longer turn on when plugged in.

IMG_20180515_153713.jpg
FixItWorkshop, May’18, Aldi Bauhn Radio, in for repair.

It was brought from Aldi for under £10, which seemed like a bit of a bargain to me.  It’s amazing just how much DAB radios have fallen in price in the last 5 years or so.

IMG_20180515_153836
FixItWorkshop, May’18, Aldi Bauhn Radio, in for repair, back of the radio.

The Bauhn UDABR-0197 (catchy name) is a compact, portable radio and is capable of being used with either a plug-in adaptor (supplied) or 4 x ‘AA’ batteries.  When powering this radio using either plug-in adaptor or batteries, the little radio refused to do anything.  Very sad.

I always start with the basics, so I checked the power from the plug-in adaptor first, which seemed to be delivering its 5.9VDC, pretty much spot-on. As a side note, I always check the condition of plug-in adaptor leads and plugs as they seem to almost always be made of the thinnest wire available in the Far East and prone to cracking causing poor connections.  This one was fine.

Opening up the radio was really easy, just 4 cross-head screws and the two halves of the radio came apart without any major dramas.

The first thing you notice about (cheaper) small appliances like this, is the ‘lack’ of anything inside.  The circuit boards in new small devices can sometimes be multi layered affairs, using micro components, making repair with normal workshop tools very difficult or impossible.

Luckily for this little radio, the designers have had the foresight to keep the power distribution board separate from the main ‘radio’ gubbins and this seemed to be of conventional construction.

On closer inspection of the power distribution board, it revealed a break in two of the pins from the ‘power-in’ jack socket meaning that power would not get through to the main circuit board.  The two pins were also shorting together, causing a local loop connection.  This meant than neither mains adaptor supply nor battery would power the radio.  Problem realised.

I was then able re-make the connection using a soldering iron on the board, reconnecting the pins to a spare section of copper detail on the power distribution printed circuit board.  Very satisfying.

Once the radio was back together, all screws back in place, power supply connected, the radio burst in to life, just in time for me to listen to my favourite station.  Happy days.

IMG_20180515_155029
FixItWorkshop, May’18, Aldi Bauhn Radio, in for repair, all fixed.

Cost of a new radio; £10.  Cost of repair; A bit of soldering and a cuppa plus gingernut biscuit.

Unsteady Dyson DC24 Roller Ball

A neglected DC24 gets some badly needed maintenance…

I really enjoy working on Dyson products as they’re so well thought out.  The designers seem to take great care factoring-in easy maintenance for longevity.  There’s also a great sense of theatre when using Dyson products.  Take the roller ball on this design for example, a throwback to the earlier Dyson Ball Barrow which allows better manoeuvrability when combined with an upright vacuum cleaner.  There’s also the exposed mechanism which automatically switches suction between the roller pick-up and hose when using the foot pedal to select the desired mode.  Genius.  All of these design touches encourage the user to care for and enjoy using the product.

IMG_5640
FixItWorkshop, April’18, Dyson DC24 (DC04 just in view too- how things have changed).

Sadly though, sometimes these touches are a bit lost on people and the design flares that appeal to some become misunderstood and neglected to others.

This DC24 had two problems.  It didn’t stand up properly when left and it didn’t really pick anything up that well either, failing as a vacuum cleaner on two fundamental points.

The first job was to find out why the DC24 was a little unsteady.  It seemed that all of the mechanism was intact and that nothing had snapped off.  Strange.  The red foot pedal operated lever that releases the latching system to move the main body from its locked position was stuck.  It seemed to be linked to a lever which operates the diverter valve, which switches suction from the roller beater foot to the flexible hose.  On closer inspection the lever on the diverter valve had come off its pin, probably by force.  The mechanism itself was also dirty which made operation rough.  The red lever is spring loaded with guides and pins which were also dirty and a little rusty.  I suspect this vacuum cleaner had been left somewhere damp.

After re-attaching the diverter valve leaver back on and giving all mechanisms a good clean-up with a light coating of silicone spray, it was as good as new again.

Once the mechanism was working, it was time to assess the vacuum’s performance.  It wasn’t that good.  As with most Dyson vacuum products, there are two filters.  One processes blow-by air from the motor and the other controls dust particles from the cylinder.  These filters can usually be cleaned with mild soap and water, but this set was well past it, requiring replacement and for under a tenner, it’s rude not to.  Dyson have made filter replacement very easy on the DC24 with good access to the motor filter via a small door on the roller ball itself and the lid on top of the cylinder.  I think there should be a massive sticker on these vacuum cleaners that says ‘don’t forget to clean the filters’ as I suspect that many of these products are chucked away by owners who forget to do the necessary.  Bag-less cleaner doesn’t mean maintenance-free!

With a couple of new filters, a clean-up of all of the rubber seals with silicone cleaner and this DC24 was fighting fit, ready to clean another carpet.

Cost of a replacement Dyson product:  £000’s.    Cost of new parts:  Under £10 plus my time.


Ultimate Speed Battery Charger from Lidl, on standby

Battery charger repaired at the workshop

My in-laws have an ornament on their drive, in the shape of a 2001 MGF roadster.  I say ornament because it’s fairly stationery, all of the time.  Even so, it’s battery gets topped up once in a while and the engine turned over when the urge presents itself.  Because the car isn’t used, the battery’s only means of charge is via a plug-in charger, my father-in-law occasionally hooks up.

IMG_5316.JPG
FixItWorkshop, March’18, Ultimate Speed (Lidl) Battery Charger.

The battery charger in question is an Ultimate Speed (Lidl brand) universal battery charger.  They’ve been on sale in the UK for a number of years at the £15 (approx.) mark.  They’re really good value as they allow ‘smart charging’ of car and motorcycle batteries without the risk of damage at a fraction of the price of the ‘big brands’ or a replacement battery.

However, this charger decided that it wasn’t playing anymore and refused to offer it’s charging services when recently connected to the MG’s flat battery.  On it’s way to the great bin in the sky, I managed to divert the charger via the workshop.

Once connected to the mains, the standby light illuminated, indicating something was actually happening, but upon connecting the low voltage side to a battery, making a charge selection via the single push-button switch, nothing changed and the whole unit remained on standby.  Pretty annoying.

Luckily, I have the triangular screwdriver required to undo the six screws that hold the (IP) ingress protected casing together.  Triangular screw heads are annoying and pointless as they prevent, in my opinion, people with a basic tool set having a go at a repair like this.  If you do fancy getting one of these tools, they are easily available on Amazon and eBay.

On with the fix.  With the casing opened up, my first port of call was with the switch itself.  Past experience has taught me to 1; start with the easy stuff and 2; these push to make switches fail all the time.  They’re in everything from door bells to cookers at the moment and when faulty, make the most expensive item and expensive paper weight in the blink of an eye.

To test the switch, I connected the charger to the mains and hooked up the low voltage end to a battery and simulated the button push switch by shorting out the switches connections on the circuit board.  Hey presto, the charger worked perfectly, every time.  The switch either needed repairing or replacing.

Because I’m a skin-flint, I opted to see what could be done with the present switch.  With care, these switches can be prised apart, using a sharp knife and the insides cleaned.  I took the switch apart which revealed nothing more than slightly corroded switch surfaces.  I can only assume that the product’s bold IP rated claim is a little over exaggerated and that some damp had wriggled its way to the switch and mucked it up.  With a cotton bud and switch cleaner, the switch surfaces scrubbed up like new and I re-assembled the switch lever and securing plat using a soldering iron to re-melt the plastic nubs holding the switch together.  No one would ever know it had been in bits.

With the circuit board returned to the housing, all six screws done up, the charger was back to rude health once more and ready to tend to the stranded MGF.

Runaway Hillbilly Golf Trolley…

Golf trolley heads for the hills…

Readers of this blog (I know there are millions of you) will recognise this golf trolley and I’m pleased to report that my first repair, the one to the motor, is still working perfectly.  However, the owner of the trolley contacted me with a (funny) problem.  Whilst recently enjoying a round of golf on the local fairway, the trolley decided to, by itself, begin to edge away from the second tee and then with some speed, head off in to the distance, without any operation of the dial switch, situated on the handle.  Whilst this seemed funny at first, I remembered that the motor on this trolley had the kind of torque that, coupled to small gearbox and wheels on a heavy frame, could do some serious damage, left unchecked.

Original photo taken in Aug’17, below.

WP_20170803_14_08_27_Pro
FixItWorkshop, Worthing, Aug’17 Hillbilly Compact Golf Trolley

Unlike many modern electric golf trolleys, it doesn’t feature GPS guidance, remote control or amazingly, a dead-man’s switch, which seems like a major safety oversight to me.  I’d have expected either a kill switch or dead-man’s switch* fitted to the handle on a trolley like this as the runaway scenario could never occur due to fail-safe nature of the switch being operated.  With one, the trolley would only run when the operators’ hand was on the handle or cut out when the kill switch is activated, as with the saftety cord mechanism, on a jet ski for example.  Perhaps the Mk2 Hillbilly Compact featured this.

*For example, a dead-man’s switch is usually fitted to something like an electric saw where the operator must old a handle-type switch to make it run.  Once the operator lets go of the handle, the motor automatically fails-safe and cuts-out.

On with the repair.  The trolley features some exposed connectors and cabling and it seemed sensible to check the continuity of the cables running up and down the handle shaft, as repeated trolley folding might have caused a problem with the wiring.  Fortunately, the cabling was OK.

The owner had mentioned that the handle, where the speed control switch is located, had got wet in the past, which made my alarm bells ring.

Opening up the handle, which only required a basic tool kit, revealed evidence of water damage and corrosion to the speed control terminals.  Luckily the owner of the trolley had stocked up on spare switches!

Removing the existing switch revealed intermittent continuity and varying amounts of resistance, which was not good.  A fault most likely to have been caused by water ingress or excessive shock.  The owner had supplied two ‘new old stock’ (NOS) switches.  Which one to fit?

From time to time, it’s downright sensible to either fit NOS or second-parts as they’re usually cost-effective and are more likely to fit over pattern parts.  But time can also affect apparently shiny parts.  This was a case in point.  I knew that the switch should vary resistance from open circuit to 10KOhms in either direction from COMM.  The old one didn’t and one of the ‘new’ parts only went to 2KOhms, so was not in specification.  Luckily, the remaining NOS switch worked fine and once refitted, and the handle reassembled, the golf trolley was ready to make the job of carrying clubs easier, once again.

IMG_20180131_135745
FixItWorkshop, Feb’18, Hillbilly Compact speed control switch, new and old- test NOS parts before fitting.

Cost of replacement trolley:  ££££ Cost of repair; £10 plus time.  Moral of the story; don’t assume NOS parts will work.  Test them first.


Vedette Wall Clock ne marche pas

A little repair on a French wall clock

This lovely wall clock had been running perfectly fine until a friend of mine decided to move it temporarily from the wall, during a recent bout of home decorating.  Now, I’m no expert on French wall clocks, but we think this one is circa 1920s or 30s, but either way, it’s a lovely thing to have in the house.  This one is also fitted with Westminster chimes, so one assumes it was made for the English market as an export item, all those years ago.

IMG_20180122_202319
FixItWorkshop, Jan’18, Vedette Wall Clock (French)

Once the paint had dried, the owner decided to re-fit the clock to its hook on the wall, but it simply didn’t run, even when fully wound-up.  Strange, what had happened?

Having a quick look at the front of the clock revealed nothing much.  The pendulum was where it should be and appeared to swing freely, as a pendulum should, but there was a slightly strange ‘double-click’ tick-tock, indicating something wasn’t right.  Clocks of this type should emit a definite even tick – tock -tick-tock.  This one wasn’t. Hmm.

Before going to see the clock, I had already decided that the small spring that suspends the pendulum could have been broken, so I packed a few spares I happened to have, just in case.  Opening up the mechanism revealed that the spring was actually intact, not bent or warped and therefore perfectly serviceable.  It was fairly obvious almost immediately that the small clasp which secures the pendulum to the escapement lever was bent and the probably cause of the problem.  All that was needed was a small amount of tinker-time to fix that with a small pair of pliers.  However, that wasn’t the end of the story.  Having undergone a ham-fisted removal from the wall, the escapement pendulum lever was now in a slightly different position and some more fettling was required to get the clock back ‘in-beat’, a common requirement on this mechanism type and often the reason why a clock won’t run, even when fully wound.

As the clock mechanism was out of the main casing (see photo) I decided to prop-up the mechanism on two tins of beans to allow the pendulum to hang over the side of a level table.  This allowed me to access to the clock’s mechanism and hear what was going on clearly.  A slight adjustment on the main pendulum lever to the right on this mechanism and the clock was back ‘in beat’, keeping good time.

After giving the case a general clean up and polish, I refitted the clock mechanism back inside it and hung the whole thing back on its hook, back where it belonged, on the wall.

Cost of a replacement: Sky’s the limit. Cost of repair; 1 cup of tea and 1 chocolate digestive.

Satellite Bass Guitar that wouldn’t go to 11.

A Fender Precision style Satellite P Bass guitar repair…

A friend of mine, who plays in a Portsmouth-based Psychedelic Garage Rock & Roll band, brought in a Satellite Bass Guitar with a few issues.  Firstly the volume control was noisy and crackly and secondly, it was a little quiet.  Not good for those moments where you need to go one higher, to eleven.

The band are:  60th Parallel

IMG_4905
FixItWorkshop Jan’18, Fender Precision style, Satellite P-Bass.

Opening up the compartment behind volume, tone and jack plug socket revealed messy wiring and dodgy connections.  The owner had already supplied a replacement potentiometer for the volume control, so all I had to do was replace the one fitted, re-make the poor connections and give the wiring a general tidy-up.

IMG_4908
FixItWorkshop Jan’18, Fender Precision style, Satellite P-Bass, wiring before work.

The guitar has Dimarzio ‘Model P’ pick-ups which can be wired many different ways, depending on the application and musical taste.  This particular guitar, circa 1976, is a Fender Precision style Satellite bass (P-Bass) and has a modified ‘through neck’.

IMG_4906
FixItWorkshop Jan’18, Fender Precision style, Satellite P-Bass, volume (top) and tone (bottom) controls.

Testing the guitar before commencing work revealed a slightly quiet, but mainly crackly output from the amplifier, the tone control was fine.  The owner had also complained that the bass sometimes cut-out, mid song.  Not ideal.

Removing the volume control was straightforward and only required a spanner to remove the nut, after pulling off the volume knob.  The rest of the job just involved careful de-soldering, cutting out the poor wiring and replacing it with new wiring where needed and some heat shrink to tidy things up. Having not repaired an electric guitar before, I did make a quick wiring diagram for reference!

Once completed, I hooked it up to the amplifier again which revealed a much cleaner, crackle free note.  Sadly, I can’t play the guitar, so I wasn’t able to test it properly!

IMG_4911
FixItWorkshop Jan’18, Fender Precision style, Satellite P-Bass, neater wiring.

Cost of a new bass:  Name a price.  Cost of the repair; about £2.00 plus tinker time.


Poorly Scalextric Sport Digital Lap Counter (C8215)…

Scalextric C8215 lap counter repaired in the workshop…

First off, I must confess, that this is part of my own Scalextric collection, not part of someone else’s.  I’ve always enjoyed slot car racing and a lap counter is an essential addition to anyone who wants to prove that they’re the fastest around the track!  Trust me, it can be very addictive, especially when racing against one’s better half.

IMG_4854
FixItWorkshop, Dec’17, Scalextric Lap Counter C8215

Anyway, I wanted to share this little repair in the hope that others might benefit.

My once reliable lap counter started to miss laps on lane two at very crucial stages of a race.  It started by only happening occasionally before completely missing several laps in a row, forcing a stewards’ enquiry to settle the race finish times.  Lane one was fine.

Time to get out the screw driver and delve in to the workings of the timer.  Once removed from the main track layout, the back of the unit has a cover which is held in place with six small self-tapping screws.  These come undone easily and removing the back reveals two sets of electrical switch contacts, operated by a lever on each track, just under the slot car rails.  The idea here is that the slot on the slot car operates the lever as the car passes the lap counter track piece, operating the switches contacts, completing a circuit, thus counting the laps.

Comparing the switch contact clearances, lane one’s was considerably closer than lane two’s.  This means that the ‘dwell’ time on lane two’s switch would be less that the switch on lane one, which was working ok, meaning a possible cause of the problem.  To anyone who’s adjusted contact breaker points on an old car, you’ll know what I mean here.

I had no idea what the correct clearance should be, so took an educated guess and closed the gap to about 0.5mm, done by eyesight alone.  I made sure that both sets of switches were the same (see photos).  While I had the counter in pieces, I cleaned the contact surfaces with a little electrical contact cleaner, just for good measure.

After re-assembly and re-fitting to the track, a few test laps with my fastest race Mini, proved that the counter was working as it should once again.

Cost of a replacement counter (second hand) circa £12.  Cost of the repair; 10 minutes tinker-time.

Gaggia Classic machine wakes up to smell the coffee.

A Gaggia Classic Coffee Machine repair…

A simple repair…. That’s what I thought when a friend asked if I could look at his Gaggia Classic Coffee Machine, which had developed a nasty little leak when in use.  The coffee wasn’t all that good either, due to the lack of pressure available, caused by the leak.  In short, it needed attention.

IMG_3616
FixItWorkshop, Oct’17, Gaggia Classic Coffee Machine, with a leak.

The owner had already bought a repair kit consisting of the main seals/ gaskets that commonly fail, so I thought no problem, take to pieces, replace seals, happy days.  Er, not quite.

Once I’d stripped the machine down, pretty straightforward on these machines, the bare parts were exposed, which revealed the problem.  After being fired up briefly, not to make coffee I’d like to point out, water could be seen escaping from the boiler unit, a alloy bodied lump of metal, split in two halves, held together by 4 screws.  The boiler, as the name suggests, heats the water up with one heating element  and creates steam for the steam wand, with another element, all part of the same module.

After separating the boiler halves, I traced the leak to a faulty gasket, but crucially, one side of the mating faces was heavily corroded and unlikely to re-seal with a new part fitted on its own.  Remedial action was required.

This model is a few years old and a replacement boiler is still available on a few websites and prices vary from £40 to £60 at the time of writing, so at that price, starts to make the cost of repair unviable.

I decided that the face with the corrosion had enough material to withstand loosing some, so went about sanding the worst of the corrosion away before gradually moving on to  smoother and smoother sandpaper.

Because Gaggia Classics are fairly common, I decided to video this repair process as I suspect the corrosion affects many machines with age and just fitting a repair kit won’t cure the problem on its own.  See below.  I hope it helps anyone else with the same machine facing the same problem.


Once I was happy with the new finish, I fitted a new gasket and reassembled the boiler.  After putting it all back together, I purged several tanks of water through the system to remove debris, before attempting a cup of coffee.  Once filled up with my favourite Lidl coffee, the machine performed well once again with no leaks and the end product tasted great.

Cost of a new machine:  £249.00.  Cost of repair:  £4.50, plus time.


Raucous Kenwood Chef A701a

A noisy Kenwood Chef A701a gets a gearbox rebuild.

This Chef had been sleeping quietly in a kitchen cupboard for some time before being woken up to make cake mixtures once again.  The owner had owned the mixer for many years from new and was sentimentally attached to it.  I fully sympathise, they’re great machines.  It had been used many times in the past and then packed away as new machines came and went.  Having decided that there was still a place for the A701a, it was fired up.

The owner didn’t remember it being quite as noisy and wondered if something was wrong with it.  She got in touch and brought it in to the workshop.   After listening to the mixer at varying speeds, we agreed that perhaps it was a bit noisy and that further investigation was required.

 At this stage I must confess at this repair has been on the bench for a long while..!

I think the A701 is my favourite Kenwood Chef product as it’s very elegant, beautifully proportioned and almost over-engineered.  It comes from a time where built-in obsolescence was a swear word.

White removed
FixItWorkshop, Oct’17, Kenwood Chef, A701a.

On with the problem.  After disconnecting the gearbox by removing the drive belt, I checked the motor for general wear and tear, the brushes and speed control mechanism and I concluded that it all seemed OK and working smoothly.  The gearbox however did seem a bit noisy when turned manually, nothing hideously graunchy, but a little rough.  To be honest, it would have probably survived, but I wanted to open up the gearbox to make sure that it was as it should be.

Whilst removing the Chef’s casing around the gearbox, I’d noticed traces of grease around the joints and various power take-offs.  All models seem to do this to an extent, but this one seemed to be quite bad.  Closer inspection revealed that some of the grease had escaped out of the seal between the two halves of the gearbox casing.  Opening up the casing revealed that the grease that was left had been pushed to the corners of the space within the gearbox and that the gears were a bit dry, this was probably the root cause of the noise.  The planet wheel that drives the beater was also bone dry.

Luckily, there are plenty of suppliers who can supply rebuild kits for Kenwood Chef gearboxes, including new gears and grease.  The gears in this seemed serviceable, but it seemed very sensible to replace the lubricant with the correct 130g of Kenwood gearbox grease, which is food safe.  I used ‘Kenwood Chef Restore’, an eBay seller and the kit was a reasonable £10.99, including P&P.  The kit included the main gearbox grease, white grease for the planet gear and sealant for the gearbox casing.

IMG_4570
FixItWorkshop, Oct’17, Kenwood Chef A701a, repair kit from Kenwood Chef Restore, eBay.

Before replacing anything, the first job was to clean out all traces of the original grease which had gone very sticky and was contaminated with general wear.   The first pass clean involved using paper toweling, followed by water and detergent, before a final clean with brake cleaner, which removed the last few traces of grease and dirt.

With the gearbox refilled and resealed making sure the spacers were re-fitted to the correct parts, the drive belt re-fitted with just enough slack, the gears sounded much sweeter with the final parts of the casing reassembled.  One last point to note is that I used silicone sealant on the blender attachment power take-off plate in replacement to the one fitted, since the original seal was well past it (see below).

As a finishing touch, I replaced the existing machine feet which had turned to mush with replacements from Sussex Spares (eBay shop) for a very reasonable £2.70, delivered.

The Chef was now ready to prepare cake mixtures again.

Cost of new machine: £300 and up.  Cost of replacement parts: £13.69 (plus my time).