An orange Kenwood Chef A901! I mean, what’s not to like?

More orange please!

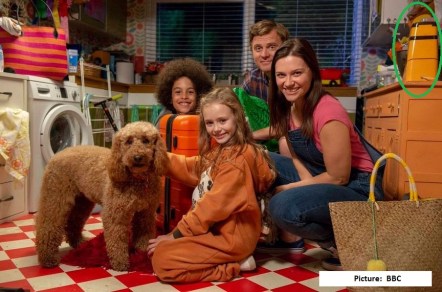
Why oh why oh why are more kitchen machines not orange?  I mean, just look at this beauty.  Rare-ish and as a Chef spotter, I think the only time I’ve seen another is on the kids’ TV program, Waffle the Wonder Dog on Cbeebies, here in the UK.  Do you have one in another funky colour?  If so, please send me a picture!

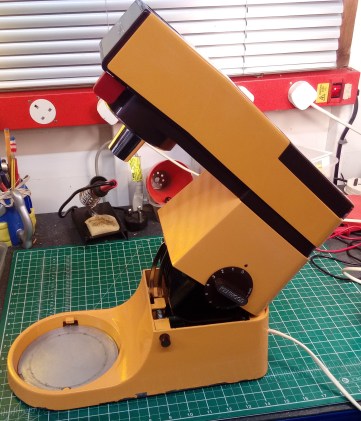
An orange Chef in the workshop:  It was like Christmas had come early.

IMG_20191209_213850
FixItWorkshop, Worthing, December’19, orange Chef A901.


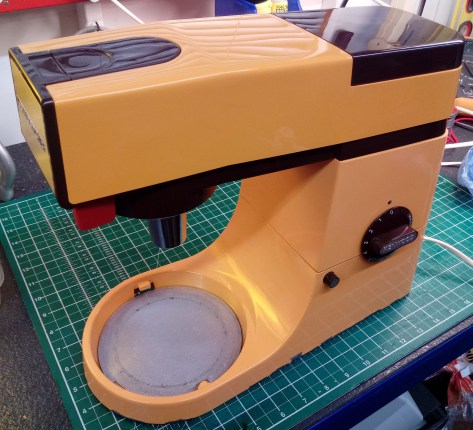
Make and model: Kenwood Chef A901 (orange)

Fault reported: No go

Cost of replacement: About £300

Cost of parts: £13.74

Hours spent on repair: 2

Tools needed: Cutters, screwdriver, soldering iron, multi-meter, cleaning tools

Sundry items: Light oil

Repair difficulty: 5/10

Cups of tea: 1

Cheesecakes: 2

Capture
FixItWorkshop, Worthing, Kenwood Chef Major in Orange.  Super rare?

The Chef had actually been working for a living since it provided daily assistance in the production of artisan cheesecakes, being sold at a local market.  Recently it had decided to start a smoking habit and then go on strike leaving the owner in a bit of a muddle and customers with rumbling tummies.  That simply wouldn’t do.

Anyway, on with the repair. Opening up the casing revealed the problem straightaway.  One of the capacitors had failed and a resistor had burned out, leaving a failed circuit.

IMG_7870 cap
FixItWorkshop, Worthing, December’19, A901 failed components.

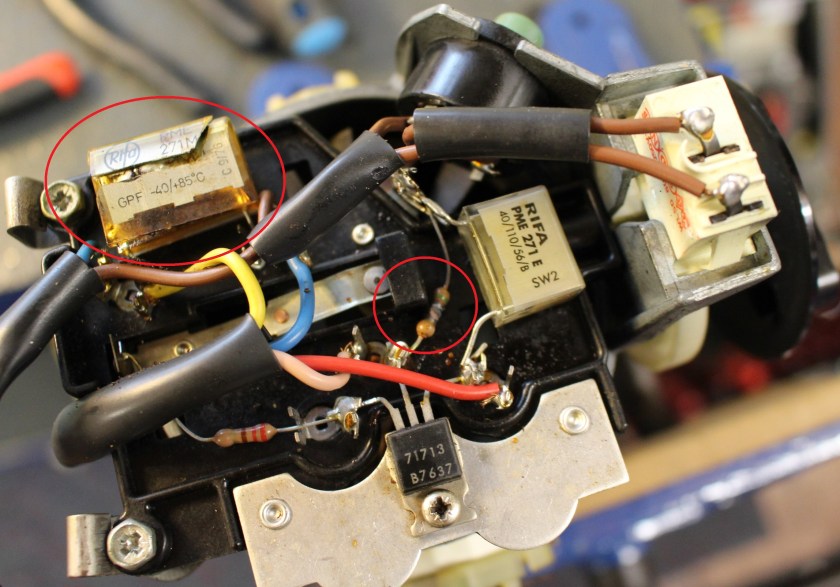
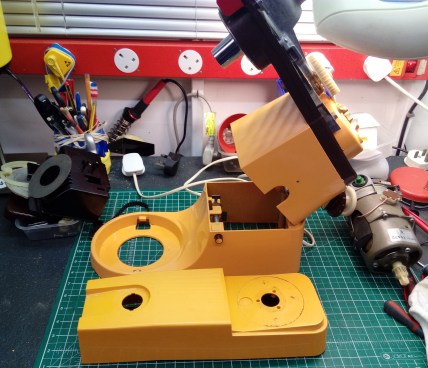
With a decent repair kit bought (from eBay), I replaced all components relating to the speed control circuit, which made the motor run again.  I also replaced all the machine’s 5 feet, since the originals had long since gone to mush, something they all do with age. Since the motor was out of the unit, I took the trouble to adjust the motor’s end float and oil the bearings, for ultra-smooth running.  Very satisfying.

IMG_20191202_210500
FixItWorkshop, Worthing, December’19, orange Chef in bits.

With the casing all back together, I gave the machine a light T-Cut and polish to make it look as good as new and despite its 30-odd years and the odd bit of flaky paint, I think you’ll agree- it looks fab.

IMG_20191209_213838
FixItWorkshop, Worthing, December’19, orange Chef A901, open, looking fab.

PS, thanks to Andrew for supplying the very yummy scrummy, lime cheescakes.


Jonathan Deer the III

A Christmas novelty toy gets a new lease of life…

IMG_0509
FixItWorkshop, Worthing, December 2019, Jonathan Deer III.

I meet some really interesting people with this hobby of mine with some quirky things to fix, often with personal and meaningful backstories.  This repair is one such item.

Make and model: Jonathan Deer III rubber deer thingy

Fault reported: Not running

Cost of replacement: About £0

Cost of parts: £0.00

Hours spent on repair: 2

Tools needed: Cutters, screwdriver and soldering iron

Sundry items: Contact cleaner

Repair difficulty: 2/10

Cups of tea: 2

Biscuits: 0

Someone got in touch to see if I could repair a festive family favourite Christmas novelty, which was a big hit with the children, back in the day.  Jonathan Deer III has become a family legend and Christmas simply wouldn’t be complete without him.  Intrigued, I agreed to see the injured deer.

A few days later, a parcel arrived and upon opening, I was greeted with a deer’s head made of rubber.  Not one’s average delivery.

This slideshow requires JavaScript.

‘Jonathan Deer’ was available about 20 years ago in the UK and I suspect the US as a novelty singing Christmas toy, designed to hang on the wall, to bring festive joy when anyone walks past the deer’s motion sensor.

Sadly, or maybe fortuitously, depending on your perspective, Jonathan was now silent and despite new batteries, it was dead.

The thing about Christmas decorations is that they get used for about 4 weeks a year and then packed away, usually in a loft or alike where it’s not necessarily that warm or dry for the remaining 48 weeks.  Cold, damp and draughty conditions are not good for small electrical items.  Batteries left leak and metallic contacts corrode and these ailments had affected poor old Jonathan.

Repairs completed:

  • Battery terminals were corroded from battery leakage and therefore cleaned with a small toothbrush and protected with contact cleaner
  • Opening up the casing (several small screws) revealed a broken negative lead.  A Small re-soldering job fixed that

Still no action.

  • Lastly, the on/off switch didn’t seem to be working.  I was able to separate the small tangs holding the switch together and gently clean the switch wiper/ contacts with cleaning agent.  I didn’t replace the switch as it’s a bespoke item and getting a replacement would be difficult.  The repair I made seemed to work OK.

Once the switch was cleaned, Jonathan burst into life.  Upon switching him on in demo mode, he woke up by blaring out James Brown – I Feel Good.  Moving the switch to on mode, he worked as he should via the motion sensor.  Wonderful.

I was then able to return the deer to its owner to enjoy over the festive season.  Result.

Check your plug! A simple Miele PowerLine Vacuum Cleaner repair

Mains plugs lead a hard life, make sure yours are safe. If they are damaged, replace!

Before and after…

A quick 15-minute job, with a satisfying result.

Sometimes, it’s not a complicated fault preventing an otherwise good machine from working.  It’s just a case of taking the plunge and getting stuck in as the owner of this vacuum cleaner had proved.

Make and model: Miele PowerLine Vacuum Cleaner

Fault reported: Not running/ occasional sparks(!)

Cost of replacement: About £139.99

Cost of parts: £0.00

Hours spent on repair: ¼

Tools needed: Cutters, screwdriver and soldering iron

Sundry items: Silicone spray, T-Cut

Repair difficulty: 1/10

Cups of tea: 1

Biscuits: 1 Ginger Nut


IMG_0300
FixItWorkshop, Worthing, November ’19, Miele S5211 Vacuum Cleaner.

Sometimes the simplest things are the best.  This machine had been working well when sparks began coming from the mains plug.  The owner had reacted quickly by turning off the power and then removing the plug from the wall socket.  Good job.

The owner then bought a new plug from a local hardware shop to replace the damaged (cracked) plastic plug fitted.  She then fitted the new plug to the vacuum cleaners’ flex but nothing happened when she switched it back on.  Frustrating!  It’s reassuring to hear that folk still bother to get screwdrivers out and attempt a repair.  It makes it all worthwhile.

When I saw the vacuum cleaner and heard the back story, I immediately inspected the plug wiring and spotted that a bit of insulation was still trapped on the live connecter, preventing the electrical connection.  30 seconds with a pair of cutters and a small flat blade screw driver and the machine was working again.

Me being me, I then decided to give the Miele’s plastic casing a quick polish with T-Cut and wax, to bring it up to the correct standard.

It made me think:  How often do people change plugs these days?  Not often.  So, if you’re wondering what the correct position of the wires should be, it’s this (UK specification).

Capture
FixItWorkshop, November’19, UK plug – not my image.

General hints

  • Make sure all screws are tight
  • Ensure the cable grip clamps the cable insulation
  • Don’t trap wires in between the casing

If in any doubt, consult a friendly shed-dweller or spanner spinner.

Is 12 years too long to keep a toothbrush?

A Braun Oral-B electric toothbrush gets a new lease of life.

Let’s just clarify one thing straightaway; I’m talking about an electric toothbrush with changeable brush heads.

I was given an Oral-B/ Braun electric toothbrush as a birthday present years ago, which when you think about it, is a bit of a strange thing to receive as a gift.  Maybe the gift contained a hint?  Back then, these toothbrushes were not cheap, starting at about £60.00 if I remember correctly.  Today, a new equivalent is quite a bit cheaper.

In the time I’ve owned it, it’s had about 40 new brush heads and it’s just about to start it’s third non-replaceable battery.

Make and model:  Oral-B/ Braun 3756 931 41306

Fault reported: Battery won’t hold charge

Cost of replacement:  About £20.00

Cost of parts:  £6.60

Hours spent on repair:  1

Tools needed:  Small flat-bladed screwdriver, soldering iron

Sundry items: None

Repair difficulty:  5/10

Cups of tea:  2

Biscuits:  2 Gingernuts

Electrical items with non-replaceable batteries are so annoying.

A message to manufacturers:  There’s simply no excuse for it as all batteries are replaceable.

In my experience, items with ‘non-replaceable batteries’ contain entirely replaceable items.  The batteries might not be standard ‘AA’ items, but there’s a host of online suppliers that are ready to supply just about any power cell for any application, you name it, usually for a reasonable price that costs-in for the repair process.

This slideshow requires JavaScript.

Now, I don’t know how long one of these toothbrushes is meant to last, but as a long-term test, I thought it would be interesting to find out.  After the first battery died, I decided to take the toothbrush apart, to see what was going on inside.

As you can see from the photos, there’s more within than one might think.  There’s a switch, charging circuit, timer circuit, over-pressure circuit, gearbox, motor, mini crankshafts and a battery.  Not to mention all of the tiny connecting parts all neatly engineered to work together, reliably.  It’s a small work of art really.

It makes me very sad that most of these toothbrushes will end up in landfill, after a few years.

The designers had clearly designed this toothbrush as a disposable item as the battery, despite being readily available from spares suppliers, was hidden, out of sight, under all of the gubbins.

To extract the battery (a simple nickel cadmium item) a full dismantle was required, in this order.

  • Prise off the top collar
  • Prise off the bottom cap
  • Pull out the main mechanism
  • De-solder the main pressure switch, charging coil, LED, and some other joints,
  • Take PCB off of battery carrier,
  • Split battery barrier from the main motor area
  • Remember the polarity of the battery, negative near the coil (a misleading ‘+’ there)
  • Reassembly, with the new battery is the same in reverse.  See pictures for hints.

Twelve years down the line and now on its third battery cell, the toothbrush is still going strong which proves that with a little tinkering, disposable items can be repaired and made to last longer.

It’s just a shame that Braun, the manufacturer, decided to ignore any notion of consumer maintenance.


A broken massage belt, with a happy ending…

An Invitalis Massage Belt gets a simple repair at the workshop.

I was asked to repair a personal massage belt recently, which had developed an annoying habit of cutting out, mid-treatment.  Over email, I confessed that I did not know what a massage belt was, but was reassured that is was used to treat lower back ailments and nothing more personal.  Phew.

Make and model:  Invitalis Vitalymed Flexi massage belt

Fault reported: Cutting out

Cost of replacement:  About £40.00

Cost of parts:  £1.29

Hours spent on repair:  1

Tools needed:  Small flat-bladed screwdriver, soldering iron

Sundry items: None

Repair difficulty:  2/10

Cups of tea:  1

Biscuits:  1 Goldbar


IMG_9894
FixItWorkshop, Worthing, August’19, Invitalis Vitalymed Flexi massage belt.

These devices are sold on Amazon and are usually available at events, such as the Ideal Home Exhibition and alike.  This belt offers the wearer a lower back massage by means of two rotating arms with smooth spheres, hidden behind a soft pad.  The spheres also emit infra-red, if required.

I don’t know much about this kind of thing, but I had noticed that the power cable for the belt was a standard female 12VDC connector, used on many types of domestic equipment.

With the power applied and with some wiggling, the belt would occasionally come on and then fail, indicating a loose connection.  The trick here was to find out where.

The belt is zipped together and access to the wiring was easy.  The belt’s power connector ran to a switch/mode box and then on to the motors and other gizmos within (see photos in slideshow).

This slideshow requires JavaScript.

After cutting into the cable, testing continuity, I found two problems; A break within one of the cable cores and a faulty female power connector.  Luckily, connectors like this are abundant and a quick look on eBay revealed lots for under £2, delivered.  As it happens, I bought a high-quality connector and flying lead, intended for a CCTV camera, to fit the belt.

The last step was to reconnect some good cable, reconnect the new connector and make good with soldered joints and heat shrink, to keep everything nice and tidy.  Before I solder things, I always make sure I’ve not cross-wired anything, by proving continuity with a multimeter.  In the past, one has been known to blow things up by not taking this sensible approach!

After reassembly, it was just a case of powering up and switching on.  Gladly, I hadn’t crossed any cables and it now worked again, happily ever after.

Old school iPod Nano battery replacement

Apple really don’t want you to get into their products- but they’re not alone.

We have two Apple products in our house from the early 2000s; one iPod Nano 1st generation and the 1st generation iPod colour.

IMG_9910
FixItWorkshop, Worthing, August’19, Apple iPod Nano.

Apple tech polarises opinion as it’s always premium priced and is quite locked-down to ‘Apple only platforms’.  Some people love the ease of use that their products seem to offer, others get frustrated with the lack of integration with other products.

Despite being an Android house, we keep the iPods as they are quite robust, but due to age, battery life has recently become an issue.

Make and model:  Apple iPod Nano

Fault reported: Battery not holding charge

Cost of replacement:  eBay, loads out there

Cost of parts:  £8.00

Hours spent on repair:  1

Tools needed:  Spudger, small flat-bladed screwdriver, soldering iron

Sundry items: None

Repair difficulty:  4/10

Cups of tea:  1

Biscuits:  2 (Custard Creams)

Let’s just get it out of the way now.  Apple really don’t want anyone opening up their devices and it was a wrestle to open up the casing, without snapping something (the iPod, not one of my nails or something).

The battery in the Nano is situated beneath the metal cover, which must be removed using a spudger.  A spudger is a small lever with a fine edge that can be used to gently open up small, usually plastic, push-fit, ‘clicked-together’ things.  Spudgers are kind of disposable and I always seem to break one on each job.  I must look out for a strong, stainless steel item.

Using the spudger on the Nano isn’t easy, since (as I later found out) all of the metal tangs located around the metal casing, dig in to the plastic face.  Trying the separate the two halves is a real battle and there’s a real risk of damage should you use too much force.

After a good 15 minutes of wrangling with the Nano, the casing popped off.

This slideshow requires JavaScript.

The battery on this model uses a small fly lead which is soldered to the main PCB, again more evidence to suggest that Apple had no intention of making the Nano’s battery replaceable by most users.  Extreme care had to be taken with the soldering too since the PCB’s components are so close and small, making it too easy to use too much heat, causing irreparable damage.

I took my time and was able to fit the new battery (push fit) and solder the connections OK.

The cover popped back on and fortunately, the screen lit up once more, when the menu button was pressed.  Phew. Tea time.


Imaginext Super Hero Flight Gotham City

Good thinking Batman, but I have a safety dilemma with a repair.

During a recent Toy Doctor surgery at a Dad La Soul/ Tot Rockin’ Beats event http://www.totrockinbeats.com/dad-la-soul I attempted a repair on a kids toy that I couldn’t get working in the two hours we had, so I asked if I could take it home to the workshop where I have more tools at my disposal.  Good thinking Batman.

The Imaginext Super Hero Flight Gotham City (catchy title for a toy) was much loved, but the flying bit (circled in red below) had stopped working and no longer did anything when switched on.  No fun without the flight bit.

Imaginext Super Hero set
FixItWorkshop, Worthing, August 2019, Imaginext Super Hero Flight Gotham City. Image: Google/Amazon.


Make and model:  Imaginext Super Hero Flight Gotham City

Fault reported: Not working

Cost of replacement:  £45.00 approx.

Cost of parts:  £0.00

Hours spent on repair:  About two hours- although to be honest, I lost count with this one

Tools needed:  Cleaning cloths, small fine file, soldering iron

Sundry items: Contact cleaner

Repair difficulty:  6/10

Cups of tea:  4

Biscuits:  10, maybe the whole pack, I lost count (Custard Creams)

The battery-powered flying thing on a weighted boom should fly about in a circular fashion and be controlled by the city platform, presumably by remote control from the main city bit.

Upon opening up the battery compartment, the problem revealed itself.  The previous batteries had leaked and the spillage has corroded the battery terminals.  No bother I thought, just a matter of cleaning-up the metal surfaces and we’d be back in business.  How wrong I was.  Even with new batteries installed, nothing happened, how very dissapointing.

No, it wasn’t going to be that easy and that was the theme for the rest of the repair.  Everywhere I turned, whether it was trying to open up the casings, inspect wiring or generally take something apart, I was going to be met with glued shut fixings and more problems.

This slideshow requires JavaScript.

Construction on this toy was very strange.  Surfaces on the casing were sometimes glued and screwed together, very odd, and I guess that method must have been used due to production time and cost saving.

The wiring between the flying bit and base checked out OK and the motor spun when I applied some charge briefly to the terminals, so that all seemed fine.

Upon opening up the gubbins where the switch was, the problem with the toy presented itself.  The mini printed circuit board had suffered from battery leakage corrosion and was shot.  Whatever it was meant to do was in the distant past.  So, this toy was for the WEEE skip, as there was no chance of getting a replacement.

Well, hang on a minute, we don’t give up like that do we.

I decided that I could make the toy work albeit without the printed circuit board by re-wiring the motor, using the existing loom and switch, so that the motor and therefore helicopter bit worked as it should.  This would mean that once the switch on the base of the unit was turned on, the helicopter would start and it would not be possible to turn it off without grabbing the moving base weight first.  It clearly wasn’t designed like that, but I had at least got it working again.

This slideshow requires JavaScript.

So, here was my dilemma:  Give up with something I couldn’t get a part for or get it working again, albeit with a removed (percived) safety feature, so that the toy could still be enjoyed.  I went with the latter as I thought that the danger was negligable.

Batman_toy(1)
FixItWorkshop, Worthing, Aug’19, flying high, once again.  Always read the safety label.

Was I right?


Blinking GHDs!

A pair of GHD 3.1B hair straighteners gets fixed

GHD hair straighteners are not something I’ve ever had the need to use, but they are seemingly very popular among the long-haired kind, none the less.  There are cheaper alternatives out there, but devotes tell me that the ceramic plates seem to have a better finish and run hotter for longer, all essential features for taming unruly curls.  So they tell me.

IMG_9909
FixItWorkshop, Worthing, August’19, GHD 3.1b hair straighteners.

Make and model:  GHD hair straighteners 3.1b

Fault reported: Buzzing noise, not warming up

Cost of replacement:  £97.00

Cost of parts:  £0.00

Hours spent on repair:  About an hour (ish)

Tools needed:  Cleaning cloths, small fine file

Sundry items: Contact cleaner

Repair difficulty:  4/10

Cups of tea:  2

Biscuits:  1 (Ginger Nut)

Someone got in touch to ask if I could fix their GHDs and to be frank, I’ve had mixed success with these repairs in the past as in general, the newer the model, the harder it is to fault-find and subsequently order parts for, something I find very frustrating.  However, the 3.1bs discussed here are pleasingly old-school.

Dismantling these GHDs involves just one small cross-head screwdriver and one small flat blade screw driver, none of your fancy Torx heads here, thank you very much.

Strangely, the GHDs made a disconcerting buzzing noise when switched on, which to my fairly trained ear sounded distinctly 50Hz-like.  That means that the mains electricity feed was causing some component to ‘arc’ or resonate- the buzzing noise, in plain English.

Fearing imminent catastrophe, I unplugged the GHDs and went to work.  The main PCB is pretty simple on the 3.1b.  Most of the solder joints were OK, but some of the joints around the switch had discoloured, showing that heat had built up, indicating a problem.  To be on the safe side, I re-soldered all the joints to avoid a dry-joint situation.

The buzzing noise still prevailed.  The switch seemed to be the next logical place to look and being of quality, the designers had provided easy access to the switch mechanism via a small metal cover with sprung tangs.  A quick bit of jiggery-pokery and the switch was in bits.

The problem was revealed in an instant.  Both switch contacts and corresponding wipers were burned and needed re-finishing and cleaning.  A quick whizz with a fine file and clean with special electrical contact cleaner and the switch was as good as new.  Since the GHDs were already in pieces, I gave the same clean up treatment to the 3600 flex mechanism, as a precaution.

This slideshow requires JavaScript.

So, this set of GHDs were saved from the bin, ready to straighten locks once more, thanks to a few basic tools and cleaning.  Very satisfying.


That thing just eats money!

Tomy (UK) /Robie (US) Mr. Money repaired in the Workshop

I have a real soft spot for novelty toy robots that actually do something.  I think I’ll make a point of collecting more.

IMG_9795
FixItWorkshop, Worthing, August’19, Tomy/ Robie Mr. Money.

Make and model:  Tomy (Robie in U.S.) Mr. Money  children’s money box

Fault reported: Not eating money

Cost of replacement:  N/A

Cost of parts:  £0.00

Hours spent on repair:  About an hour

Tools needed:  Cleaning cloths

Sundry items: Contact cleaner

Repair difficulty:  3/10

A lady got in touch with me on the back of an article I wrote a while ago about a faulty Mr. Money toy robot money box.  My Mr. Money had gone wrong as I’d left an old battery inside which had then leaked.  A major clean-up and tinker was then required to get it working again.

This particular Mr Money belonged to the lady’s husband and was to be ‘given to him again’ as a 40th birthday present.  What a nice thought.  The only problem was that Mr. Money had stopped working long ago; put away and forgotten about.  He needed bringing back to life.  Perhaps there was a hidden message to the husband to save for something?  Who knows.

Mr_Money_Quick_Strip

Mr. Money arrived well packed at the workshop and I wasted no time in taking him apart.  There was no evidence of battery leakage or accidental Cadbury Button ingestion and he was generally in good condition with no bits broken off.  A good start.

Mr. Money is getting on a bit and when taking apart any toy, let alone one that’s over 30 years old, one must be careful not to accidently snap-off any lugs or tangs that hold things like casing and levers together.  Very tricky.  It’s not something I usually attempt after a day at work, when I’m shattered.

After some rooting around in the depths of the mechanism, I noticed that the ‘limit switch’ was a little dirty and that some of the contacts needed a little clean.  Using some fine cloth and switch cleaner, all metallic switch surfaces and battery connections were cleaned up and with a new AA battery installed, Mr. Money worked again.

Being 30 years old, there’s no silly use of electronics or other USB excesses which are, I think, ‘over used’ on modern toys.  It all adds up to something which can be repaired with basic tools and parts.

This slideshow requires JavaScript.

I carefully reassembled the workings, casing, switches, arms, head, eyes and lid.

Mr. Money was ready to feast.

After testing a couple of quid through the Mr.Money’s eating cycle, I was happy for him to start his journey home.  I hope he gets used regularly and never put away in a box again.


Tone-deaf VTECH Singing Nursery Rhyme Book

VTECH kids toy gets a little help.

We love a musical singing book toy, don’t we.  They’re great for encouraging children to form words, read and follow a narrative.  We have a few of these and they’re all great fun, all the time the batteries hold up.

We’re not so fond of musical books when they seemingly start by themselves, at one o’clock in the morning, when there’s no one else in the house.  Very creepy.

Make and model:  VTECH Electronics Singing Nursery Rhyme Book

Fault reported: Poor sound quality

Cost of replacement:  N/A

Cost of parts:  £0.00

Hours spent on repair:  About 10 minutes

Tools needed:  Small file, cleaning cloths

Sundry items: Contact cleaner

Repair difficulty:  1/10

IMG_9559
FixItWorkshop, Worthing, July’19, VTECH Singing Nursery Rhyme Book.

This toy was a hand-me-down and had enjoyed a few years of use already, before it came in to our household, but it was in good condition and still has many more years left in it yet.

Recently though the singing emanating from the book was becoming a bit off-key and to be frank, rather than bringing joy the noise coming from the toy was enough to induce nightmares.  I keep a ready supply of rechargeable ‘AA’ batteries in this house and after popping out the old ones, the new ones fitted, I assumed all would be well, but not so.

Despite fresh power, the singing was still horrible and wobbly.  A quick test of both sets of batteries (old and new) revealed that the original batteries were fine and that something else was at play.

Time to delve a little deeper.

Galvanic corrosion can occur when two different metals in close contact with each other, chemically react.  The corrosion forms a barrier, in this case between the electrical contacts of the toy and battery to form a resistance.  This means that the toy, with the corroded contacts, wouldn’t get the full power it needed.

There was some minor corrosion on the contacts that needed a quick clean with some cloth and contact cleaner, something I keep on the shelf for such an occasion.

This did the trick and with the original batteries fitted, the toy was back on song once more, ready for another performance.