Imaginext Super Hero Flight Gotham City

Good thinking Batman, but I have a safety dilemma with a repair.

During a recent Toy Doctor surgery at a Dad La Soul/ Tot Rockin’ Beats event http://www.totrockinbeats.com/dad-la-soul I attempted a repair on a kids toy that I couldn’t get working in the two hours we had, so I asked if I could take it home to the workshop where I have more tools at my disposal.  Good thinking Batman.

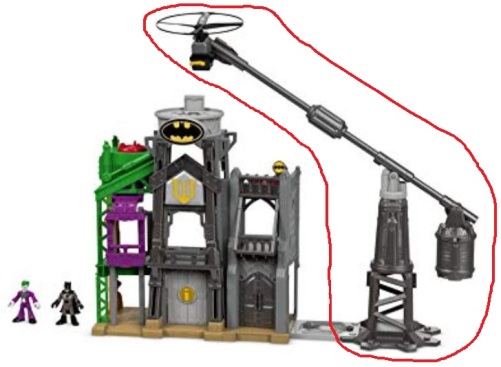
The Imaginext Super Hero Flight Gotham City (catchy title for a toy) was much loved, but the flying bit (circled in red below) had stopped working and no longer did anything when switched on.  No fun without the flight bit.

Imaginext Super Hero set
FixItWorkshop, Worthing, August 2019, Imaginext Super Hero Flight Gotham City. Image: Google/Amazon.


Make and model:  Imaginext Super Hero Flight Gotham City

Fault reported: Not working

Cost of replacement:  £45.00 approx.

Cost of parts:  £0.00

Hours spent on repair:  About two hours- although to be honest, I lost count with this one

Tools needed:  Cleaning cloths, small fine file, soldering iron

Sundry items: Contact cleaner

Repair difficulty:  6/10

Cups of tea:  4

Biscuits:  10, maybe the whole pack, I lost count (Custard Creams)

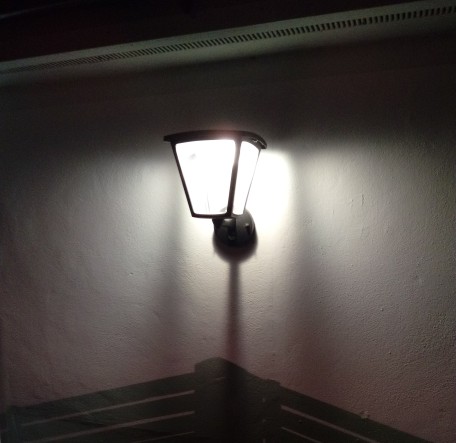
The battery-powered flying thing on a weighted boom should fly about in a circular fashion and be controlled by the city platform, presumably by remote control from the main city bit.

Upon opening up the battery compartment, the problem revealed itself.  The previous batteries had leaked and the spillage has corroded the battery terminals.  No bother I thought, just a matter of cleaning-up the metal surfaces and we’d be back in business.  How wrong I was.  Even with new batteries installed, nothing happened, how very dissapointing.

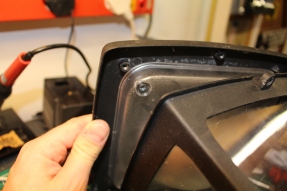
No, it wasn’t going to be that easy and that was the theme for the rest of the repair.  Everywhere I turned, whether it was trying to open up the casings, inspect wiring or generally take something apart, I was going to be met with glued shut fixings and more problems.

This slideshow requires JavaScript.

Construction on this toy was very strange.  Surfaces on the casing were sometimes glued and screwed together, very odd, and I guess that method must have been used due to production time and cost saving.

The wiring between the flying bit and base checked out OK and the motor spun when I applied some charge briefly to the terminals, so that all seemed fine.

Upon opening up the gubbins where the switch was, the problem with the toy presented itself.  The mini printed circuit board had suffered from battery leakage corrosion and was shot.  Whatever it was meant to do was in the distant past.  So, this toy was for the WEEE skip, as there was no chance of getting a replacement.

Well, hang on a minute, we don’t give up like that do we.

I decided that I could make the toy work albeit without the printed circuit board by re-wiring the motor, using the existing loom and switch, so that the motor and therefore helicopter bit worked as it should.  This would mean that once the switch on the base of the unit was turned on, the helicopter would start and it would not be possible to turn it off without grabbing the moving base weight first.  It clearly wasn’t designed like that, but I had at least got it working again.

This slideshow requires JavaScript.

So, here was my dilemma:  Give up with something I couldn’t get a part for or get it working again, albeit with a removed (percived) safety feature, so that the toy could still be enjoyed.  I went with the latter as I thought that the danger was negligable.

Batman_toy(1)
FixItWorkshop, Worthing, Aug’19, flying high, once again.  Always read the safety label.

Was I right?


Leave the light on…

A Philips outdoor wall lamp with a major case of built-in obsolescence, gets a cheap fix.

A mate of mine mentioned that his outdoor wall light had given-up-the-ghost, despite not being more than three years old.  He’d put them up around his house as part of an extension and exterior restoration project.  The trouble was that despite only being a few years old, the product now seemed to be discontinued.  This meant that, should the lamp need to be replaced, he would need to replace all of them (three in this case) to keep them matching.  Annoying quite frankly.

IMG_20181112_194358.jpg
FixItWorkshop, March’19, Philips outdoor wall light, working.

He’d read that the bulb within the Philips lamp was not replaceable, in which case a faulty lamp would render the whole thing broken, which seemed very daft to me.  Items made in such a way that prevents even the most basic of repair get me very annoyed.  Sometimes an item is developed in such a way for safety reasons but I suspect that most of the time, the motive is just pure greed.  It’s such a shame.

At my mate’s house, over a cup of tea, I removed the lamp from the wall to take back to the workshop, to see what Philips had been getting up to.

Opening up the casing was straightforward, just a few simple screws and retaining nuts holding the casing together, before finally revealing the bulb itself, under a lamp diffuser.

IMG_7609
FixItWorkshop, March’19, Philips outdoor wall light, lamp unit.

The bulb/ lamp unit itself appeared to be a custom/ bespoke disc light, that wasn’t user serviceable.  It had blown and there was evidence of scorching on a few of the LEDs, linked in series, indicating the failure of the entire circuit.

I couldn’t find any replacement disc LEDs suitable for the lamp from any of the usual sources, which I expected.  It could be that Philips can supply a replacement disc, but this was not evident on their website.

Not wanting to be beaten by a bespoke part, I thought about what else might work, within the lamp’s enclosure, to have the same effect.  I had a spare GU9 LED bulb, about the same brightness, sitting on the shelf, left over from another project which was going spare, so I set about fitting it in the space.

The generic GU9 bulb, available from most hardware shops, fitted in the existing disc mounting bracket, with a small modification and once connected to the lamp’s circuitry, worked well, albeit with a slightly warmer glow.

In case anyone else has the same problem, I made a little video of the repair.  I hope it gives others inspiration if faced with a similar problem.

Cost of replacement (with something similar): £50.00.  Cost of repair:  £1.50 for the bulb and a couple of Belgian beers for my time.


Very leaky Renault Clio

A Clio gets it’s drains cleared

I’ve owned my fair share of banger material motors, but I’ve never known one as rain intolerant as my latest car.  I bought a ‘one owner’ Clio for not a lot of money, as a hack to get to work.  The car was very honest.  It honestly told me that not much in the way of maintenance had been done- in recent times.

Anyway, £60 or so on service and maintenance parts later and the 120K mile machine responded well, trouble was, that I needed a brolley and wellington boots to drive it, it leaked so much.  My 1983 Austin Mini was more water resistant, it was that bad.

After doing a bit of Googling, I found that the classic Renault fault with the sunroof seals had plagued my car, but that wasn’t the end of my problems.  Both door card gasket (the gasket between the door card and metal) had failed.  A reel of £6.99 mastic tape fixed both sunroof and door card leaks, happy days.

However, when it rained hard, I still needed wellies to drive.  This leak was eventually traced to a hidden drain hole, buried deep within the bulkhead/ scuttle area.  A few videos on YouTube mention this, but I thought it was still video worthy to cover again with the wiper mechanism and heater blower removed to see the drain more clearly, in the hope it might help fellow Clio Mk2 owners with perpetual Athletes foot.

Enjoy!

Chilly Hotpoint Tumble Dryer (VTD00)

A cheap fix for an old tumble dryer.

A tumble dryer that didn’t dry

img_3201
FixItWorkshop, Worthing,  Feb’17.  Hotpoint (VTD00) tumble dryer (Ariston, Creda, Indesit similar.  Now drying once more…

This machine is our very own, which decided to stop drying clothes.  Everything seemed to work; the drum was going around, the timer was working and nothing sounded out of sorts, but it started taking longer and longer to dry clothes.  In short, it wasn’t well.

This particular model is well documented online as it’s the same one with a world-wide model recall.  Fortunately, Hotpoint/ Indesit/ Creda/ Ariston have an excellent recall process and information service.  In fact if you’re concerned about yours, please visit http://www.hotpointservice.co.uk/safety-notices/ to see if your machine is listed.  This machine had been modified and was cleared safe for use.

Anyway, it was time to dig out the tools.  There’s not much to a tumble dryer really, the most expensive and important part being the motor, which in this case was fine.  Having tested the heating elements for suitable resistance, it was time to check the wiring, which also tested fine.

Since the machine would heat up and then cool, it suggested a temperature control system fault.  This machine has three temperature sensors; one in the exhaust and two on the back of the heater, the latter two to act as heat control and safety cut out.

If you’re still reading,  it turned out that the exhaust thermostat sensor was at fault.  Once it has allowed a brief heat cycle, it would shut down for ages.  It had excess temperature switch ‘hysteresis’.  The spare part was about £12, so versus the cost of a replacement machine at about £170, it was well worth spending time on the machine.