I had a slightly unusual request to do a ‘bit of soldering’ on a circular saw recently. As I’m not one to say no to a broken item, I said “yes, I’ll have a look” as I was intrigued.
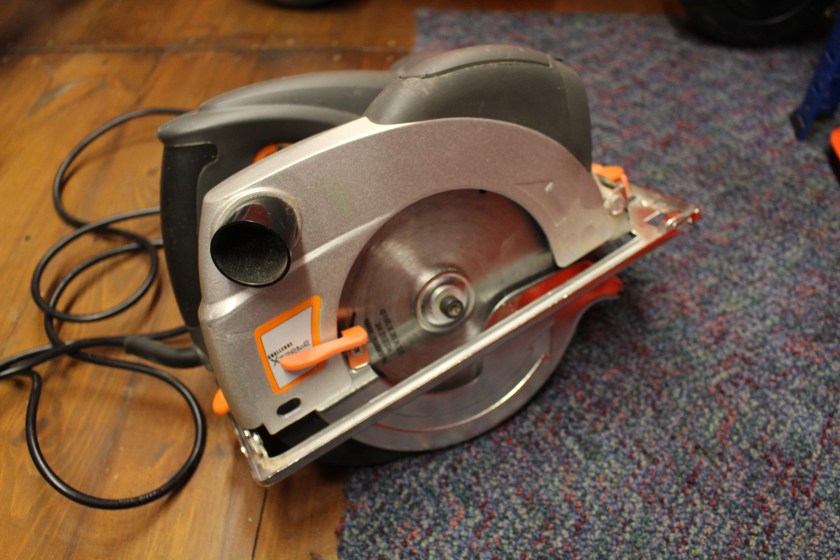
This Challenge Xtreme Circular Saw was working fine, but the spring-loaded safety guard had split at one of the ends and was now dangerous to use.
I guess this saw was originally sold at the ‘budget’ end of the market and some of the materials used on it were light-weight to say the least. But having said all that, for light use, this saw was a very good tool with features like a laser to guide cutting.
The guard was made of a ‘mazak’ style alloy, which would have been pressed together at the factory and therefore quite difficult to re-attach. Definitely not for soldering, welding or brazing.
I could have used a chemical metal compound as a glue or even epoxy resin, but in the end, I opted for making a simple couple of neat drilled holes with a small cable tie to bring the separated halves together, a neat mechanical and cheap fix to get the tool usable once more. Sometimes, simple is best.
This slideshow requires JavaScript.
Cost of replacement: £40.00 Cost of repair: One cable tie. One cup of tea.
I love a good radio. I used to collect them as a kid, working or not, do them up, get them working and I eventually ended up with, er… lots. I’ve since scaled my collection back a bit these days to around 10 or so, quite frankly more than is healthy really.
So when someone got in touch recently with a broken DAB radio to fix, I got quite excited.
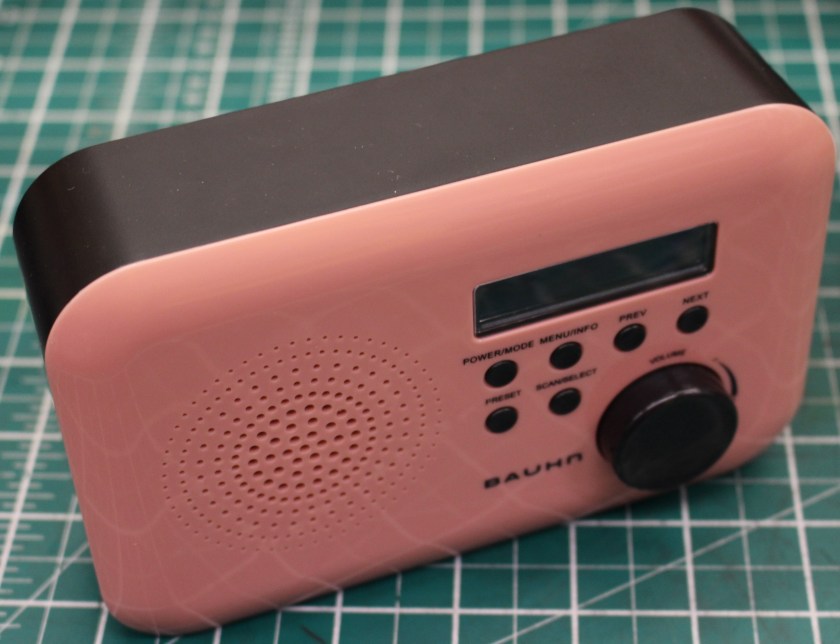
FixItWorkshop, Worthing, February’19, Bauhn DAB Radio.
These Bauhn DAB radios (available from Aldi or Lidl in the UK, I think) were on the market for about £10 and at that price they represent great value when compared to more expensive devices.
However, the one in the workshop appeared to have a problem power connector, which when wobbled, made the radio work intermittently. Suspicious.
Having already repaired a similar radio with a similar fault before, I decided to video the repair to encourage others to check theirs, if something similar happens. I hope you find it useful.
Happy fixing!
Cost of a new radio: £10. Cost of repair: One cuppa and a bit of tinker time.
Another Kenwood Chef A901 gets the Workshop treatment…
There’s been a steady flow of poorly Kenwood Chefs through the workshop of late and the new year started off with yet another. A customer got in touch with reports of smoke coming from her Chef A901, a machine which had given years of faithful service to her family. As a result, she was very keen to see what could be done.
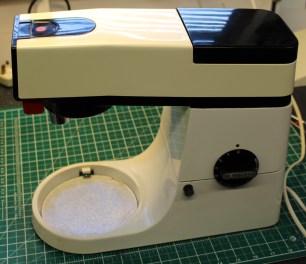
FixItWorkshop, Worthing, Jan’19, Kenwood Chef A901.
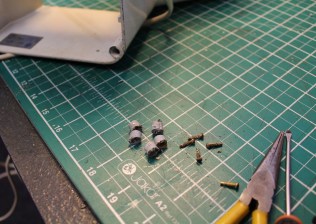
As usual with Chefs of this age, the 5 machine feet had deteriorated and now resembled squashed dry Blu-Tac, so had to be replaced. I replace the feet to most Chefs that come in. Not only do the feet prevent the machine from moving all over the place when in use, they provide a gap for air to be drawn in to the motor for cooling, so it’s essential the feet are in good condition.
FixItWorkshop, Worthing, Jan’19, replacing the feet on a Chef A901 (others similar).
The feet are inexpensive and are easy to fit. If you decide to replace yours, consider coating the existing ones with something like WD-40, a few days before you try to extract the centre pin or you risk snapping it off in the machine base, as it will likely be ceased.
On with the repair. The speed control circuitry had failed, specifically a capacitor and resistor, a common problem on older machines, had gone pop. As usual, the correct repair kit was bought and fitted. With careful soldering and a dab of heat transfer gel on the new triac and the job was complete. Nice.
With any Kenwood Chef, I always check the motor end-float, the allowable spindle movement north and south. The end float in this case was a little lose and required adjustment. A small grub screw with Allen key head allows this adjustment and with a bit of trial and error, the end float was now spot-on. Poor end float on these machines usually makes the speed control ‘wobbly’, especially at lower speeds. With this one adjusted correctly, the motor now ran smoothly through all speeds.
Job done. The owner of the machine was so pleased with my work, she even bought me a new packet of Custard Creams. Fab.
This slideshow requires JavaScript.
Cost of replacement: £400 and up. Cost of repair: £11.24, plus my time and Custard Creams!
Christmas wouldn’t be complete without having to fix last years’ tree lights and this year was no exception. It’s a tradition I look forward to and savour.
Gone are the days spending hours trying to find a faulty bulb, now due to the wide availability of cheap LED products, the thing that’s often likely to fail is the wiring, something which was much more unusual, a few years ago. Manufacturers must make savings somewhere and I often wonder how retailers can offer new decorative lights, so cheap. Compromises must be made somewhere I guess.
Being cheap, like a lot of things, makes them more disposable, which is a shame when things fail, often for trivial reasons. This year’s blackout was caused by a couple of broken wires on the control box, which didn’t appear to have any obvious way to get inside.
We don’t like to be beaten in the workshop and sealed units and tamper-proof items are just seen as a challenge, rather than a deterrent.
Like many multi-function sets, the lights are operated via a control box with a switch, mounted in a plastic enclosure which appears sealed. The fault was obvious here, just the main wire from the transformer had broken ‘flush’ with the control box, meaning that there was not enough wire either side of the break to re-join it.
The control box has no screws nor visible clips, holding it together, so it was time to break it open, using a small flat-bladed screwdriver. The small section covering the wires snapped off cleanly, revealing several terminals covered in hot melt glue, annoyingly. This meant that before any repair, the glue must be removed. Several minutes picking this off with the screwdriver, revealed some conventional post terminals. The fix was easy from there, just cut down the wire to make a new connection, remembering which way round they went, clean up the terminals and solder back together. A little bit of fresh hot-melt glue to seal the connection and a bit more on the surface to be stuck together, and the cover was refitted. I also fitted a little heat shrink to repair to reduce the chance of the cable from breaking again.
This slideshow requires JavaScript.
As I had the soldering iron out, I also did a small repair to the control box wire to transformer plug, which had also broken. It was a case of cutting back two sides of the break, soldering, isolating with a small amount of electrical tape and sealing with heat shrink.
Now that’s all done, Christmas can now officially start.
Cost of replacement: £ 5.00 up. Cost of repair: 1 cup of tea, heat shrink, tape and solder.
Starting a new job is always fun and when a new colleague of mine mentioned that the office vacuum cleaner had packed up, I rose to the challenge.
I’m quite fond of Dyson products as some of you know, mainly because:
They’re well-engineered, by engineers
They’re designed to be repaired easily with simple tools, which is better for everyone
Parts are readily available at reasonable prices
The DC01 was launched in the early 90’s and was Dyson’s first market clean-up, competing with the established market leaders. Although this machine is over 20 years old and Dyson no longer supports it directly, reasonable quality pattern parts are available on eBay. If you have one, love it and keep it going.
FixItWorkshop, Worthing, November’18, Dyson DC01
This one is actually an ‘Antarctica Solo’ model (grey and light blue instead of yellow), which commemorated Sir Ranulph Fiennes’ solo trek across Antarctica and raised money for Breakthrough Cancer. It had been abandoned and was moments away from the skip. I felt quite sorry for it.
Faults reported included; no suction, excess noise and smell!
The first thing to check on the DC01 is the filters, as like many other Dyson products, people forget to clean or change the filters. Both filters were totally choked and full of all sorts of detritus. A quick shake out and wash with warm soapy water and they were as good as new. Following that, I inspected the seals around the join between the cylinder and the main body. All the seals were dirty, so a clean up and quick spray with silicone spray and they were as good as new. Great.
The noise seemed to be coming from the front beater/ rollers which usually means, noise bearings. The beater on this model uses a two bearing set up. One was fine, but the other was seized. As I didn’t want to spend any more than I needed, I cleaned the bearing, after removing it and the dust cover, re-greased it with LM High-Melt Point grease (general automotive stuff) and it was ready to roll and beat again.
This slideshow requires JavaScript.
Once the filters were dry and re-installed, the Dyson ran like new again. Very satisfying.
Cost of replacement: £15 second hand, £100’s for an equivalent-ish new model.
Cost of repair: Patience, washing up liquid, two cups of tea.
My mum’s got an old electric Singer sewing machine which is about 40 odd years old. Singer sewing machines are well supported generally and parts are readily available, but I find it’s sometimes fun to try and find the cheapest way to fix something myself.
FixItWorkshop, Worthing, November’18, Singer Sewing Machine Foot Control Pedal
The foot pedal on this machine went pop and smelled horrible after. The machine then stopped working, oh dear.
The pedal is of high quality construction and easily better than any generic replacement on the market, so it was definately worth saving.
Opening up the pedal was just a few screws, which then exposed the whole mechanism. The mains resistor was in tact and seemed to test with resistance. A good start. The contacts were in good condition as was the rest of all the components, except for the mains input capacitor, which has spectactularly failed and split open, a common problem on older mains capacitors.
Repair kits are readily available for about £5, but that seemed expensive to me! Using the existing capacitor as a guide, I found a suitable component on eBay for £2.09 delivered. That’s more like it.
The capacitor I used was: Film Capacitor, 0.1 µF, 250 V, PET (Polyester), ± 5%, R60 Series (from eBay).
Here’s a little slide show that I hope will help others fix their pedal, should it fail.
This slideshow requires JavaScript.
With the old capacitor cut out and the new one soldered in, the pedal was ready to run again. Sorted.
Cost of a replacement: £15-30 for a generic part. Cost of repair, £2.09, 1 cup of tea.
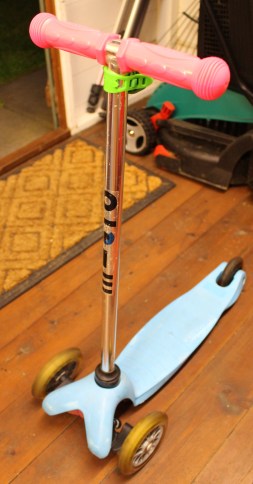
I really had no idea that Micro Scooters have been a ‘thing’ for the last few years and as a result, there are lots to choose from on the second-hand market. We picked up a ‘bargain’ for our oldest daughter for a princely sum of £5.00 via a local Facebook For Sale page. With hindsight, it was overpriced.
Just about every part of the scooter was either nasty or plain broken. The handle bar grips were missing, the wheel bearings were all shot to pieces, the steering mechanism seized and the rear brake was missing. The back brake on this scooter type, I’ve since found out, have a habit of snapping off with hard use, so that should have been the clue to the low, low price. But if you read these pages, you know me, I like a challenge.
First step was to address the static wheels. An Allen key holds the wheels on to the stub-axels at the front of the scooter and there’s something similar on the trailing wheel. The bearings on our wheels were beyond a re-grease as they’d appeared to have spent their entire life at the bottom of The Channel.
This slideshow requires JavaScript.
Luckily, the bearings are easy to replace and good-quality generic items are available on eBay for under £5.00 for a whole set (6 bearings, 2 per wheel).
Next came the handlebar grips. Ours were missing and again, generic ‘copy’ grips are available on eBay which are perfect for the job and are half the price of the original equipment. While I was shopping on eBay, I also found an original Micro Scooter bell. Just the job.
FixItWorkshop, May’18, Micro Mini Scooter, new handlebar grips and bell fitted, prior to painting.
The steering mechanism was next and all it needed was a good clean up and light lubrication with some plastic-friendly white PTFE grease, readily available from Toolstation.
This slideshow requires JavaScript.
The shabby foot plate area was once baby-blue but had since faded and had evidence of scrapes. It looked a bit sorry for itself. I decided to address this by giving surfaces a good clean up and then key with wire wool. A couple of coats of good quality plastic primer and then a couple of coats of vinyl black paint, which now gave the scooter quite a ‘presence’. I then decided to improve the foot plate ‘grippy-ness’ by applying a custom grip tape design.
This slideshow requires JavaScript.
Before re-attaching the foot plate back to the chassis, the brake needed to be replaced. As with some of the other fixings on the scooter, the brake’s fixings were so rusty, they needed to be drilled out and replaced. Luckily the new original equipment brake came with new improved fixings which fitted perfectly.
I know what you’re thinking… for £40 more, I could have bought a brand-new scooter and saved myself the bother. At times, I did question my own sanity. But what we now have is a perfectly serviceable, one-off that no one else will have. Can you put a price on that?!
A neglected DC24 gets some badly needed maintenance…
I really enjoy working on Dyson products as they’re so well thought out. The designers seem to take great care factoring-in easy maintenance for longevity. There’s also a great sense of theatre when using Dyson products. Take the roller ball on this design for example, a throwback to the earlier Dyson Ball Barrow which allows better manoeuvrability when combined with an upright vacuum cleaner. There’s also the exposed mechanism which automatically switches suction between the roller pick-up and hose when using the foot pedal to select the desired mode. Genius. All of these design touches encourage the user to care for and enjoy using the product.
FixItWorkshop, April’18, Dyson DC24 (DC04 just in view too- how things have changed).
Sadly though, sometimes these touches are a bit lost on people and the design flares that appeal to some become misunderstood and neglected to others.
This DC24 had two problems. It didn’t stand up properly when left and it didn’t really pick anything up that well either, failing as a vacuum cleaner on two fundamental points.
The first job was to find out why the DC24 was a little unsteady. It seemed that all of the mechanism was intact and that nothing had snapped off. Strange. The red foot pedal operated lever that releases the latching system to move the main body from its locked position was stuck. It seemed to be linked to a lever which operates the diverter valve, which switches suction from the roller beater foot to the flexible hose. On closer inspection the lever on the diverter valve had come off its pin, probably by force. The mechanism itself was also dirty which made operation rough. The red lever is spring loaded with guides and pins which were also dirty and a little rusty. I suspect this vacuum cleaner had been left somewhere damp.
FixItWorkshop, April’18, Dyson DC24 diverter lever and valve.
FixItWorkshop, April’18, Dyson DC24, red foot lever.
FixItWorkshop, April’18, Dyson DC24, cleaning the lever mechanism.
FixItWorkshop, April’18, Dyson DC24, cleaning a lubricating the mechanism springs.
After re-attaching the diverter valve leaver back on and giving all mechanisms a good clean-up with a light coating of silicone spray, it was as good as new again.
Once the mechanism was working, it was time to assess the vacuum’s performance. It wasn’t that good. As with most Dyson vacuum products, there are two filters. One processes blow-by air from the motor and the other controls dust particles from the cylinder. These filters can usually be cleaned with mild soap and water, but this set was well past it, requiring replacement and for under a tenner, it’s rude not to. Dyson have made filter replacement very easy on the DC24 with good access to the motor filter via a small door on the roller ball itself and the lid on top of the cylinder. I think there should be a massive sticker on these vacuum cleaners that says ‘don’t forget to clean the filters’ as I suspect that many of these products are chucked away by owners who forget to do the necessary. Bag-less cleaner doesn’t mean maintenance-free!
FixItWorkshop, April’18, Dyson DC24, cleaned up rubber seals.
FixItWorkshop, April’18, Dyson DC24, motor filter cover.
FixItWorkshop, April’18, Dyson DC24, motor filter cover.
FixItWorkshop, April’18, Dyson DC24, cleaned up rubber seals.
With a couple of new filters, a clean-up of all of the rubber seals with silicone cleaner and this DC24 was fighting fit, ready to clean another carpet.
Cost of a replacement Dyson product: £000’s. Cost of new parts: Under £10 plus my time.
My brother-in-law popped in to see us for a cuppa recently and mentioned he was off to the tip with an old VAX cylinder style bag-less vacuum cleaner, in pieces, not the carpet washer type. It was on its way to the great scrap yard in the sky. Luckily, I was on hand to divert the sick VAX via the workshop.
It was being disposed of due to the flex having gone faulty together with the opinion that it wasn’t working that well before the mains cable failed. Well, I hate to see good machinery go to waste.
On this VAX, the mains flex is stored within the vacuum cleaner housing and is wound up on a spring-loaded coil during storage. When in use, the user can pull the mains plug until the desired cable flex length is reached. When the user is finished cleaning their carpet, a foot operated button causes the flex to speedily disappear back in to the vacuum cleaner. My brother-in-law had already looked at the spring-loaded mains flex winding mechanism, which had resulted in the bi-metallic coil spring escaping from the enclosure, freeing itself in to an orbit. It’s quite a shock and sometimes dangerous when this happens!
What to do. I was very nearly tempted to dump this vacuum cleaner too as the build quality of the whole thing reminded me of the plastic toys one gets in Christmas crackers, but that’s not really in the spirit of The Workshop.
Then I remembered I had a defunct Hoover Telios that was minus a motor, perhaps this would be a suitable parts donor? I liked the idea of making one working vacuum cleaner from two unhappy ones.
The Telios had a working mains lead flex, but the automatic spring loaded mechanism on that was past its best, so I decided to use the working lead on the VAX. The VAX would be without its flex winding mechanism, but at least it would work. I adapted a cable tie to make a cable grip, to prevent a user from pulling the cable from the VAX, when in use. The cable would have to be stored, wrapped around the vacuum cleaner, after use, a small price for working machine.
The other job was to address the poor performance.
This product is clearly an inferior Dyson rip-off and therefore has a couple of filters; one for the intake and one for the exhaust, like a Dyson. As suspected, both of these were virtually blocked! The filters on this model were not as easy to get at nor as easy to clean. I’m not sure whether these filters are meant to be washed, but wash them I did and after 24 hours of drying on the radiator, they were as good as new. Once refitted, full performance was restored, for the price of a bowl of warm water and Fairy liquid.
Finally, the VAX was missing its cleaning head for the hose, so I decided to use the Hoover one (which was quite a nice design) with the VAX’s hose. After some jiggery pokery and some electrical tape, it fitted.
FixItWorkshop, Feb’18, VAX cylinder vacuum cleaner- with Hoover parts.
What we’ve now ended up with is a working VAX vacuum cleaner, using some parts from a beyond economical to repair Hoover. Whilst it’s not the most elegant repair I’ve ever completed, I now have something working from two nearly condemned items and surely, that’s good thing?
Readers of this blog (I know there are millions of you) will recognise this golf trolley and I’m pleased to report that my first repair, the one to the motor, is still working perfectly. However, the owner of the trolley contacted me with a (funny) problem. Whilst recently enjoying a round of golf on the local fairway, the trolley decided to, by itself, begin to edge away from the second tee and then with some speed, head off in to the distance, without any operation of the dial switch, situated on the handle. Whilst this seemed funny at first, I remembered that the motor on this trolley had the kind of torque that, coupled to small gearbox and wheels on a heavy frame, could do some serious damage, left unchecked.
Unlike many modern electric golf trolleys, it doesn’t feature GPS guidance, remote control or amazingly, a dead-man’s switch, which seems like a major safety oversight to me. I’d have expected either a kill switch or dead-man’s switch* fitted to the handle on a trolley like this as the runaway scenario could never occur due to fail-safe nature of the switch being operated. With one, the trolley would only run when the operators’ hand was on the handle or cut out when the kill switch is activated, as with the saftety cord mechanism, on a jet ski for example. Perhaps the Mk2 Hillbilly Compact featured this.
*For example, a dead-man’s switch is usually fitted to something like an electric saw where the operator must old a handle-type switch to make it run. Once the operator lets go of the handle, the motor automatically fails-safe and cuts-out.
On with the repair. The trolley features some exposed connectors and cabling and it seemed sensible to check the continuity of the cables running up and down the handle shaft, as repeated trolley folding might have caused a problem with the wiring. Fortunately, the cabling was OK.
The owner had mentioned that the handle, where the speed control switch is located, had got wet in the past, which made my alarm bells ring.
Opening up the handle, which only required a basic tool kit, revealed evidence of water damage and corrosion to the speed control terminals. Luckily the owner of the trolley had stocked up on spare switches!
FixItWorkshop, Feb’18, Hillbilly Compact handle.
FixItWorkshop, Feb’18, Hillbilly Compact switch.
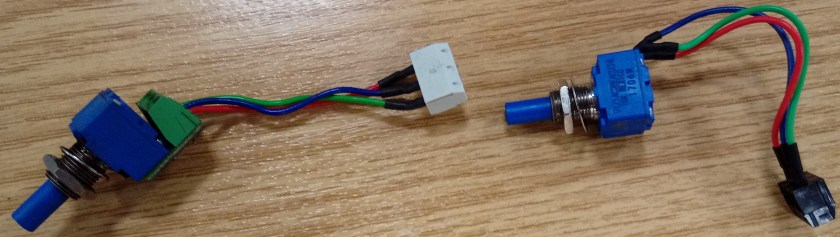
Removing the existing switch revealed intermittent continuity and varying amounts of resistance, which was not good. A fault most likely to have been caused by water ingress or excessive shock. The owner had supplied two ‘new old stock’ (NOS) switches. Which one to fit?
From time to time, it’s downright sensible to either fit NOS or second-parts as they’re usually cost-effective and are more likely to fit over pattern parts. But time can also affect apparently shiny parts. This was a case in point. I knew that the switch should vary resistance from open circuit to 10KOhms in either direction from COMM. The old one didn’t and one of the ‘new’ parts only went to 2KOhms, so was not in specification. Luckily, the remaining NOS switch worked fine and once refitted, and the handle reassembled, the golf trolley was ready to make the job of carrying clubs easier, once again.
FixItWorkshop, Feb’18, Hillbilly Compact speed control switch, new and old- test NOS parts before fitting.
Cost of replacement trolley: ££££ Cost of repair; £10 plus time. Moral of the story; don’t assume NOS parts will work. Test them first.