KONGMAN lives again!

A classic 1980s Tomy Kongman game pays a visit to the workshop, for some much-needed TLC.

Every now and again, a little gem drops right into my inbox and I think; Christmas has come early. My eyes light-up! It’s nice to get something different to work on, and hopefully repair, especially when it involves motors, batteries, ball bearings and a gorilla.

A customer contacted me after rediscovering Kongman in his attic, not literally you understand, but the 1980s hit toy from Tomy. The toy was in wonderful condition, despite being a little dusty. A new battery had been installed, but upon switching it on, nothing happened. Not even a peep.

FixItWorkshop, Worthing, June’21, Kongman box

I should really kick this thing off by saying what Kongman (the game) is. Kongman is an animated vertical game with the objective of getting a small metal ball bearing from the bottom of the wall to the top. The player must defy gravity and move the ball up-stairs, across a bridge, along several steps to a magnetic swing and then into a lift. The zenith of the game is reached with a quick flick of the ball on to Kongman’s magnet hand, which then gets dropped down a hole, ringing a bell on the way down. Fun really doesn’t get any better. If you’ve ever played Screwball Scramble, you’ll have a pretty good idea of what I am talking about. Did I mention that this infuriating game can be set against the clock too? Bonkers!

Tomy’s Kongman comes from a time just before kids games started to contain many electronic gizmos and wizmos within, parts that when kaput, render a toy useless, forever. Luckily, Kongman uses an electro-mechanical animation movement; elegant and clever. Old, but good.

Kongman is powered by a single D-cell, 1.5V battery and the motion of the toy is actuated with a reassuringly simple little motor, connected to a compact gearbox driving a series of levers and rods, which make up the games’ animation. On a slightly different note; are D-cell batteries an endangered species? I mean, really, ‘what the 1980s torch’ takes D-cell batteries any more?!

Make and model: Tomy Kongman, circa 1981

Fault reported: Not working

Cost of replacement machine: £40.00 if you can find one working

Manufacturer support (in the UK): 0/10

Cost of parts (for this repair): £0.99p

My time spent on the repair: 1 hour

Tools needed: Small knife, pliers, small screwdriver

Sundry items: None

Cleaning materials: Silicone spray, contact cleaner

Repair difficulty: 5/10 (fiddly)

Beverages: 2 teas

Biscuits: 2 custard creams

So, on to the repair.

The toy wouldn’t run and after checking the basics like battery contacts and proving that the local wiring from the battery compartment to the main gubbins was OK, it was time to dive in.

One of the things that makes this already difficult game to complete, is the fact that as a player, you’re up against the clock. This seemed to be the next logical place to check.

The timer seemed to be part of the gearbox which is responsible for driving the rest of the game’s motion. I found this a most practical application of sound and efficient design. You can trace the DNA of this toy back to early pinball machines and jukeboxes, something I also love. Anyway, I seem to be getting romantic, not the workshop way.

The gearbox was easy to remove, just a few screws, and it was out. The timer’s switch contacts were situated within the ‘box and came apart with a gentle prod of a small screwdriver. This allowed me to apply a small amount of additional tension to the switch’s spring and to clean the contacts with cleaner. Reassembling was pretty much the reversal of the disassembly.

With the gearbox back in, it was time to turn some attention to the mechanism, to ensure smooth, reliable performance. With nearly 40 years’ worth of dust to contend with, it was time to clean all of the game’s nooks and crannies with a small brush and treat some of the sliding parts to a little silicone, plastic-friendly, lube.

With the D-Cell battery installed, a deft twist of the timer’s knob, and the game sprang to life.

I’ll be honest with you now. I tried several times to get the ball the whole course to ring the bell, against the clock, but alas, I failed. I did complete the game, but only with the timer set to ‘auto’… which provides as much time as you need, or at least until the battery runs out.

Until the next time…

The perfect blend…

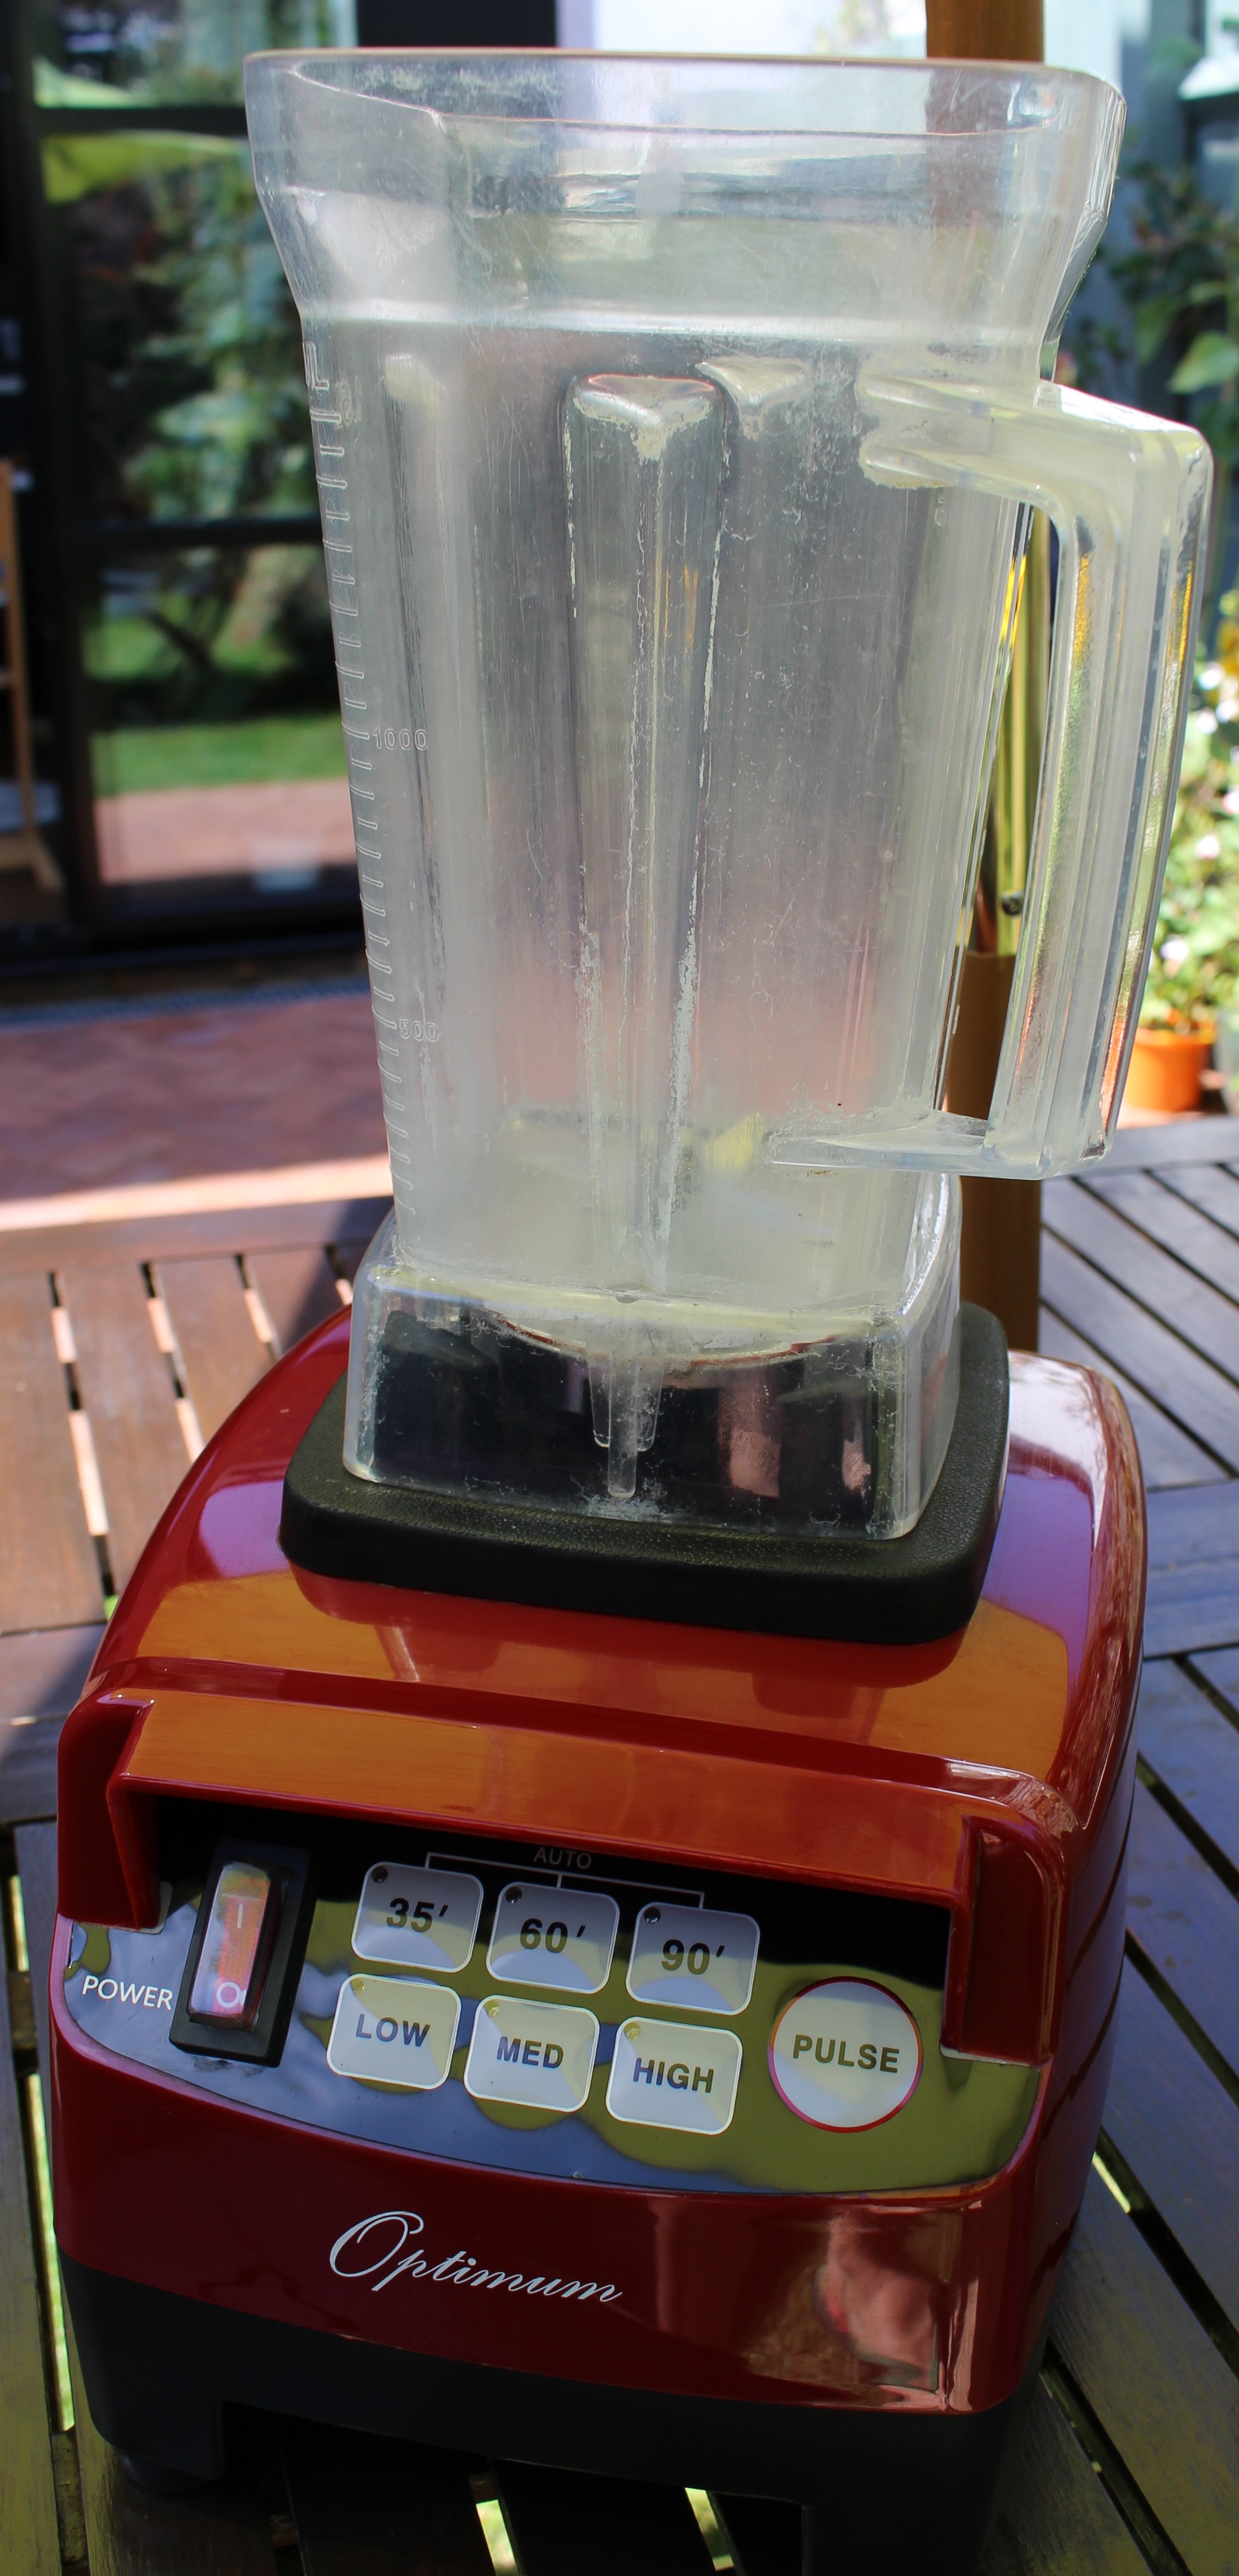
An Optimum 8200 Blender, escapes the chop!

IMG_2844
FixItWorkshop, Worthing, August’20, Optimum 8200 Blender… in red.

When I agreed to ‘have a look’ at a customer’s beloved broken blender, I had no idea that the market for blenders was so, well, juicy.  One can spend anything from £50-£1800 – a huge price range.  You have to ask yourself a question; is the juice made by a blender costing 36 times more than a cheaper one, any better?  Hmm, the virtues of blender technology, robustness and efficiency could be debated in a future, exhilarating article, maybe. But for now, our attention is on this one, the repair of an Optimum 8200 Blender.

The reason I mention the huge price range is that prices for spare parts also vary wildly too.

Make and model: Optimum 8200 Blender

Fault reported: Leaking, noisy, crunchy, horrible

Cost of replacement: £300.00

Manufacturer support:  5/10

Cost of parts: £18.95

My repair time: 1.5 hours

Tools needed: Screwdrivers, test meter, heat shrink, soldering iron etc

Sundry items:  paint, contact cleaner

Cleaning materials: Bleach, bicarbonate of soda, washing up liquid, car polish

Repair difficulty: 3/10

Cups of tea: 2

Biscuits: 2 X custard creams

I received this blender with a broken drive coupler/ socket (the bit that transfers the power to the blades in the jug) and a rough, leaking blender jug.  This high-mileage kitchen appliance had been used until it would work no more.

Upon taking the blender into the workshop, I suggested to the owner that ‘it must have been sounding rough’ for a while… There then might have been a small admission of guilt.

Now, I realise that I’m unusual.  I regularly service my vacuum cleaners, sandwich toaster and kettle and I know that this isn’t normal, so my views on machine maintenance are a little outside the bell curve.

The owner had done her own research on repairing her blender.  She’d located a spares provider and had identified the parts required, to get the blender back making smoothies, which is more than many folk do.  The trouble was that the total amount for all the new parts required, was more than the price of a reconditioned unit.  This is often the case as some reconditioning agents have access to cheaper parts, not available to regular punters, through economies of scale.  To make this repair financially viable, I was going to have to work smart.

As mentioned earlier, blenders vary widely in price and there are established names out there that command a high price.  However, look beyond the logo and things are a little greyer.  Badge engineering, colour and subtle style changes can literally add hundreds of pounds to the asking price for the same basic machine.  This is nothing new.  Manufacturers have been sharing designs and production since the dawn of time and when it comes to buying spares for an expensive machine, there can often be a cheaper route for good quality alternative spares that are compatible, intended for the cheaper variation.  The skill is knowing where to look.

This slideshow requires JavaScript.

A picture paints a thousand words as they say and the slide show above shows the stages that I went through with this repair.

Using the original parts listed for an Optimum 8200 blender, the best deal the customer and I could find was:

  • Replacement drive socket, £39.95
  • Replacement blade and bearing, £69.00
  • Tool for blade removal, £11.99

Total, £120.94 (more if you want speedier delivery). Source:  froothie.co.uk

Shopping around for alternatives…

  • Replacement blade and bearing, £18.95 for a Vitamix blender (Amazon.co.uk)
  • Repair to existing drive socket (I drilled and tapped a new grub screw), £ my time
  • I used a tool I had already to remove the old blade (a plumbing bracket) so no need to buy one

Total, £18.95, plus my time

I chose a Vitamix blade as I noticed that some Optimum and Vitamix blenders shared the same jug design.  I actually saw the blade assembly for £7.99 on eBay, but decided that the warranty offer on Amazon.co.uk, was a better deal.

Now, I know I haven’t been that scientific here, but one suspects that there is little or no difference in blender blade robustness and all the ones I’ve ever seen to date contain the same bearings you might find in a scooter or skateboard.  I suspect that the blade assemblies are all made in the same factory, somewhere.

My guess here is that the aftermarket parts supplier must charge a comparitively high price for some items to:

  • Cover staff and site overheads
  • Provide a sense of reassuring expense compared to the original purchase price
  • Potentially recover a high charge from the manufacturer

The trouble with this strategy is that many domestic appliances are worth little once unwrapped compared to the original ticket price.  The comparative high prices for aftermarket parts would likely in many cases, put a customer off doing the repair at all.  The customer then weighs up the cost of:

  • Finding someone to do the repair work
  • Doing the repair work themselves
  • The price of parts
  • The price of labour

Often, when added up, it’s cheaper to replace, rather than repair which in my opinion, not the way to go.

As a repairer, the statement I’m always grappling with is:

Value Repair ≤ Replacement Product Purchase or simply: VR ≤ RPP

So, when someone brings me an item to repair, I’m always looking for:

  • An overall repair that costs-in for the customer, encouraging the customer to keep the existing machine for longer, saving it from the dump
  • A repair that’s likely to be reliable in relation to the condition of the machine
  • An upgrade to the original design (where possible) taking advantage of the innovations or modifications to the original design that enhance longevity or performance

It’s a careful balancing act and one that doesn’t always work first time, but that’s the challenge!

I’ve gone a little off subject but it all relates.

Back to the blender, I saved the customer money on the purchase of a new appliance, saved money on a potential repair elsewhere and saved the broken blender from the chop.  The customer was happy.  As with all items I receive for repair, I also cleaned and polished the blender to make it shine like new.


Footnote: The repair was over, or so I thought.  A week or so later, the customer contacted me again to tell me that a new fault had started.  Speed control was now a little erratic and was making the blender hard to use.  I said no problem and agreed to have a look.  Likely to have happened during my repair work, a small lead on the printed circuit board had become loose.  A quick tighten up and normal operation resumed.  Phew!


Micro Mini Scooter tune up

A Micro Mini Scooter gets a little TLC

IMG_0983
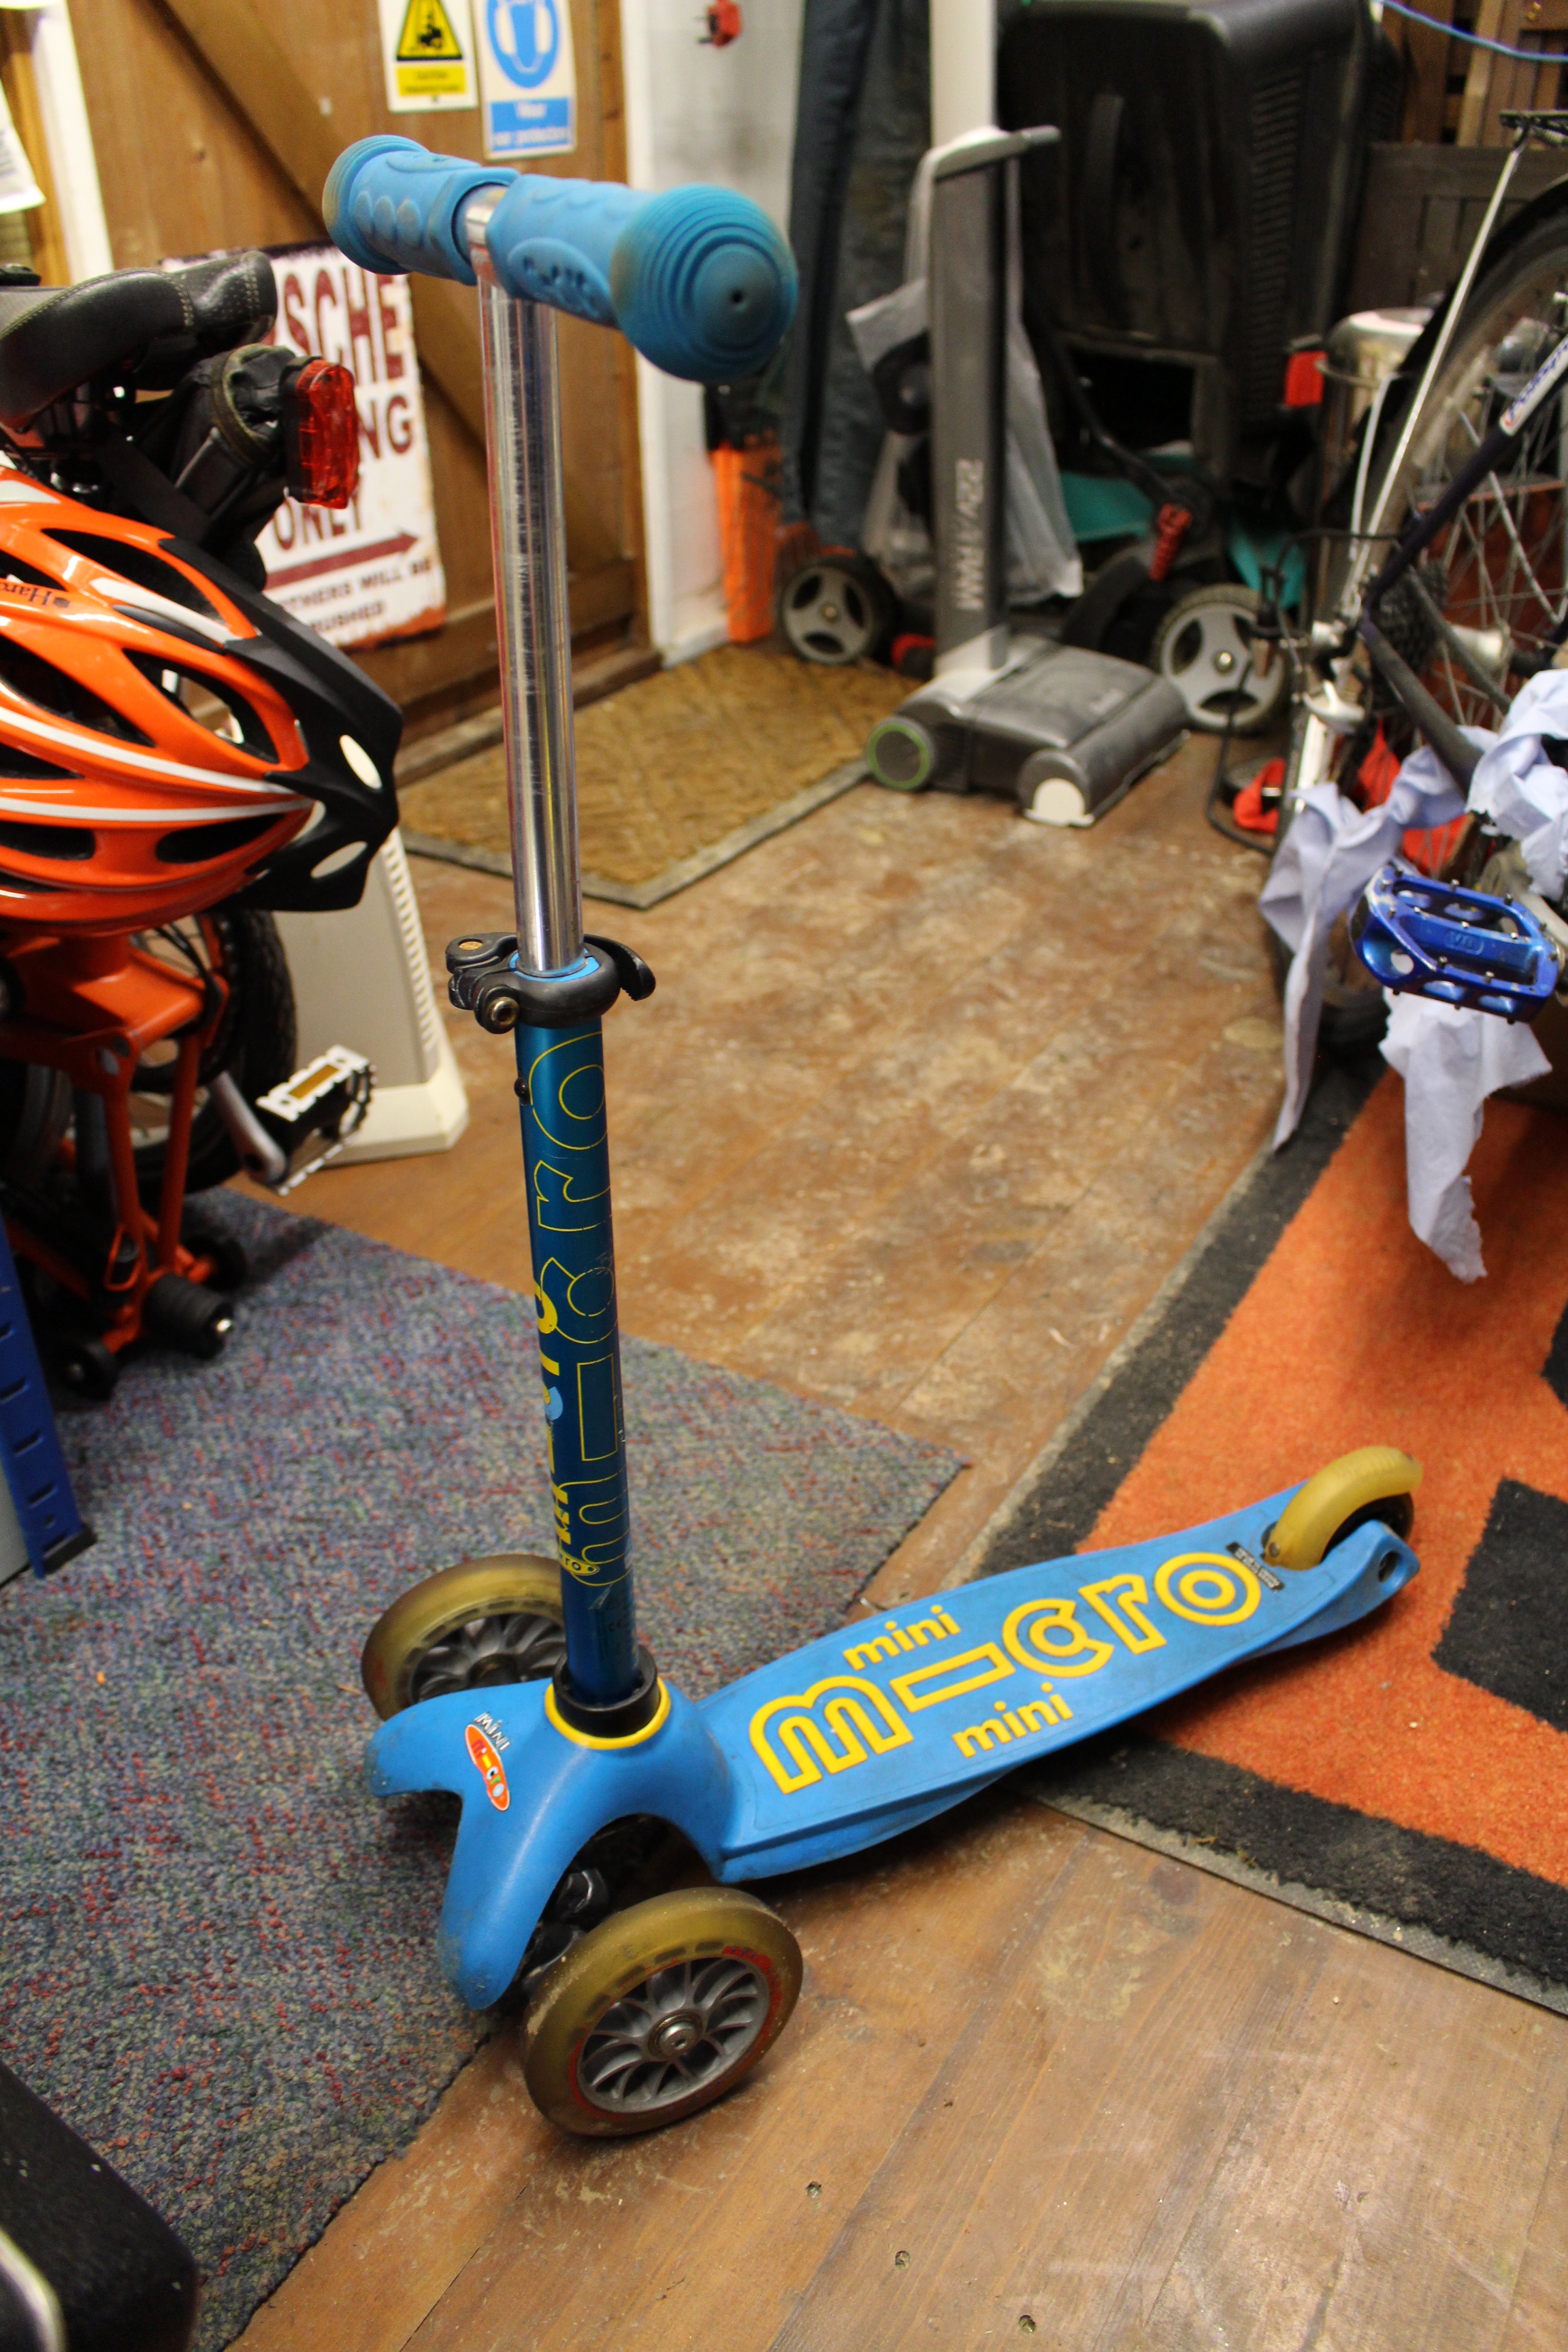
FixItWorkshop, Worthing, March’20, Micro Mini Scooter.

I like Micro scooters and I would have loved one when I ‘were a boy’.  My daughters have them and they love zipping along the pavement on them to school.  The scooters handle well and are well screwed together.  They are also well supported from a spares point of view, so I like them even more.

Make and model: Micro Mini Scooter

Fault reported: Back wheel stuck

Cost of replacement: £55

Manufacturer support:  7/10

Cost of parts: £2.00

Hours spent on repair: 30 minutes

Tools needed: Cleaning tools/ cross-head screwdriver/ Allen keys

Sundry items: Silicone spray/ cleaning rags/ PTFE spray for steering

Repair difficulty: 2/10

Cups of tea: 1

Biscuits: 1 custard cream

The scooter in the picture belonged to my friend’s son who’d taken it through one too many puddles I think, as the rain water had taken its toll on some of the scooter’s moving parts.  Over time, the rear wheel’s bearing had suffered excess water ingress, had rusted and had seized.  I’m always amazed at how ‘stuck’ things can get with only a small amount of rust.

This slideshow requires JavaScript.

In their wisdom, Micro have decided to fit their products with generic bearings commonly fitted to skateboards, roller boots, bikes, cars, photocopiers etc, which means that replacement bearings are a doddle to obtain.  I bought some upgraded bearings with better water seals for under £10, so I know that the repair will last longer than the original equipment fitted from the factory.

The front wheels were seemingly fine, so I left them alone. ‘If it ain’t broke, don’t fix it’.

On this model, the rear wheel comes off with one Allen key bolt holding a retaining a stub axel, which slides out with a little persuasion.  The bearings just pop out of the wheel using a small screwdriver as a lever and before fitting new equipment, I always clean the area first to ensure that no dirt is trapped, which could cause premature bearing failure in future.

With the new bearings in, stub axel refitted, a quick wipe down with a strong cleaning wipe, a little PTFE lube applied to the scooter’s steering mechanism and it was ready to see another day.

Bonza.

Minimum Cash for a Maxi Micro Scooter

A Maxi Scooter Gets a Refresh!

Before and after…

This is exactly the kind of job that I should have done with my daughter, but I had to do this repair in secret on this occasion as the scooter was to be a present for her.

Birthdays can be expensive times, but Dad is a shed-dwelling-repair-mad-penny-pinching fiend and it means that his children’s presents don’t need to be new. Take this Micro Maxi Scooter. £129.99 when new, second-hand for £10. Wheelie good value.

However, a £10 Micro Scooter isn’t going to be as fresh as one costing £129.99 is it, so time for a few service items and light renovation.

Make and model: Micro Maxi Scooter

Fault reported: Tatty, noisy wheels, brake rattles

Cost of replacement: About £129.99

Cost of parts: £16.68 (bearings, grips and tassels)

Hours spent on repair: 1

Tools needed: Allen keys, screwdriver, drill

Sundry items: Silicone spray, PTFE spray, rag

Repair difficulty: 3/10

Cups of tea: 1

Biscuits: 0 (I was being good for a change)

This slideshow requires JavaScript.

It’s amazing what a bit of spit and polish, mixed with a little elbow grease can achieve. A rattily, untidy Micro scooter that might have end up at the tip prematurely is now as good as new, thanks to some time spent and basic new parts, which only cost just over £16, or just over 10% of the value when new.

Rattily wheels

The four wheels on this model can take a pounding as kids take their scooters off kerbs and through puddles, just as they should. But the small bearings that allow the wheels to spin freely and smoothly can suffer with age and wear. Due to sensible design, the bearings fitted are readily available online and a complete set can bought for a fiver. After removing the wheels using an Allen key, the old bearings simply pop out using a large screwdriver and the new ones can be pushed in using your thumbs or a small vice. If you do this job yourself, don’t forget to clean all of the surfaces with a rag and something like WD40.

Tatty grips

The grips on older scooters can get mucky and after oil and sunshine have worked on them, they tend to suffer with discolouration and cracking. Again, the handle bars are a standard size and you won’t have any trouble sourcing the official replacements or aftermarket replacements

Noisy brake

The brakes on these scooters tend to become noisy with use as the small steel rivets rust and become lose with time. Although this issue doesn’t affect operation generally, it sounds horrible. On this scooter I decided to drill-out the existing rusty rivets and after a quick clean up, replace them with some alloy alternatives. These look better and will last much longer.

During this repair, I couldn’t do much about the chipped Micro Scooter logo, but even a new one would end up like this example after 5 minutes use!

A very satisfying repair and something any parent could do with their kids at home using basic tools.

Hotpoint ‘Rumble’ Tumble Dryer VTD01

A noisy tumble dryer gets fixed cheaply

Strange noises from machines play on my mind.  None more so than when that niggling noise starts to get worse.  Noises like that usually mean two things.  Catastrophic failure and expense.

Time to disconnect from the mains and fetch the tool box.

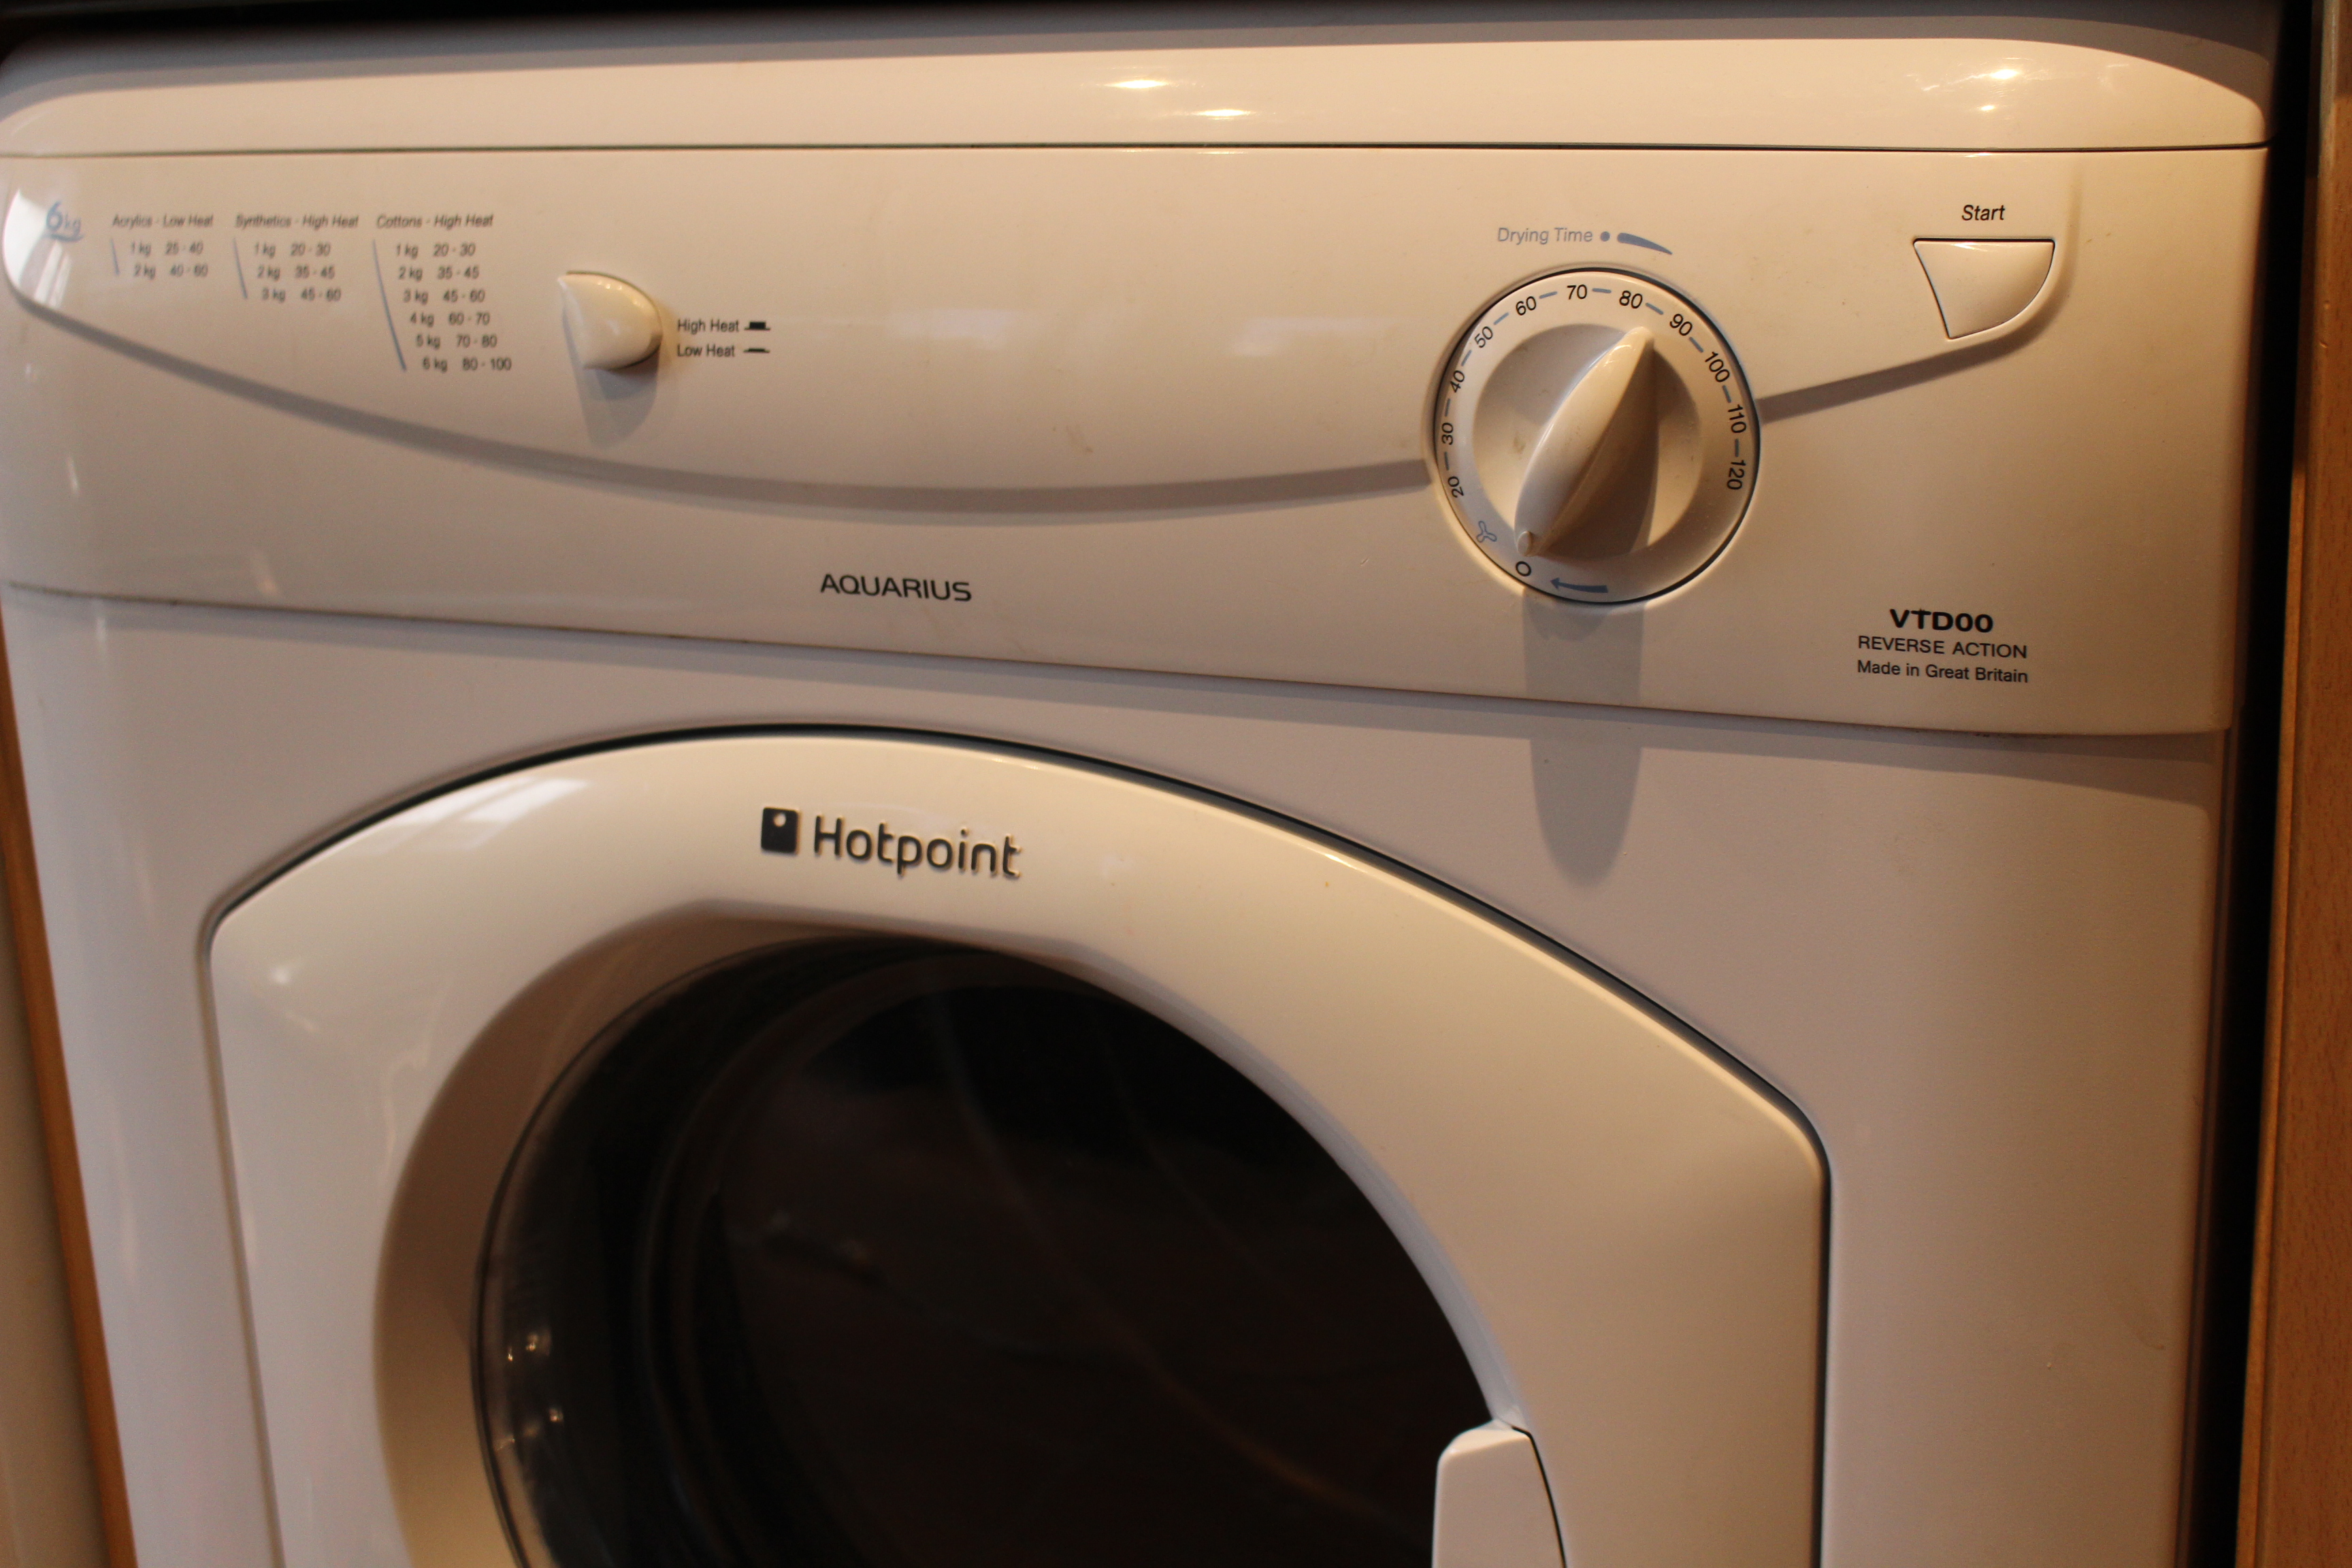
The patient in the surgery this week is our own Hotpoint tumble dryer.  We avoid using it at all costs, but with miserable English weather and two children, getting washing turned around efficiently, ready for use is mandatory.  To be frank, I’d noticed the excess whinning bearing noise coming from the dryer for a few uses, but it was getting to the point where it was hard to ignore.

Electric hot air tumble dryers are pretty simple things.  They work by sucking cool air in, heating it up under thermostatic control and then blowing it in to a rotating drum.  The moist air is then expelled via a filter and then hose, to atmosphere.  Tumble dryer models of this kind will have the following:  A motor, heater, thermostat circuitry, timer and a drum.  There isn’t much to go wrong and many parts for UK tumble dryers are available, cheaply from places like eSpares.co.uk.  Usually, no special tools are required if you want to have a go at fixing your machine and I recommend you do of course.

IMG_7419
FixItWorkshop, Worthing, December’18, Hotpoint VTD01 Tumble Dryer.

After opening up the cabinet, access to the drum and motor was available by the side panel which was held in position with several self-tapping screws and hooks.  Care must be taken if you attempt something similar on your machine since there are plenty of sharp edges to watch out for.  This dryer features an AC induction motor (which has no motor brushes).  It has a spindle which runs through the motor with a pully one side to drive the drum via the belt and a fan the other to blow the hot air.  Removing the belt and spinning the motor by hand revealed the problem.  The spindle spun OK, but sounded rough.

Replacement motors are available at a reasonable £90 or so, but you know me by now, I don’t like spending that kind of money, unless I have to.

The motor is attached to the appliance with simple bolts and is removed easily.  The motor is held together with self-tapping screws, which are easily accessible.  Just two bearings feature in this motor; one at each end to support the load.  Both bearings sounded rough, but seemed not to be worn too much.  The bearings are standard items and it would be easy to find exact replacements from a bearing supplier (rather than replacing the whole motor), for under £20.  However, as this was my own machine, I went for cheaper fix, to squeeze more life out of what I already had.  With the dust cover popped off from both bearings, I cleaned both with isopropyl alcohol cleaner and then re-greased with quality high-melt point bearing grease.  Much better.

This slideshow requires JavaScript.

The motor re-assembled, re-installed back in the machine and it was time to switch on.  It now sounded as sweat as a nut.

If and when the bearings get noisy again (and they will eventually), I’ll replace the bearings with new ones.

Cost of replacement:  circa £200.  Cost of repair:  My time, two cups of tea, one custard cream, a bit of grease.  Not in that order.

Classic (asthmatic) Dyson DC01

A tired DC01 gets some TLC

Starting a new job is always fun and when a new colleague of mine mentioned that the office vacuum cleaner had packed up, I rose to the challenge.

I’m quite fond of Dyson products as some of you know, mainly because:

  • They’re well-engineered, by engineers
  • They’re designed to be repaired easily with simple tools, which is better for everyone
  • Parts are readily available at reasonable prices

The DC01 was launched in the early 90’s and was Dyson’s first market clean-up, competing with the established market leaders.  Although this machine is over 20 years old and Dyson no longer supports it directly, reasonable quality pattern parts are available on eBay.  If you have one, love it and keep it going.

IMG_7425
FixItWorkshop, Worthing, November’18, Dyson DC01

This one is actually an ‘Antarctica Solo’ model (grey and light blue instead of yellow), which commemorated Sir Ranulph Fiennes’ solo trek across Antarctica and raised money for Breakthrough Cancer.  It had been abandoned and was moments away from the skip.  I felt quite sorry for it.

Faults reported included; no suction, excess noise and smell!

The first thing to check on the DC01 is the filters, as like many other Dyson products, people forget to clean or change the filters.  Both filters were totally choked and full of all sorts of detritus.  A quick shake out and wash with warm soapy water and they were as good as new.  Following that, I inspected the seals around the join between the cylinder and the main body.  All the seals were dirty, so a clean up and quick spray with silicone spray and they were as good as new.  Great.

The noise seemed to be coming from the front beater/ rollers which usually means, noise bearings.  The beater on this model uses a two bearing set up.  One was fine, but the other was seized.  As I didn’t want to spend any more than I needed, I cleaned the bearing, after removing it and the dust cover, re-greased it with LM High-Melt Point grease (general automotive stuff) and it was ready to roll and beat again.


This slideshow requires JavaScript.

Once the filters were dry and re-installed, the Dyson ran like new again.  Very satisfying.

Cost of replacement:  £15 second hand, £100’s for an equivalent-ish new model.

Cost of repair:  Patience, washing up liquid, two cups of tea.

Bissell Powerlifter Pet noisy roller beaters

Now, some of you will remember that I’ve written about a similar issue before, but I think it’s worth covering again as often, complete replacement items need to be purchased, which can be costly.

This Bissell Powerlifter Pet vacuum cleaner had snapped a belt, due to an obstruction in the roller/ beater area and while the casing was open to replace the belt, I removed the beater to see how smoothly it turned.  It was noisy.

Seemingly, Bissell will only supply a complete unit for around £30, with shipping, so given the overall value of the machine, it seemed sensible to have a look at the noisy component on the bench.  The bearing housings, located at each end of the roller, come out easily and with some careful manipulation, each bearing can be removed.

On this unit, both bearings were dirty and dry.  Now, I could have replaced them with a generic bearing, but in the spirit of thrift, I decided to clean the bearing races with brake cleaner and then repack with high-melt-point grease.  When reassembled to the roller/ beater, it ran very smoothly and was much quieter, once re-fitted to the vacuum cleaner.  Job done.