Elna SP foot pedal went bang

Elna SP foot pedal to the metal

On the back of a previous article about a repair I did on the rather wonderful Elna SP sewing machine, a reader got in touch.  She was a genuine sewing aficionado and had several top of the range current machines, but she used the trusty Elna SP for many smaller jobs, where the other machines didn’t quite cut it.

All Elna SP machines are getting on a bit and parts are either re-manufactured, scarce or secondhand, if you can find them.  Having said all that, a well-maintained Elna will run for many years and last much longer than new metal on sale now.

IMG-1971
FixItWorkshop, Worthing, November’18, Elna SP Special, in action

The foot pedal on this machine had gone pop, bang, finito.  It smelled terminal.

Knowing that parts for this machine are rarer than hens teeth and I do like a challenge, I took on the job.  I’m based in Worthing, West Sussex and the machine was located in Scotland, so after a short wait, the knackered pedal arrived in the post.

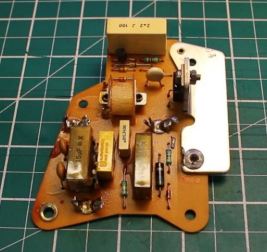
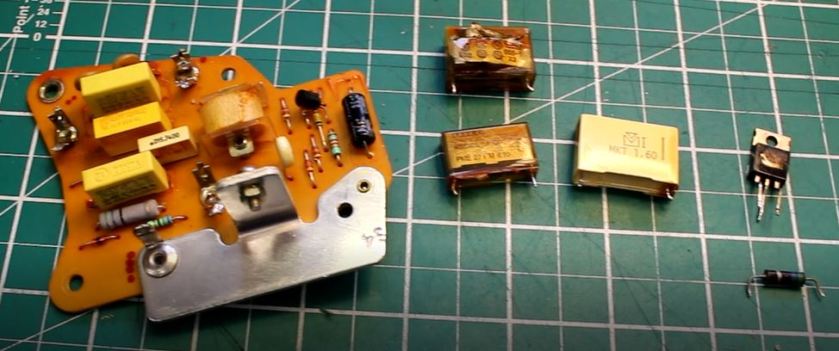
The pedal is held together with four small self-tapping screws and came apart easily.  The reason for failure was two-fold.  The copper leaf contacts had arced excessively and caused major pitting in the contact strip (see slide show) and the probably ensuing resistance had caused the main resistor to overheat, causing the winding to fail.

This slideshow requires JavaScript.

The contact surfaces were easy-ish to fix, or rather breathe new life into as all they needed was cleaning and re-shaping.  The resistor was a bit trickier to mend.  Getting hold of a replacement was going to be near impossible, so the only thing to do was to try and repair it.  Without that particular style of resistor, of that value, it wouldn’t work again.  Luckily, there was some excess resistance wire on the thing and I managed to twist it in to the broken section.  Soldering was not an option, since the wire was an alloy that wouldn’t take to solder and in any case, these things get hot in normal service.  I twisted both ends of the break to form a new section, while maintaining the same length of windings on the resistor, essential if I was to match or get close to the original specification.  Difficult.  Luckily, after a few goes, I managed it and the applied a little heat-conducting (and therefore dissipating) paste to the join.

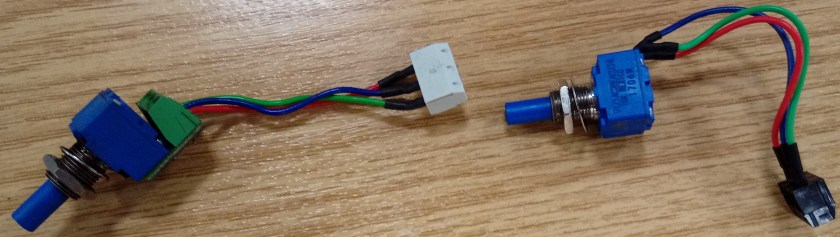
With the pedal reassembled, I was only able to test it with my meter, since the sewing machine was far too heavy to post.  The pedal tested as a closed circuit (OK), which was a result.  I then had to wait for the pedal to be collected, taken back to Scotland and tested.  Fortunately, my fix worked and the machine sprang in to life, without a hitch or missed stitch.

Now, a word of caution with this one.  This is NOT the best way of mending something like this and all I’ve probably done is prolong it’s life a little longer.  There are generic sewing machine pedals that would work with this machine and will be fine, when this one fails in future, but that’s not the point.  The main thing is that something that was broken is now working and even if it’s not the best fix, at least it will run for a bit longer.  Happy days.

Cost of replacement: (generic part) £15-30.  Cost of repair, my time, a bit of solder and several cups of tea.

A flying barbecue problem

A rusty barbecue lives to cook another day.

My dad kindly donated an elderly Homebase Sorrento gas barbecue a few years ago and each summer since, it’s cooked a good few bangers and steaks in the garden.  Nice.  However, during the winter this year, the barbecue nearly met an unfortunate end.  The barbecue is always kept lightly sprayed with WD-40 when not in use and always covered with a generic tarpaulin, to keep the rain out.  However, one particularly windy day during the winter of 2018, the cover that was meant to protect the outdoor cooker turned in to a handy sail and briefly lifted it a few feet in to the air and then down again with a crash.  Oh dear.

IMG_5736
FixItWorkshop, May’18, Worthing, Homebase Sorrento/ Campingaz Eldorado.

At first glance, all appeared to be well but on further inspection it seemed that the gas burner within the main ‘charcoal’ area had taken quite a hit.  Years of use and damp storage had taken their toll and the rusty burner within had finally shattered and was no longer in good serviceable condition.  In fact, using the barbecue in this state could literally be explosive, since the gas would be flowing out all over the place, potentially un-burned.

Not holding out much hope for spares, I took to Google to see what parts were available for the nearly 20-year-old appliance.  It turns out that there are many spare parts available for gas barbecues, from spare handles to gas valves to replacement grilles, including burners of just about every variant.  With a bit more research, it appears that my Homebase Sorrento is in fact a re-badged Campingaz Eldorado.  As Campingaz is a well-known brand, the burner was readily available at a very reasonable £23.00, including delivery from Hamilton Gas Products www.gasproducts.co.uk.

Hamilton supplied the parts quickly and the part fitted as easily as the existing one, as it was a like for like spare part, more or less.  I had to cut-off the existing screw, as it was beyond help and replace it with something similar, once fitted and the height adjusted with a washer and nut or two, the burner was once again ready to cook.

This slideshow requires JavaScript.

However, before I could sit back with a cool beer and admire my work, I decided to tackle the piezo push-button ignition, which had stopped working a while ago.  The wiring had broken away from the main spark anode and to be honest, even I nearly binned it.  I hate to be beaten by silly problems like this, so I soldered the wire to the base of the spark anode and then re-attached the bracket back to the barbecue.  After a little tinker time, the spark was close enough to light the gas, pretty much every time.  I was well pleased!

IMG_5743
FixItWorkshop, May’18, Worthing, Homebase Sorrento/ Campingaz Eldorado.  Re-attached wiring.

So, if your gas barbecue needs parts, don’t assume it’s not worth repairing.  There is a wealth of direct replacement and generic spares that will get yours working again, cost effectively.

Cost of a replacement barbecue:  £100 upwards (although the range could be as dramatic as £30- £5000).  Cost of repair:  £23.00 for the burner and £1.00 for the nuts, bolts and washers (which I had already).

Re-vamped Micro Mini Scooter (just for fun).

A Micro Mini Scooter repair, just for fun!

I really had no idea that Micro Scooters have been a ‘thing’ for the last few years and as a result, there are lots to choose from on the second-hand market.  We picked up a ‘bargain’ for our oldest daughter for a princely sum of £5.00 via a local Facebook For Sale page.  With hindsight, it was overpriced.

Just about every part of the scooter was either nasty or plain broken.  The handle bar grips were missing, the wheel bearings were all shot to pieces, the steering mechanism seized and the rear brake was missing.  The back brake on this scooter type, I’ve since found out, have a habit of snapping off with hard use, so that should have been the clue to the low, low price.  But if you read these pages, you know me, I like a challenge.

First step was to address the static wheels.  An Allen key holds the wheels on to the stub-axels at the front of the scooter and there’s something similar on the trailing wheel.  The bearings on our wheels were beyond a re-grease as they’d appeared to have spent their entire life at the bottom of The Channel.

This slideshow requires JavaScript.

Luckily, the bearings are easy to replace and good-quality generic items are available on eBay for under £5.00 for a whole set (6 bearings, 2 per wheel).

Next came the handlebar grips.  Ours were missing and again, generic ‘copy’ grips are available on eBay which are perfect for the job and are half the price of the original equipment.  While I was shopping on eBay, I also found an original Micro Scooter bell.  Just the job.

IMG_5715
FixItWorkshop, May’18, Micro Mini Scooter, new handlebar grips and bell fitted, prior to painting.

The steering mechanism was next and all it needed was a good clean up and light lubrication with some plastic-friendly white PTFE grease, readily available from Toolstation.

This slideshow requires JavaScript.

The shabby foot plate area was once baby-blue but had since faded and had evidence of scrapes.  It looked a bit sorry for itself.  I decided to address this by giving surfaces a good clean up and then key with wire wool.  A couple of coats of good quality plastic primer and then a couple of coats of vinyl black paint, which now gave the scooter quite a ‘presence’.  I then decided to improve the foot plate ‘grippy-ness’ by applying a custom grip tape design.

This slideshow requires JavaScript.

Before re-attaching the foot plate back to the chassis, the brake needed to be replaced.  As with some of the other fixings on the scooter, the brake’s fixings were so rusty, they needed to be drilled out and replaced.  Luckily the new original equipment brake came with new improved fixings which fitted perfectly.

This slideshow requires JavaScript.

Thanks to the cool dudes at Alleyoops, Worthing for their help and advice www.alleyoopsskates.co.uk.  The UK Micro website is also very good as it lists spare parts www.micro-scooters.co.uk/spares-support.

Micro Mini Scooter (AKA ‘Triggers Broom’) renovation spend, May’18:

New good quality bearings                                                        eBay                      £4.15

Generic copy Micro Scooter handlebar grips                         eBay                      £9.75

Genuine Micro Scooter bell                                                        eBay                      £7.78

Paint and sundries                                                                        Shed                      £2.00 (approx.)

Grip Tape (customised to fit)                                                       Alleyoops            £8.00

Genuine Micro rear brake                                                            Alleyoops            £8.99


Total                      £40.67

I know what you’re thinking… for £40 more, I could have bought a brand-new scooter and saved myself the bother.  At times, I did question my own sanity.  But what we now have is a perfectly serviceable, one-off that no one else will have.  Can you put a price on that?!

Another Smoking Kenwood Chef Excel A902/ A904

I’ve repaired a few Kenwood Chefs recently, but this one seemed worthy of a mention on these pages as it’s slightly different to the ones I’ve repaired so far.

Many Kenwood Chef accessories are usable on Chefs from all eras, due to logical thinking by the designers over the years and this is something to be applauded as it reduces waste.  For example, the beater on a 1970s machine will fit one from today.  An interesting fact for any occasion.

I’ve repaired many A701s and A901s, but this was the first A902/4, so I thought I’d share some of my repair experience in order to help others.

The owner contacted me explaining that she’d been using the family’s cherished Chef to make a cake when a plume of smoke started coming from the mixer.  The smell was bad and she’d quickly disconnected the unit from the mains.  The owner then contacted me to ask ‘was the Chef worth repairing’?  Of course it was!

I suspected the infamous speed control components which tends to fail with age.  However, this model featured extra components all mounted on a neat printed circuit board (PCB) which is fixed near the motor.  A reasonably priced repair kit, with new rubber feet was available online so I ordered one up straightaway.

Opening up the A902/4 is a similar job on many Chefs and after removing a few screws, the motor and gubbins is available for maintenance.

As suspected, two out of the three capacitors on the PCB had blown visibly, due to crystallisation and general fatigue, so these needed to be replaced.

PCB
FixItWorkshop, May’18, Kenwood Chef Excel A902/A904, PCB before work.
PCB renewed
FixItWorkshop, May’18, Kenwood Chef Excel A902/A904, old and new components.

As all the components are PCB mounted, each part must be de-soldered first, contacts cleaned before re-assembly which is time consuming, but satisfying and even though I’ve done this kind of work many times before, I always take a couple of photos and mark wires with a pen or label, as it’s very easy to make mistakes later.

The kit included replacements for the faulty bits, plus some additional parts which should be changed as a matter of course.  I also chose a kit with replacement rubber feet for the machine as the ones fitted had squashed ‘flat’ with age, a very common problem with the Chefs of this vintage.

New components fitted, the motor ran sweetly once again, without smoke, wobble or extra noise.  It’s worth noting that the A902/4 is quieter than earlier Chef models and is probably worth seeking out if you’re in the market for a second-hand unit.

Another ‘happy little Chef’ leaves the workshop.


Cost of new machine: £400 plus.  Cost of new parts:  £15.24 plus my time.

Runaway Hillbilly Golf Trolley…

Golf trolley heads for the hills…

Readers of this blog (I know there are millions of you) will recognise this golf trolley and I’m pleased to report that my first repair, the one to the motor, is still working perfectly.  However, the owner of the trolley contacted me with a (funny) problem.  Whilst recently enjoying a round of golf on the local fairway, the trolley decided to, by itself, begin to edge away from the second tee and then with some speed, head off in to the distance, without any operation of the dial switch, situated on the handle.  Whilst this seemed funny at first, I remembered that the motor on this trolley had the kind of torque that, coupled to small gearbox and wheels on a heavy frame, could do some serious damage, left unchecked.

Original photo taken in Aug’17, below.

WP_20170803_14_08_27_Pro
FixItWorkshop, Worthing, Aug’17 Hillbilly Compact Golf Trolley

Unlike many modern electric golf trolleys, it doesn’t feature GPS guidance, remote control or amazingly, a dead-man’s switch, which seems like a major safety oversight to me.  I’d have expected either a kill switch or dead-man’s switch* fitted to the handle on a trolley like this as the runaway scenario could never occur due to fail-safe nature of the switch being operated.  With one, the trolley would only run when the operators’ hand was on the handle or cut out when the kill switch is activated, as with the saftety cord mechanism, on a jet ski for example.  Perhaps the Mk2 Hillbilly Compact featured this.

*For example, a dead-man’s switch is usually fitted to something like an electric saw where the operator must old a handle-type switch to make it run.  Once the operator lets go of the handle, the motor automatically fails-safe and cuts-out.

On with the repair.  The trolley features some exposed connectors and cabling and it seemed sensible to check the continuity of the cables running up and down the handle shaft, as repeated trolley folding might have caused a problem with the wiring.  Fortunately, the cabling was OK.

The owner had mentioned that the handle, where the speed control switch is located, had got wet in the past, which made my alarm bells ring.

Opening up the handle, which only required a basic tool kit, revealed evidence of water damage and corrosion to the speed control terminals.  Luckily the owner of the trolley had stocked up on spare switches!

Removing the existing switch revealed intermittent continuity and varying amounts of resistance, which was not good.  A fault most likely to have been caused by water ingress or excessive shock.  The owner had supplied two ‘new old stock’ (NOS) switches.  Which one to fit?

From time to time, it’s downright sensible to either fit NOS or second-parts as they’re usually cost-effective and are more likely to fit over pattern parts.  But time can also affect apparently shiny parts.  This was a case in point.  I knew that the switch should vary resistance from open circuit to 10KOhms in either direction from COMM.  The old one didn’t and one of the ‘new’ parts only went to 2KOhms, so was not in specification.  Luckily, the remaining NOS switch worked fine and once refitted, and the handle reassembled, the golf trolley was ready to make the job of carrying clubs easier, once again.

IMG_20180131_135745
FixItWorkshop, Feb’18, Hillbilly Compact speed control switch, new and old- test NOS parts before fitting.

Cost of replacement trolley:  ££££ Cost of repair; £10 plus time.  Moral of the story; don’t assume NOS parts will work.  Test them first.


Satellite Bass Guitar that wouldn’t go to 11.

A Fender Precision style Satellite P Bass guitar repair…

A friend of mine, who plays in a Portsmouth-based Psychedelic Garage Rock & Roll band, brought in a Satellite Bass Guitar with a few issues.  Firstly the volume control was noisy and crackly and secondly, it was a little quiet.  Not good for those moments where you need to go one higher, to eleven.

The band are:  60th Parallel

IMG_4905
FixItWorkshop Jan’18, Fender Precision style, Satellite P-Bass.

Opening up the compartment behind volume, tone and jack plug socket revealed messy wiring and dodgy connections.  The owner had already supplied a replacement potentiometer for the volume control, so all I had to do was replace the one fitted, re-make the poor connections and give the wiring a general tidy-up.

IMG_4908
FixItWorkshop Jan’18, Fender Precision style, Satellite P-Bass, wiring before work.

The guitar has Dimarzio ‘Model P’ pick-ups which can be wired many different ways, depending on the application and musical taste.  This particular guitar, circa 1976, is a Fender Precision style Satellite bass (P-Bass) and has a modified ‘through neck’.

IMG_4906
FixItWorkshop Jan’18, Fender Precision style, Satellite P-Bass, volume (top) and tone (bottom) controls.

Testing the guitar before commencing work revealed a slightly quiet, but mainly crackly output from the amplifier, the tone control was fine.  The owner had also complained that the bass sometimes cut-out, mid song.  Not ideal.

Removing the volume control was straightforward and only required a spanner to remove the nut, after pulling off the volume knob.  The rest of the job just involved careful de-soldering, cutting out the poor wiring and replacing it with new wiring where needed and some heat shrink to tidy things up. Having not repaired an electric guitar before, I did make a quick wiring diagram for reference!

Once completed, I hooked it up to the amplifier again which revealed a much cleaner, crackle free note.  Sadly, I can’t play the guitar, so I wasn’t able to test it properly!

IMG_4911
FixItWorkshop Jan’18, Fender Precision style, Satellite P-Bass, neater wiring.

Cost of a new bass:  Name a price.  Cost of the repair; about £2.00 plus tinker time.


Gaggia Classic machine wakes up to smell the coffee.

A Gaggia Classic Coffee Machine repair…

A simple repair…. That’s what I thought when a friend asked if I could look at his Gaggia Classic Coffee Machine, which had developed a nasty little leak when in use.  The coffee wasn’t all that good either, due to the lack of pressure available, caused by the leak.  In short, it needed attention.

IMG_3616
FixItWorkshop, Oct’17, Gaggia Classic Coffee Machine, with a leak.

The owner had already bought a repair kit consisting of the main seals/ gaskets that commonly fail, so I thought no problem, take to pieces, replace seals, happy days.  Er, not quite.

Once I’d stripped the machine down, pretty straightforward on these machines, the bare parts were exposed, which revealed the problem.  After being fired up briefly, not to make coffee I’d like to point out, water could be seen escaping from the boiler unit, a alloy bodied lump of metal, split in two halves, held together by 4 screws.  The boiler, as the name suggests, heats the water up with one heating element  and creates steam for the steam wand, with another element, all part of the same module.

After separating the boiler halves, I traced the leak to a faulty gasket, but crucially, one side of the mating faces was heavily corroded and unlikely to re-seal with a new part fitted on its own.  Remedial action was required.

This model is a few years old and a replacement boiler is still available on a few websites and prices vary from £40 to £60 at the time of writing, so at that price, starts to make the cost of repair unviable.

I decided that the face with the corrosion had enough material to withstand loosing some, so went about sanding the worst of the corrosion away before gradually moving on to  smoother and smoother sandpaper.

Because Gaggia Classics are fairly common, I decided to video this repair process as I suspect the corrosion affects many machines with age and just fitting a repair kit won’t cure the problem on its own.  See below.  I hope it helps anyone else with the same machine facing the same problem.


Once I was happy with the new finish, I fitted a new gasket and reassembled the boiler.  After putting it all back together, I purged several tanks of water through the system to remove debris, before attempting a cup of coffee.  Once filled up with my favourite Lidl coffee, the machine performed well once again with no leaks and the end product tasted great.

Cost of a new machine:  £249.00.  Cost of repair:  £4.50, plus time.


Hubble bubble toy’s in trouble.

This bubble machine needed more huff and puff.

About a year ago, we bought an Early Learning Centre Freddy the Fish Bubble Machine for our daughter and it’s been a great addition to summer garden fun, as it unleashes thousands of bubbles per minute.  It’s been truly bubble-tastic.

However, it’s decided to become a little temperamental of late when switched on.  With good batteries and a full tank of bubble fuel, the machine would sometimes cough and sputter and generally be a disappointment in the bubble-making department.

The toy is shaped like a fish, like the name suggests and has a small reservoir for the bubble mix and a carousel of bubble wands operated by a motor which is ‘blown’ by a small fan inside, to inflate the bubbles to the optimal size.

The fault:  The fan would sometimes, by itself, vary in speed, reducing the speed of the air though the bubble wand carousel, which would limit the quantity and quality of bubbles produced.  Most disappointing.

The toy is held together by small Pozi-drive screws and the whole things comes apart in two halves.  It gets a bit tricky inside as there are a few small components held in place using the internal plastic parts.  After testing the batteries, I thought I’d start by testing the action of the on/off switch which seemed to click on/ off OK, but I wondered what the quality of the electrical mechanism was like.  A quick test with the multi-meter revealed slightly variable resistances, indicating either damp or dirt had entered the switch, highly likely considering what the toy does.

IMG_4091.JPG
FixItWorkshop, Sept’17, Early Learning Centre Freddy Fish Bubble Machine

The switch is reasonably well protected from the elements, but I suspect it had become immersed in water, not really what the switch or toy is meant to handle.  It’s not Ingress Protected Rated (IP).

The switch isn’t really designed to be repaired, but after a few minutes bending the small tabs holding it together, I revealed the switch contacts.  A quick clean with switch cleaner and blue towel and the switch was working as it should once more.  Once reassembled, the toy performed well once again and was soon filling the garden with bubbly magic.

Nice customer feedback: Bosch Athlet

A customer got in touch to say thanks. Always appreciated.

It’s always good to get feedback on the stuff I write here and produce for YouTube.  I welcome it all, good and bad.

Here’s a nice one, relating to my Bosch Athlet repair, I received recently.  Makes it all worthwhile.  https://fixitworkshopblog.wordpress.com/2017/06/16/flimsy-bosch-athlet-25-2v-cordless-vacuum-cleaner.

From a chap who’s repaired his Athlet using my video.

Just a thank you.
I went looking for a solution to the intermittent cut-out on my Bosch Athlet and found your solution. It took all of about 2 minutes once I’d found a suitable length screw and works perfectly. Like it was designed that way.

In your video you thought maybe the handle was removable to allow the attachment of some accessory. It isn’t. It’s just a way of making the box smaller for shipping.

Which means if Bosch put the hole in, and supplied a screw, it would be a much better product. (But of course, then they could sell it as no assembly required:)

But seriously, thank you. I love the Athlet, but that bloody intermittent cutting-out was really beginning to bug me. If I’m ever in Worthing I’ll buy you a pint.

Name supplied.

Well, I know a few good pubs in Worthing!

IMG_3613
FixItWorkshop Aug’17, Bosch Athlet repair

Happy repairs.

Blocked Hoover Steam Cleaner

Hoover Steam Cleaner Repaired!

I’ll put money on the fact that many steam cleaners like this one are thrown away needlessly due to blockages which could be easily cleared using everyday items.

This Hoover S2IN1300C hand held steam cleaner appeared to switch on OK (LED lamp on), the pump ran OK, but even with a full tank of water, no steam came out of the steam nozzle.

Off with the cover and after checking the pipes for leaks and pinches, it appeared that all was well.  The pump did indeed run and the boiler appeared to get very hot.

After a fair bit of dismantling, it appeared that the nozzle was blocked by a build-up of chalk.

IMG_3923
Hoover Hand Held Steam Cleaner, July’17, repaired at the FixItWorkshop, Worthing, England.

Cost of replacement; £30-50, cost of repair – some white vinegar.

Have a look at the video…