My mum’s got an old electric Singer sewing machine which is about 40 odd years old. Singer sewing machines are well supported generally and parts are readily available, but I find it’s sometimes fun to try and find the cheapest way to fix something myself.
FixItWorkshop, Worthing, November’18, Singer Sewing Machine Foot Control Pedal
The foot pedal on this machine went pop and smelled horrible after. The machine then stopped working, oh dear.
The pedal is of high quality construction and easily better than any generic replacement on the market, so it was definately worth saving.
Opening up the pedal was just a few screws, which then exposed the whole mechanism. The mains resistor was in tact and seemed to test with resistance. A good start. The contacts were in good condition as was the rest of all the components, except for the mains input capacitor, which has spectactularly failed and split open, a common problem on older mains capacitors.
Repair kits are readily available for about £5, but that seemed expensive to me! Using the existing capacitor as a guide, I found a suitable component on eBay for £2.09 delivered. That’s more like it.
The capacitor I used was: Film Capacitor, 0.1 µF, 250 V, PET (Polyester), ± 5%, R60 Series (from eBay).
Here’s a little slide show that I hope will help others fix their pedal, should it fail.
This slideshow requires JavaScript.
With the old capacitor cut out and the new one soldered in, the pedal was ready to run again. Sorted.
Cost of a replacement: £15-30 for a generic part. Cost of repair, £2.09, 1 cup of tea.
On the back of a previous article about a repair I did on the rather wonderful Elna SP sewing machine, a reader got in touch. She was a genuine sewing aficionado and had several top of the range current machines, but she used the trusty Elna SP for many smaller jobs, where the other machines didn’t quite cut it.
All Elna SP machines are getting on a bit and parts are either re-manufactured, scarce or secondhand, if you can find them. Having said all that, a well-maintained Elna will run for many years and last much longer than new metal on sale now.
FixItWorkshop, Worthing, November’18, Elna SP Special, in action
The foot pedal on this machine had gone pop, bang, finito. It smelled terminal.
Knowing that parts for this machine are rarer than hens teeth and I do like a challenge, I took on the job. I’m based in Worthing, West Sussex and the machine was located in Scotland, so after a short wait, the knackered pedal arrived in the post.
The pedal is held together with four small self-tapping screws and came apart easily. The reason for failure was two-fold. The copper leaf contacts had arced excessively and caused major pitting in the contact strip (see slide show) and the probably ensuing resistance had caused the main resistor to overheat, causing the winding to fail.
This slideshow requires JavaScript.
The contact surfaces were easy-ish to fix, or rather breathe new life into as all they needed was cleaning and re-shaping. The resistor was a bit trickier to mend. Getting hold of a replacement was going to be near impossible, so the only thing to do was to try and repair it. Without that particular style of resistor, of that value, it wouldn’t work again. Luckily, there was some excess resistance wire on the thing and I managed to twist it in to the broken section. Soldering was not an option, since the wire was an alloy that wouldn’t take to solder and in any case, these things get hot in normal service. I twisted both ends of the break to form a new section, while maintaining the same length of windings on the resistor, essential if I was to match or get close to the original specification. Difficult. Luckily, after a few goes, I managed it and the applied a little heat-conducting (and therefore dissipating) paste to the join.
With the pedal reassembled, I was only able to test it with my meter, since the sewing machine was far too heavy to post. The pedal tested as a closed circuit (OK), which was a result. I then had to wait for the pedal to be collected, taken back to Scotland and tested. Fortunately, my fix worked and the machine sprang in to life, without a hitch or missed stitch.
Now, a word of caution with this one. This is NOT the best way of mending something like this and all I’ve probably done is prolong it’s life a little longer. There are generic sewing machine pedals that would work with this machine and will be fine, when this one fails in future, but that’s not the point. The main thing is that something that was broken is now working and even if it’s not the best fix, at least it will run for a bit longer. Happy days.
Cost of replacement: (generic part) £15-30. Cost of repair, my time, a bit of solder and several cups of tea.
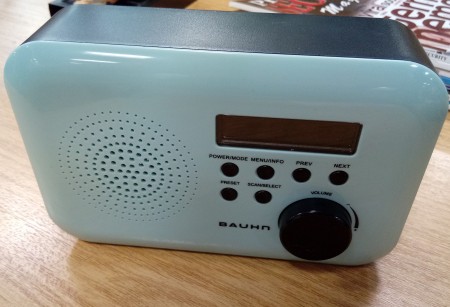
A colleague of mine brought this cool little DAB radio in to the workshop as it’s once crisp DAB tones were now no more and all life from the little device, had seemed to have ceased. It was, very much, a dead radio. When working, it picked up every station available, really clearly and seemed to out-perform the much more expensive devices my colleague also owned. However, after a few months in the hands of his son, the radio would no longer turn on when plugged in.
FixItWorkshop, May’18, Aldi Bauhn Radio, in for repair.
It was brought from Aldi for under £10, which seemed like a bit of a bargain to me. It’s amazing just how much DAB radios have fallen in price in the last 5 years or so.
FixItWorkshop, May’18, Aldi Bauhn Radio, in for repair, back of the radio.
The Bauhn UDABR-0197 (catchy name) is a compact, portable radio and is capable of being used with either a plug-in adaptor (supplied) or 4 x ‘AA’ batteries. When powering this radio using either plug-in adaptor or batteries, the little radio refused to do anything. Very sad.
I always start with the basics, so I checked the power from the plug-in adaptor first, which seemed to be delivering its 5.9VDC, pretty much spot-on. As a side note, I always check the condition of plug-in adaptor leads and plugs as they seem to almost always be made of the thinnest wire available in the Far East and prone to cracking causing poor connections. This one was fine.
Opening up the radio was really easy, just 4 cross-head screws and the two halves of the radio came apart without any major dramas.
The first thing you notice about (cheaper) small appliances like this, is the ‘lack’ of anything inside. The circuit boards in new small devices can sometimes be multi layered affairs, using micro components, making repair with normal workshop tools very difficult or impossible.
Luckily for this little radio, the designers have had the foresight to keep the power distribution board separate from the main ‘radio’ gubbins and this seemed to be of conventional construction.
FixItWorkshop, May’18, Aldi Bauhn Radio, in for repair, PCB repaired.
FixItWorkshop, May’18, Aldi Bauhn Radio, in for repair, PCB back in position after soldering.
FixItWorkshop, May’18, Aldi Bauhn Radio, in for repair, broken pins.
On closer inspection of the power distribution board, it revealed a break in two of the pins from the ‘power-in’ jack socket meaning that power would not get through to the main circuit board. The two pins were also shorting together, causing a local loop connection. This meant than neither mains adaptor supply nor battery would power the radio. Problem realised.
I was then able re-make the connection using a soldering iron on the board, reconnecting the pins to a spare section of copper detail on the power distribution printed circuit board. Very satisfying.
Once the radio was back together, all screws back in place, power supply connected, the radio burst in to life, just in time for me to listen to my favourite station. Happy days.
FixItWorkshop, May’18, Aldi Bauhn Radio, in for repair, all fixed.
Cost of a new radio; £10. Cost of repair; A bit of soldering and a cuppa plus gingernut biscuit.
A neglected DC24 gets some badly needed maintenance…
I really enjoy working on Dyson products as they’re so well thought out. The designers seem to take great care factoring-in easy maintenance for longevity. There’s also a great sense of theatre when using Dyson products. Take the roller ball on this design for example, a throwback to the earlier Dyson Ball Barrow which allows better manoeuvrability when combined with an upright vacuum cleaner. There’s also the exposed mechanism which automatically switches suction between the roller pick-up and hose when using the foot pedal to select the desired mode. Genius. All of these design touches encourage the user to care for and enjoy using the product.
FixItWorkshop, April’18, Dyson DC24 (DC04 just in view too- how things have changed).
Sadly though, sometimes these touches are a bit lost on people and the design flares that appeal to some become misunderstood and neglected to others.
This DC24 had two problems. It didn’t stand up properly when left and it didn’t really pick anything up that well either, failing as a vacuum cleaner on two fundamental points.
The first job was to find out why the DC24 was a little unsteady. It seemed that all of the mechanism was intact and that nothing had snapped off. Strange. The red foot pedal operated lever that releases the latching system to move the main body from its locked position was stuck. It seemed to be linked to a lever which operates the diverter valve, which switches suction from the roller beater foot to the flexible hose. On closer inspection the lever on the diverter valve had come off its pin, probably by force. The mechanism itself was also dirty which made operation rough. The red lever is spring loaded with guides and pins which were also dirty and a little rusty. I suspect this vacuum cleaner had been left somewhere damp.
FixItWorkshop, April’18, Dyson DC24 diverter lever and valve.
FixItWorkshop, April’18, Dyson DC24, red foot lever.
FixItWorkshop, April’18, Dyson DC24, cleaning the lever mechanism.
FixItWorkshop, April’18, Dyson DC24, cleaning a lubricating the mechanism springs.
After re-attaching the diverter valve leaver back on and giving all mechanisms a good clean-up with a light coating of silicone spray, it was as good as new again.
Once the mechanism was working, it was time to assess the vacuum’s performance. It wasn’t that good. As with most Dyson vacuum products, there are two filters. One processes blow-by air from the motor and the other controls dust particles from the cylinder. These filters can usually be cleaned with mild soap and water, but this set was well past it, requiring replacement and for under a tenner, it’s rude not to. Dyson have made filter replacement very easy on the DC24 with good access to the motor filter via a small door on the roller ball itself and the lid on top of the cylinder. I think there should be a massive sticker on these vacuum cleaners that says ‘don’t forget to clean the filters’ as I suspect that many of these products are chucked away by owners who forget to do the necessary. Bag-less cleaner doesn’t mean maintenance-free!
FixItWorkshop, April’18, Dyson DC24, cleaned up rubber seals.
FixItWorkshop, April’18, Dyson DC24, motor filter cover.
FixItWorkshop, April’18, Dyson DC24, motor filter cover.
FixItWorkshop, April’18, Dyson DC24, cleaned up rubber seals.
With a couple of new filters, a clean-up of all of the rubber seals with silicone cleaner and this DC24 was fighting fit, ready to clean another carpet.
Cost of a replacement Dyson product: £000’s. Cost of new parts: Under £10 plus my time.
My brother-in-law popped in to see us for a cuppa recently and mentioned he was off to the tip with an old VAX cylinder style bag-less vacuum cleaner, in pieces, not the carpet washer type. It was on its way to the great scrap yard in the sky. Luckily, I was on hand to divert the sick VAX via the workshop.
It was being disposed of due to the flex having gone faulty together with the opinion that it wasn’t working that well before the mains cable failed. Well, I hate to see good machinery go to waste.
On this VAX, the mains flex is stored within the vacuum cleaner housing and is wound up on a spring-loaded coil during storage. When in use, the user can pull the mains plug until the desired cable flex length is reached. When the user is finished cleaning their carpet, a foot operated button causes the flex to speedily disappear back in to the vacuum cleaner. My brother-in-law had already looked at the spring-loaded mains flex winding mechanism, which had resulted in the bi-metallic coil spring escaping from the enclosure, freeing itself in to an orbit. It’s quite a shock and sometimes dangerous when this happens!
What to do. I was very nearly tempted to dump this vacuum cleaner too as the build quality of the whole thing reminded me of the plastic toys one gets in Christmas crackers, but that’s not really in the spirit of The Workshop.
Then I remembered I had a defunct Hoover Telios that was minus a motor, perhaps this would be a suitable parts donor? I liked the idea of making one working vacuum cleaner from two unhappy ones.
The Telios had a working mains lead flex, but the automatic spring loaded mechanism on that was past its best, so I decided to use the working lead on the VAX. The VAX would be without its flex winding mechanism, but at least it would work. I adapted a cable tie to make a cable grip, to prevent a user from pulling the cable from the VAX, when in use. The cable would have to be stored, wrapped around the vacuum cleaner, after use, a small price for working machine.
The other job was to address the poor performance.
This product is clearly an inferior Dyson rip-off and therefore has a couple of filters; one for the intake and one for the exhaust, like a Dyson. As suspected, both of these were virtually blocked! The filters on this model were not as easy to get at nor as easy to clean. I’m not sure whether these filters are meant to be washed, but wash them I did and after 24 hours of drying on the radiator, they were as good as new. Once refitted, full performance was restored, for the price of a bowl of warm water and Fairy liquid.
Finally, the VAX was missing its cleaning head for the hose, so I decided to use the Hoover one (which was quite a nice design) with the VAX’s hose. After some jiggery pokery and some electrical tape, it fitted.
FixItWorkshop, Feb’18, VAX cylinder vacuum cleaner- with Hoover parts.
What we’ve now ended up with is a working VAX vacuum cleaner, using some parts from a beyond economical to repair Hoover. Whilst it’s not the most elegant repair I’ve ever completed, I now have something working from two nearly condemned items and surely, that’s good thing?
Now, before I start the story, I have a confession. I technically stole this room fan. I didn’t pay for it, I just took it.
Just before Christmas 2017, I noticed that a room fan had been dumped in the small carpark at the end of my road. At first, I assumed that it was being left on a temporary basis, ready to be taken to the tip in a responsible manner, but as the days and weeks rolled on, it became clear that someone had carelessly left it there to turn to rust, which seemed a shame.
I did the only responsible thing; pick it up off the ground and take it back to the workshop in broad daylight.
Once I’d allowed it to dry out, I plugged it in and guess what, it powered up and ran on all three speeds without an issue. Its operation was very smooth and quiet. On closer inspection, it didn’t seem that old to me. How strange.
The major problem with the fan was that it didn’t stand up properly, in fact it would fall over easily. The fan’s base stand was a simple cross-section of metal feet, supporting the main pole which holds the fan itself. The whole assembly was loose and being held together with masking tape, which was far from ideal.
FixItWorkshop, Jan’18, fan repair, stand.
FixItWorkshop, Jan’18, fan repair, stand underneath.
Once I’d removed half-a-roll of masking tape from the stand, it revealed that one of the screws that holds the main pole to the stand was missing and the remaining three were loose. Could it really be that simple?
Once I’d straightened the slightly bent metal work in the vice, replaced the missing screw with one I already had in my nut and bolt pots, tightened the rest up, the stand performed as a stand once again and the whole thing worked without wobbling in a drunken manner.
FixItWorkshop, Jan’18, fan repair, stand repaired.
FixItWorkshop, Jan’18, fan repair, stand reassembled.
FixItWorkshop, Jan’18, fan repair, stand, missing screw.
Now, this probably wasn’t an expensive item. It’s not the finest example of good design or build quality. But it struck me then that the otherwise fine fan had been condemned on the one missing screw and the owners’ simple lack of screw driver aptitude. Crazy. I find it very sad that something with plenty of life left in it ends up dumped in a car park over one missing screw. Some people have a very disposable and wasteful view of everyday items.
FixItWorkshop, Jan’18, fan repaired.
I did repaint some of the rusty metal work after these photos were taken.
Cost of a new fan: £15 to over £100. Cost of repair; 5p.
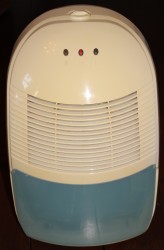
Over a cuppa, my mother in law mentioned that she was chucking out a dehumidifer this weekend and had already replaced it. This was a shock to me since it hadn’t started it’s journey to Worthing tip via my shed yet. Time to intervene.
FixItWorkshop, Jan’18, GET Dehumidifier repair.
Aparently it had overflowed water all over the floor and had cut out and not restarted. It had probably been left to its own devices in their cellar, totally neglected in the run up to its demise.
Before worrying my toolbox, I usually plug things in and press buttons to see what happens. When connecting this dehumidifier to the mains, it fired-up and seemed to run perfectly. Strange.
Looking at the device in more detail revealed three tell-tale LED lights (cooling, empty the tank and running). The tank was removable from the front and featured a small float operated level which married up to a small microswitch. The idea being that when the water rose to the top, the switch would be activated by the float and the machine would cut out safely, all being well.
The lever mechanism on the float seemed to be stiff and all that was required to restore service was a good clean with a brush and Fairy liquid and some silicone spray, once dried.
FixItWorkshop, Jan’18, GET Dehumidifier repair, microswitch.
While giving the unit a general inspection, I noticed dirt in the units’ grille. Fortunately, the grille had a removable filter which had clearly never been cleaned, so in effect had been chocking the dehumidifer in normal operation. Bad news.
FixItWorkshop, Jan’18, GET Dehumidifier repair, dirty filter.
FixItWorkshop, Jan’18, GET Dehumidifier repair, clean filter.
Piecing the evidence together in my mind surrounding the causes of failure, I came up with the following theory. The float had failed, causing the unit to leak. The unit had then run hot, probably for a while and had probably tripped a thermal protection fuse. I have no evidence for the latter idea as I never opened up the unit fully, but the theory fits the sequence of events.
In any case, the dehimidifier now switches on and switches off when full and doesn’t seem to run hot. I was pleased with that. I wasn’t so pleased that my in-laws wanted the unit back.
Cost of replacement: Circa £100. Cost of repair; cleaning stuff.
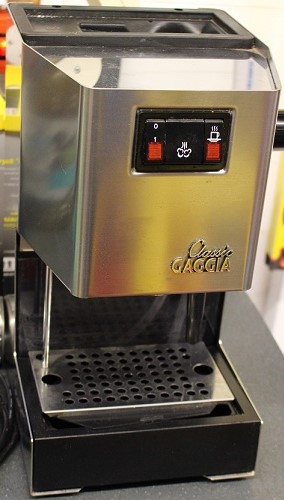
A simple repair…. That’s what I thought when a friend asked if I could look at his Gaggia Classic Coffee Machine, which had developed a nasty little leak when in use. The coffee wasn’t all that good either, due to the lack of pressure available, caused by the leak. In short, it needed attention.
FixItWorkshop, Oct’17, Gaggia Classic Coffee Machine, with a leak.
The owner had already bought a repair kit consisting of the main seals/ gaskets that commonly fail, so I thought no problem, take to pieces, replace seals, happy days. Er, not quite.
Once I’d stripped the machine down, pretty straightforward on these machines, the bare parts were exposed, which revealed the problem. After being fired up briefly, not to make coffee I’d like to point out, water could be seen escaping from the boiler unit, a alloy bodied lump of metal, split in two halves, held together by 4 screws. The boiler, as the name suggests, heats the water up with one heating element and creates steam for the steam wand, with another element, all part of the same module.
After separating the boiler halves, I traced the leak to a faulty gasket, but crucially, one side of the mating faces was heavily corroded and unlikely to re-seal with a new part fitted on its own. Remedial action was required.
This model is a few years old and a replacement boiler is still available on a few websites and prices vary from £40 to £60 at the time of writing, so at that price, starts to make the cost of repair unviable.
I decided that the face with the corrosion had enough material to withstand loosing some, so went about sanding the worst of the corrosion away before gradually moving on to smoother and smoother sandpaper.
Because Gaggia Classics are fairly common, I decided to video this repair process as I suspect the corrosion affects many machines with age and just fitting a repair kit won’t cure the problem on its own. See below. I hope it helps anyone else with the same machine facing the same problem.
Once I was happy with the new finish, I fitted a new gasket and reassembled the boiler. After putting it all back together, I purged several tanks of water through the system to remove debris, before attempting a cup of coffee. Once filled up with my favourite Lidl coffee, the machine performed well once again with no leaks and the end product tasted great.
Cost of a new machine: £249.00. Cost of repair: £4.50, plus time.
Readers of this blog would have worked out by now that I’m a little bit sentimental.
A short story:
When I moved away from home, many years ago, my mum made me a ‘moving out kit’ in which contained a trusty Probus Butterfly can opener, the classic British design can opener type. Today, it broke. I was gutted.
You can still buy the same tool for just over £1, so it clearly doesn’t usually cost-in to repair such an item. However, all that seemed to be wrong was a broken pivot or spindle. The original riveted fixing had worn and eventually sheered off today when opening the cat food.
All that was needed was to re-rivet the can opener and all would be well again. Luckily, I had some rivets lying around of the right size. I grabbed my pop-rivet gun and 5 minutes later, it was ready to open cans once again…joy.
FixItWorkshop, Sep’17, Probus Butterfly Can Opener repair
FixItWorkshop, Sep’17, Probus Butterfly Can Opener repair
FixItWorkshop, Sep’17, Probus Butterfly Can Opener repair
I quite like the idea of this vacuum cleaner in that it’s lightweight, easy to use, highly portable and easy to maintain. All things that make a great product.
The particular vacuum cleaner came in to the workshop, just outside of its warranty period and had been looked after well. However, it had developed a nasty intermittent cutting-out problem when in use. I also noticed that the charger’s flex had also cracked near the wall plug, making it dangerous while charging.
First things first and it was off with the rollers and filters to clean any obstructions that might make a device like this overheat. Nothing obvious there, but all items cleaned and washed as a precaution to allow the roller to move freely and the vacuum to breathe easily.
Closer inspection of the handle area revealed a weakness in the design which had meant that the quick-release mechanism had caused an electrical connection to degrade, causing the cutting out.
The only remedy was to address the handle’s weak point with a mechanical fix and make good the electrical contact.
I hope Bosch take note and make an improvement in this area on an otherwise nicely engineered item.
I also did a small repair to the damaged flex on the charger.
Cost of a new vacuum cleaner, circa £250. Cost of screw… less than 50p (without my time of course!)