Repair, kettles and er, the Citroen 2CV

Less is usually more. Simpler devices can mean repair is more likely in the event of failure.

I keep a model of a Citroen 2CV car on my desk at work.  It’s about 30-odd years old and it’s a bit battered due to an incident involving a shelf, my old cat and an 8ft drop, but that’s another story.

IMG_20200704_122535
FixItWorkshop, Worthing, July’20, The 2CV (AZ series)

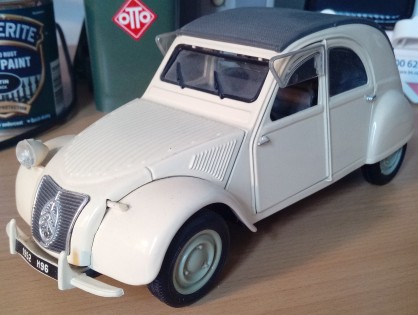
The 2CV is there to remind me to keep things simple, to the point.

To me (and many others) the 2CV represents pure function over form.  Nothing on the car is superfluous to its function as a capable load lugging, robust, ever-repairable and frugal vehicle. I have a soft spot for these cars. They encapsulate the phrase ‘less is more’.

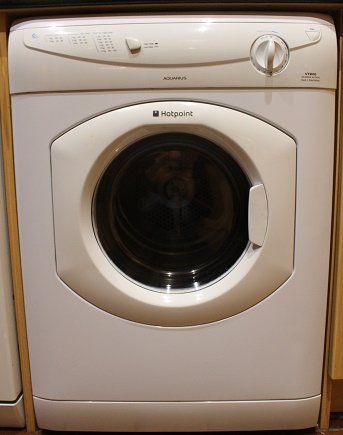
Not every story from the workshop is rosy and my heart usually sinks when I receive something to fix that has tiny printed circuit boards fitted inside that do ‘something’ and nothing at the same time.

What the Tin Snail do I mean by that? Many appliances and machines manufactured in the last 20 years or so often contain ‘mini’ circuits that control ‘something’.

Take an electric kettle, something that most people have in their homes. Kettles generally are a water holding vessel, a heating system, and an on/off switch with a boiling water state detecting negative feedback loop (it switches off by itself when the water boils).  There’s also some wire and stuff.

Electric kettles haven’t really changed that much over the years, after all the basic need hasn’t changed:  You put water in, you switch it on, you get hot water to make a drink. Nothing has changed. However, many offered these days are fitted with things like filters, LED lighting and other electronic temperature control systems with bells on.

Trouble is, all these (kettle) gadgets tend to be controlled by a small circuit board which isn’t repairable or even replaceable. It only takes an accidental water spill, some static electricity or bump mishap and that tiny circuitry is toast.  Not even a professional circuit repair agent, let along home spanner wielder would have a chance of repairing the broken circuit. When failure occurs, many will just discard the appliance and go and buy another one, quickly. Who wants to be without tea or coffee?!

The tragedy is that the rest of the (kettle in this case) appliance is, nine times out of ten, OK and if it was made with more traditional components that one could see with the naked eye, the appliance would stand far more chance of being repaired easily and economically. Something to think about, next time you’re considering a new purchase.


Why are some spare parts more expensive than a complete product?!

I struggle to buy a replacement part for a reasonable price.

I’ve been meaning to do a little article on this problem for a while and I apologise in advance if (you’re still reading) this seems like a rant.

Why-o-why-o-why are manufacturers still allowed to price spare parts dearer than a complete product?

IMG_20190810_102348
FixItWorkshop, Worthing, Aug’19, Triton Cara and Enrich Showers.

Recently our electric wall shower gave up the ghost and tripped the electrical breaker in the fuse cupboard.  Not great when it happens mid-wash.

The shower was a few years old and registered with the manufacturer for support for things like recalls and so on.  I had fitted the shower myself and it it had been a reliable product until this point.

Out with the screwdrivers and multimeter.

The 8.5kW heating element is split into two circuits, one for half-power and one for full.  Most people would use full power, but you might be able to get away with using it on half or economy mode in summer, when the water feed is generally warmer.

All micro switches seemed to be working OK, which was a bit of a shame actually as it meant that the heater can was probably faulty.  It was.  Half the heater can tested OK, the other half was dead.  Oh dear.

IMG_20190810_102404
FixItWorkshop, Worthing, Aug’19, Triton Cara heater can.

After visiting some shower spares suppliers and the manufacturers’ own website, I discovered that the spare part I needed wasn’t cheap at over £50 delivered.  I saw some advertised for £70 on some third-party sites.

Price of part
FixItWorkshop, Worthing, Aug’19, Triton Cara replacement heater can spare part.  Price sourced from triton.co.uk, correct 10/08/19.

I was fuming.  Why so expensive?  I mean, you’d have to be out of your mind to part with your hard-earned cash on a spare part like this when you can buy the whole unit for less.  See below.

price new
FixItWorkshop, Worthing, Aug’19, Triton Enrich/ Cara – new price listing.  Price sourced from Screwfix.com, correct 10/08/19.

The Cara shower has been replaced by the Enrich and is basically the same product, by another name.  Therefore, the high price of the spare part in this instance cannot be blamed on low manufacturing volumes as the showers are still made, are widely available and have been in production for a long time.   Something is ethically wrong with Triton’s spare parts pricing policies.

Now, I don’t want to beat-up Triton, they’re not alone and many manufacturers do the same, but there are now many forward-thinking companies out there getting it right.  Maybe Triton will revisit their spares listings.

Despite my natural leaning to repair and recondition, I had to admit that simple logic won the day and I bought a whole new unit from Screwfix.  The Enrich shower fitted exactly where the Cara had been and worked perfectly.

I thought about this situation long and hard and decided that for this type of appliance, a spare part should not cost more than 30% of the current retail price.  In this instance, I would have been prepared to pay about £15.00 for a spare part. 

In a world where we need to encourage people to repair appliances (and anything else) manufacturers need to facilitate a reasonable and proportionate spares back up service.  It’s as simple as that.

Still, there is a bright side to this tale.  The old shower’s solenoid, mixer, control knobs and switches all work fine and I’ll keep those as spares to be used again in a shower or something else that comes along.

The heat is on…

Dimplex DX300T heater gets repaired in the workshop.

I acquired this Dimplex heater as the previous owner had reported that it had tripped their electrics and smelled of burning, it was perfect material for the workshop.  The owner had given up on it and I felt like I could give it a second chance.  This is the usual way we end up with much of the stuff in our home.

Now, this heater is only a few years old and on the face of it, it looked in reasonable condition, with just a couple of scratches, so it would be a shame if I couldn’t get it working.

With electrical faults like this, I always check the basics; the condition of the flex and mains plug etc.  I then measure for resistance to earth from either live or neutral to see if there has been any electrical shorts, that would have triggered the reported fuse incident.  All clear.

Through the top heat vent, I had a quick look at the inside of the heater to see if any stray paperclips or other metallic item had found its way to the heating element or wiring creating an electrical problem, again, all clear.

Upon checking the mains plug again, something didn’t seem quite right.  It felt a little ‘warped’.  I’d already checked the fuse for continuity via the live and neutral (there was resistance), but it was time to take it out to have a proper look.  The plug on this heater was a ‘moulded-on’ type, with no screws and the fuse carrier was accessible from the outside, should it need replacing.  Upon levering the fuse holder out, the plastic carrier sheared off, revealing burned plastic and signs of melting.  The plug was toast.

I decided to break the plug cover off and see what was going on.  The plug had ‘run hot’ for some time causing the casing to melt and smoulder and the excess heat had probably caused excess resistance, exacerbating the problem, making the previous owners’ electrics to go pop.

This slideshow requires JavaScript.

With the cover ‘broken off’ the plug, I was then able to cut back the internal connections and remove the cable from the mouldings, without sacrificing the cable length, which was a good job as the flex was quite short anyway.

I always keep a few replacement ‘quality’ mains plugs in the workshop for occasions like this, as not all moulded plugs are terribly well made and the melted one I had here was a good example of what can happen when the quality of the plug can’t match the potential current flow required.  The heater is rated at 3K Watts (max), which would mean a current of 12.5 Amps, which is close to the 13 Amps fuse fitted.  Poor quality materials and connectors would generate excess resistance and therefore heat.  The resistance was probably detected by the sophisticated minature circuit breaker in the previous owners’ electrics board, which was a good job as who knows what could have happend if the plug had been next to something flamable.

With a new plug fitted, the old fuse re-fitted, the heater sprung to life and didn’t seem to draw excess current when checked.  A nice cheap fix and I didn’t even have to take the heater apart.

Cost of a replacement heater:  £50 (circa)  Cost of repair:  One cup of tea.

Morphy Richards smoky heater

A heater with a broken motor gets a clean up…

I like the classic, function-over-form design of this heater.  Simple, clear, chunky controls and nothing included that isn’t needed.  Less is usually more.

This 1980s heater, although very well made and clearly designed with longevity and repair in mind was a little bit, er smoky.

IMG_8365
Fixitworkshop, February’19, Morphy Richards fan heater.

It appeared that the fan wasn’t running and the smoke was coming from old dust which had settled inside the machine.  I don’t think that the heater had been used in many years.

The heater came apart very easily, just three self-tapping screws holding the sides together to the main shell.

On first examination that the shell was out of shape and that it had come in to contact with the fan itself, forcing it to far down the motor shaft on to the motor body.  So, all that would be needed would be reposition the fan and re-shape the outer heater shell, a simple fix then.  Not quite.

The motor did not spin easily and even with a little penetrating oil on it, it was turning slowly, with the mains applied.

The motor was an induction type, with no brushes and didn’t obviously have anything restricting the motor’s spin.  I know that even apparently clean motor parts can have deposits of unseen oil and muck that can stop an otherwise good motor from working properly.  In situations like this, I tend to use brake cleaner or similar to break down the dirt.  Once cleaned, just a couple of drops of sewing machine oil on the moving parts and that usually cures things.  I was in luck and after performing a mild service on the motor, it was spinning at full speed once again.  Quite literally warming.

This slideshow requires JavaScript.

With the parts all back together, the heater was ready to run for many years to come.

Cost of replacement:  £15.00    Cost of repair:  £0.00, one cup of tea and a Bourbon.

Very leaky Renault Clio

A Clio gets it’s drains cleared

I’ve owned my fair share of banger material motors, but I’ve never known one as rain intolerant as my latest car.  I bought a ‘one owner’ Clio for not a lot of money, as a hack to get to work.  The car was very honest.  It honestly told me that not much in the way of maintenance had been done- in recent times.

Anyway, £60 or so on service and maintenance parts later and the 120K mile machine responded well, trouble was, that I needed a brolley and wellington boots to drive it, it leaked so much.  My 1983 Austin Mini was more water resistant, it was that bad.

After doing a bit of Googling, I found that the classic Renault fault with the sunroof seals had plagued my car, but that wasn’t the end of my problems.  Both door card gasket (the gasket between the door card and metal) had failed.  A reel of £6.99 mastic tape fixed both sunroof and door card leaks, happy days.

However, when it rained hard, I still needed wellies to drive.  This leak was eventually traced to a hidden drain hole, buried deep within the bulkhead/ scuttle area.  A few videos on YouTube mention this, but I thought it was still video worthy to cover again with the wiper mechanism and heater blower removed to see the drain more clearly, in the hope it might help fellow Clio Mk2 owners with perpetual Athletes foot.

Enjoy!

Hotpoint ‘Rumble’ Tumble Dryer VTD01

A noisy tumble dryer gets fixed cheaply

Strange noises from machines play on my mind.  None more so than when that niggling noise starts to get worse.  Noises like that usually mean two things.  Catastrophic failure and expense.

Time to disconnect from the mains and fetch the tool box.

The patient in the surgery this week is our own Hotpoint tumble dryer.  We avoid using it at all costs, but with miserable English weather and two children, getting washing turned around efficiently, ready for use is mandatory.  To be frank, I’d noticed the excess whinning bearing noise coming from the dryer for a few uses, but it was getting to the point where it was hard to ignore.

Electric hot air tumble dryers are pretty simple things.  They work by sucking cool air in, heating it up under thermostatic control and then blowing it in to a rotating drum.  The moist air is then expelled via a filter and then hose, to atmosphere.  Tumble dryer models of this kind will have the following:  A motor, heater, thermostat circuitry, timer and a drum.  There isn’t much to go wrong and many parts for UK tumble dryers are available, cheaply from places like eSpares.co.uk.  Usually, no special tools are required if you want to have a go at fixing your machine and I recommend you do of course.

IMG_7419
FixItWorkshop, Worthing, December’18, Hotpoint VTD01 Tumble Dryer.

After opening up the cabinet, access to the drum and motor was available by the side panel which was held in position with several self-tapping screws and hooks.  Care must be taken if you attempt something similar on your machine since there are plenty of sharp edges to watch out for.  This dryer features an AC induction motor (which has no motor brushes).  It has a spindle which runs through the motor with a pully one side to drive the drum via the belt and a fan the other to blow the hot air.  Removing the belt and spinning the motor by hand revealed the problem.  The spindle spun OK, but sounded rough.

Replacement motors are available at a reasonable £90 or so, but you know me by now, I don’t like spending that kind of money, unless I have to.

The motor is attached to the appliance with simple bolts and is removed easily.  The motor is held together with self-tapping screws, which are easily accessible.  Just two bearings feature in this motor; one at each end to support the load.  Both bearings sounded rough, but seemed not to be worn too much.  The bearings are standard items and it would be easy to find exact replacements from a bearing supplier (rather than replacing the whole motor), for under £20.  However, as this was my own machine, I went for cheaper fix, to squeeze more life out of what I already had.  With the dust cover popped off from both bearings, I cleaned both with isopropyl alcohol cleaner and then re-greased with quality high-melt point bearing grease.  Much better.

This slideshow requires JavaScript.

The motor re-assembled, re-installed back in the machine and it was time to switch on.  It now sounded as sweat as a nut.

If and when the bearings get noisy again (and they will eventually), I’ll replace the bearings with new ones.

Cost of replacement:  circa £200.  Cost of repair:  My time, two cups of tea, one custard cream, a bit of grease.  Not in that order.

Chilly Hotpoint Tumble Dryer (VTD00)

A cheap fix for an old tumble dryer.

A tumble dryer that didn’t dry

img_3201
FixItWorkshop, Worthing,  Feb’17.  Hotpoint (VTD00) tumble dryer (Ariston, Creda, Indesit similar.  Now drying once more…

This machine is our very own, which decided to stop drying clothes.  Everything seemed to work; the drum was going around, the timer was working and nothing sounded out of sorts, but it started taking longer and longer to dry clothes.  In short, it wasn’t well.

This particular model is well documented online as it’s the same one with a world-wide model recall.  Fortunately, Hotpoint/ Indesit/ Creda/ Ariston have an excellent recall process and information service.  In fact if you’re concerned about yours, please visit http://www.hotpointservice.co.uk/safety-notices/ to see if your machine is listed.  This machine had been modified and was cleared safe for use.

Anyway, it was time to dig out the tools.  There’s not much to a tumble dryer really, the most expensive and important part being the motor, which in this case was fine.  Having tested the heating elements for suitable resistance, it was time to check the wiring, which also tested fine.

Since the machine would heat up and then cool, it suggested a temperature control system fault.  This machine has three temperature sensors; one in the exhaust and two on the back of the heater, the latter two to act as heat control and safety cut out.

If you’re still reading,  it turned out that the exhaust thermostat sensor was at fault.  Once it has allowed a brief heat cycle, it would shut down for ages.  It had excess temperature switch ‘hysteresis’.  The spare part was about £12, so versus the cost of a replacement machine at about £170, it was well worth spending time on the machine.