More power please

Does your toy have enough energy?

IMG_20200304_211145
FixItWorkshop, Worthing, March’20, testing a battery (featuring my retro BT multimeter).

I’m not a fan of batteries. They run out and always when you least expect it.

You know that anything with a battery, will need attention at some point.

Batteries either need to be replaced or better, recharged.

But often, replacement batteries are the only option for toys, which can mean high running costs. Especially when the toy is played with continually by an enthusiastic child owner!

Trouble is, a mixture of built-in obsolescence and poor design means that it’s just not obvious how one replaces duff batteries meaning that, I suspect, lots of toys get thrown away needlessly, but it’s not the owners fault necessarily.

Sadly, some replacement batteries cost more than the toy itself, which is just mad.

Make and model: toy radio control car (no brand or model)

Fault reported: Not working

Cost of replacement: £10ish

Manufacturer support:  0/10

Cost of parts: £5 (batteries)

Hours spent on repair: 30 minutes

Tools needed: Screwdrivers, test meter etc

Sundry items: None

Repair difficulty: 0/10

Cups of tea: 1/2 cup

Biscuits: None

This slideshow requires JavaScript.

The owner of this toy had played with it non-stop wearing the batteries out.  Mum and dad had replaced some of the batteries in the car part of this toy, but still the toy didn’t work.  It wasn’t clear to the parents, which batteries in what part of the toy needed to be replaced, which meant that an email asking for help, popped in to my inbox.

At first glance, the car part of the toy had no battery cover or compartment, but on closer inspection, the car separated in to two halves, allowing access to the 4 X AA (1.5V) batteries.  Not a straightforward task for everyone.  Testing each battery revealed that they were all worn with an average of 1.3 volts (much lower under load) each.  I replaced these with fresh ones and put the car back together.  The car’s casing was simply held together with a clip and a couple of small screws.

However, the toy still wasn’t working, time to test the radio controller.  Again, a screwdriver was needed to open the battery compartment to access the battery.  Not all households have screwdrivers (even though I believe they should!).

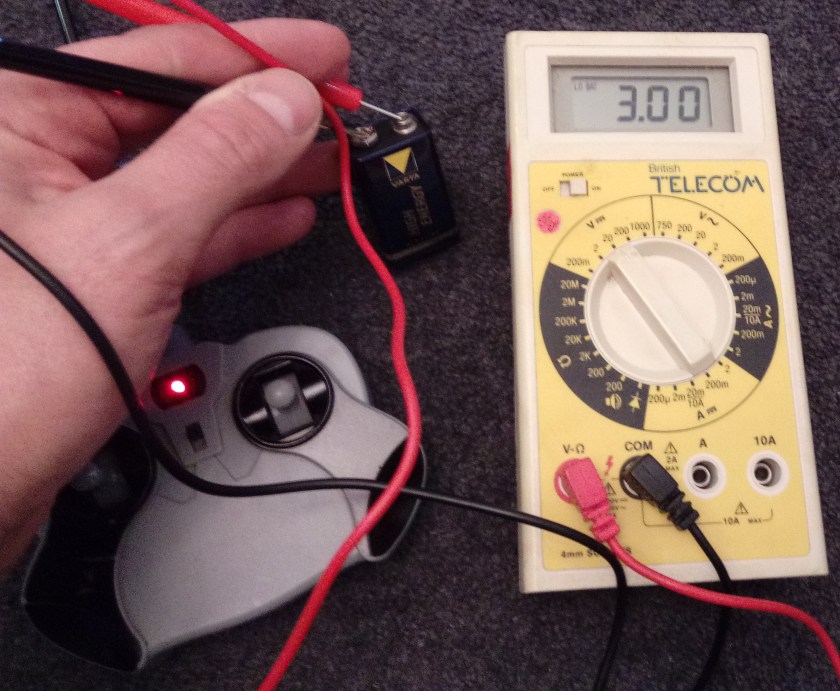
Testing the 9V PP3/ 6LR61 battery revealed around 3 volts, 6 volts too low.  Again, a new battery got the radio controller working once more.

Doing this ‘repair’ got me thinking.  Batteries can be tricky things to manage.  New ones can go flat when not in use and old ones that have been kicking around in a drawer for a while can be fine to use.  One can replace batteries with ‘new’ ones which are no better than the ones fitted, leading a user to believe that the ‘thing’ must be faulty.  A false positive.

With a little basic training on multimeter use, hours and cash can be saved by testing pesky batteries.  At under £5 for a basic multimeter, it could be money well saved for any household.  Just a thought.

With both car and radio controller switched on, the toy sprung to life.  Of course, I had to test the car thoroughly before handing it back(!).


Magic Lamp

Rub the lamp release the genie, make three wishes (make ’em good)

IMG_20200206_210036
FixItWorkshop, Worthing, March’20, Dimmable Projector Lamp

I’d say that 8 out of 10 repairs commissioned by folk who get in touch are for sentimental reasons.  Take this unusual lamp.  It’s not worth a great deal of cash, it doesn’t use the latest luminescence technology and it doesn’t even have a makers’ mark (we think it came from Aldi or Lidl).

Yet, it had been a family favourite for years and the owners were keen to see it light their world, once more.

Make and model: Dimmable ‘projector ball’ lamp

Fault reported: Not working

Cost of replacement: £30ish

Manufacturer support:  0/10

Cost of parts: £15.30 plus £3.25 for bulb

Hours spent on repair: 1 hour

Tools needed: Spanner, screwdrivers, test meter etc

Sundry items: None

Repair difficulty: 2/10

Cups of tea: 2

Biscuits: 1 Gold Bar

Firstly, we all make mistakes and here’s one of mine!

It’s easy to fall into traps or ‘snap diagnosis’ when doing a repair and I want to share a ‘little accident’ that I had with this one.  Even an experienced repair bloke can make mistakes.

Here goes.

After checking the mains plug (all fine) and cable to the lamp for continuity and potential shorts to earth, I was convinced that the supply lead was fine.  All good so far.

Next, I checked continuity from the dimmer module to the lamp socket.  Ah ha, that’s the problem, that link in the circuit is dead.  A quick repair job, on to the next?  Not quite.

As a temporary test, I decided to by-pass the dimmer and rig a temporary wire to the lamp, to prove the wiring was OK and that the dimmer was the fault.  Upon plugging the mains plug in, the bulb nearly exploded.  Bang!  My safety circuit breakers then stopped the power to the whole workshop.  I was now in darkness, but luckily, my heart was still ticking.

I had failed to realise that the dimmer on this light was actually doing two jobs; dimming the lamp as well as stepping down from the (UK) mains 240VAC supply to a safer 12VAC operating power.  I had connected 240 Volts to a 12 Volt bulb!  What a simple mistake to make.  If I had simply inspected the dimmer more closely, I would have realised this.  The original sticker and badges on this lamp had long disappeared.  An important lesson, relearned.  Time for a cup of tea and a biscuit.

The repair.

With the power back on, it was time to see what the original dimmer was doing.  Not much as it turned out and due to the tininess of the dimmer’s components and build type, I was unable to say why it had failed.  I suspect that one of the power sink control components (maybe a Zenner diode) had failed, causing an overload to the onboard one-time blow fuse.  However, that’s just an unproven theory.  The fact was that I now needed a replacement dimmer with step-down 240/12VAC capability.

This slideshow requires JavaScript.

It turns out that only a couple of manufacturers make such a dimmer module and I chose one made by Relco as it seemed to match the original specification quite well.  It would have been tempting to convert the lamp to mains power and just fit a simple on/off switch, but I’m not keen on this as technically, the lamp would need to be re-subjected to British/ EN Standards, not something I was prepared to do.  Unless impossible otherwise, all kit leaving the workshop must be original specification or better.

With a new (correct) dimmer wired-in and replacement MR11 bulb fitted, the lamp came to life once more.  I’d also fitted a proper mains on/off switch, since the replacement dimmer did not have one.  The new switch would isolate the flow of power to the whole thing when not in use, hopefully prolonging the life of the dimmer module.

The owners of this lamp were very pleased to have it back as they had missed the lovely light patterns it projected on to their ceiling.

Micro Mini Scooter tune up

A Micro Mini Scooter gets a little TLC

IMG_0983
FixItWorkshop, Worthing, March’20, Micro Mini Scooter.

I like Micro scooters and I would have loved one when I ‘were a boy’.  My daughters have them and they love zipping along the pavement on them to school.  The scooters handle well and are well screwed together.  They are also well supported from a spares point of view, so I like them even more.

Make and model: Micro Mini Scooter

Fault reported: Back wheel stuck

Cost of replacement: £55

Manufacturer support:  7/10

Cost of parts: £2.00

Hours spent on repair: 30 minutes

Tools needed: Cleaning tools/ cross-head screwdriver/ Allen keys

Sundry items: Silicone spray/ cleaning rags/ PTFE spray for steering

Repair difficulty: 2/10

Cups of tea: 1

Biscuits: 1 custard cream

The scooter in the picture belonged to my friend’s son who’d taken it through one too many puddles I think, as the rain water had taken its toll on some of the scooter’s moving parts.  Over time, the rear wheel’s bearing had suffered excess water ingress, had rusted and had seized.  I’m always amazed at how ‘stuck’ things can get with only a small amount of rust.

This slideshow requires JavaScript.

In their wisdom, Micro have decided to fit their products with generic bearings commonly fitted to skateboards, roller boots, bikes, cars, photocopiers etc, which means that replacement bearings are a doddle to obtain.  I bought some upgraded bearings with better water seals for under £10, so I know that the repair will last longer than the original equipment fitted from the factory.

The front wheels were seemingly fine, so I left them alone. ‘If it ain’t broke, don’t fix it’.

On this model, the rear wheel comes off with one Allen key bolt holding a retaining a stub axel, which slides out with a little persuasion.  The bearings just pop out of the wheel using a small screwdriver as a lever and before fitting new equipment, I always clean the area first to ensure that no dirt is trapped, which could cause premature bearing failure in future.

With the new bearings in, stub axel refitted, a quick wipe down with a strong cleaning wipe, a little PTFE lube applied to the scooter’s steering mechanism and it was ready to see another day.

Bonza.

Hooray for Henry!

A Numatic Henry vacuum cleaner gets the kiss of life…

IMG_1545
FixItWorkshop, Worthing, March’20, Numatic ‘Henry’ vacuum cleaner HVA200a (to be exact).

There are times when only no-nonsense suck will do.  Other vacuum cleaners offer the moon on a stick, but rarely live up to the repeated abuse of everyday life.  Henry on the other hand is tough, no-nonsense and above all, reliable.

Reviewers of this kind of thing, seem to agree.

Make and model: Numatic International ‘Henry’ vacuum cleaner HVA200a

Fault reported: Dead/ not running

Cost of replacement: About £130, give or take

Cost of parts: £17.25

Hours spent on repair: 1

Tools needed: Cleaning tools/ cross-head screwdriver

Sundry items: Silicone spray/ cleaning rags

Repair difficulty: 2/10

Cups of tea: 1

Biscuits: 1 bourbon, I think

I have friends in trades who will only buy and use Henry ‘hoovers’ as they last, always work and are easy to use. And above all, who doesn’t like an appliance with a smiley face?

The example in the picture above had been used by a local Worthing taxi driver everyday for the last 15 years without any problems and was in pretty good nick.  The filter was clean and apart from some wear and tear scratches, still looked like the current model.

One day, Henry failed to switch on and after the owner had checked the fuse in the plug, he decided to get in touch with the workshop.

IMG_1546
FixItWorkshop, Worthing, March’20, Henry’s on switch.

The HVA200a has two speed settings, one at 600 Watts power and one at 1200 Watts power, selectable by a red switch and indicated in a red tell-tail lamp.  When plugged in, nothing was happening.

Time to perform surgery.

Opening up Henry’s casing was straightforward and top marks to the designers for creating sensible parts that fit together logically.  Henry is designed to last and be repaired.  All very pleasing.

This slideshow requires JavaScript.

With the lid removed, all electrical checks were made from the plug to the end of the flex, down to the motor.  The flex was in good condition with no snags, shorts or earth faults.  The cable winder on this model is a simple handle operating spindle and was a bit sticky.  The contacts inside the gubbins were also tarnished, so while it was all in pieces, I decided to clean all of the electrical contacts with cleaner and make sure all the sliding parts of the cable winder were clean and had a small dab of silicone spray for smoothness.

Testing for current around the circuit revealed that the speed control board was where things stopped.  The speed control board was dead and required replacing.

To prove this fact, I was able to temporarily by-pass the controller and connect the mains switch to the motor, which revealed that the motor was strong.

A quick bit of shopping with my favourite parts suppliers yielded a replacement (updated) speed control PCB for under £20, which seemed like good value to me.  After making a note of the wiring (see slideshow), the new PCB was connected up, the casing back together and Henry was ready to run, once more.

I also decided to give Henry a little polish too, just because.