Keeping a light on the subject

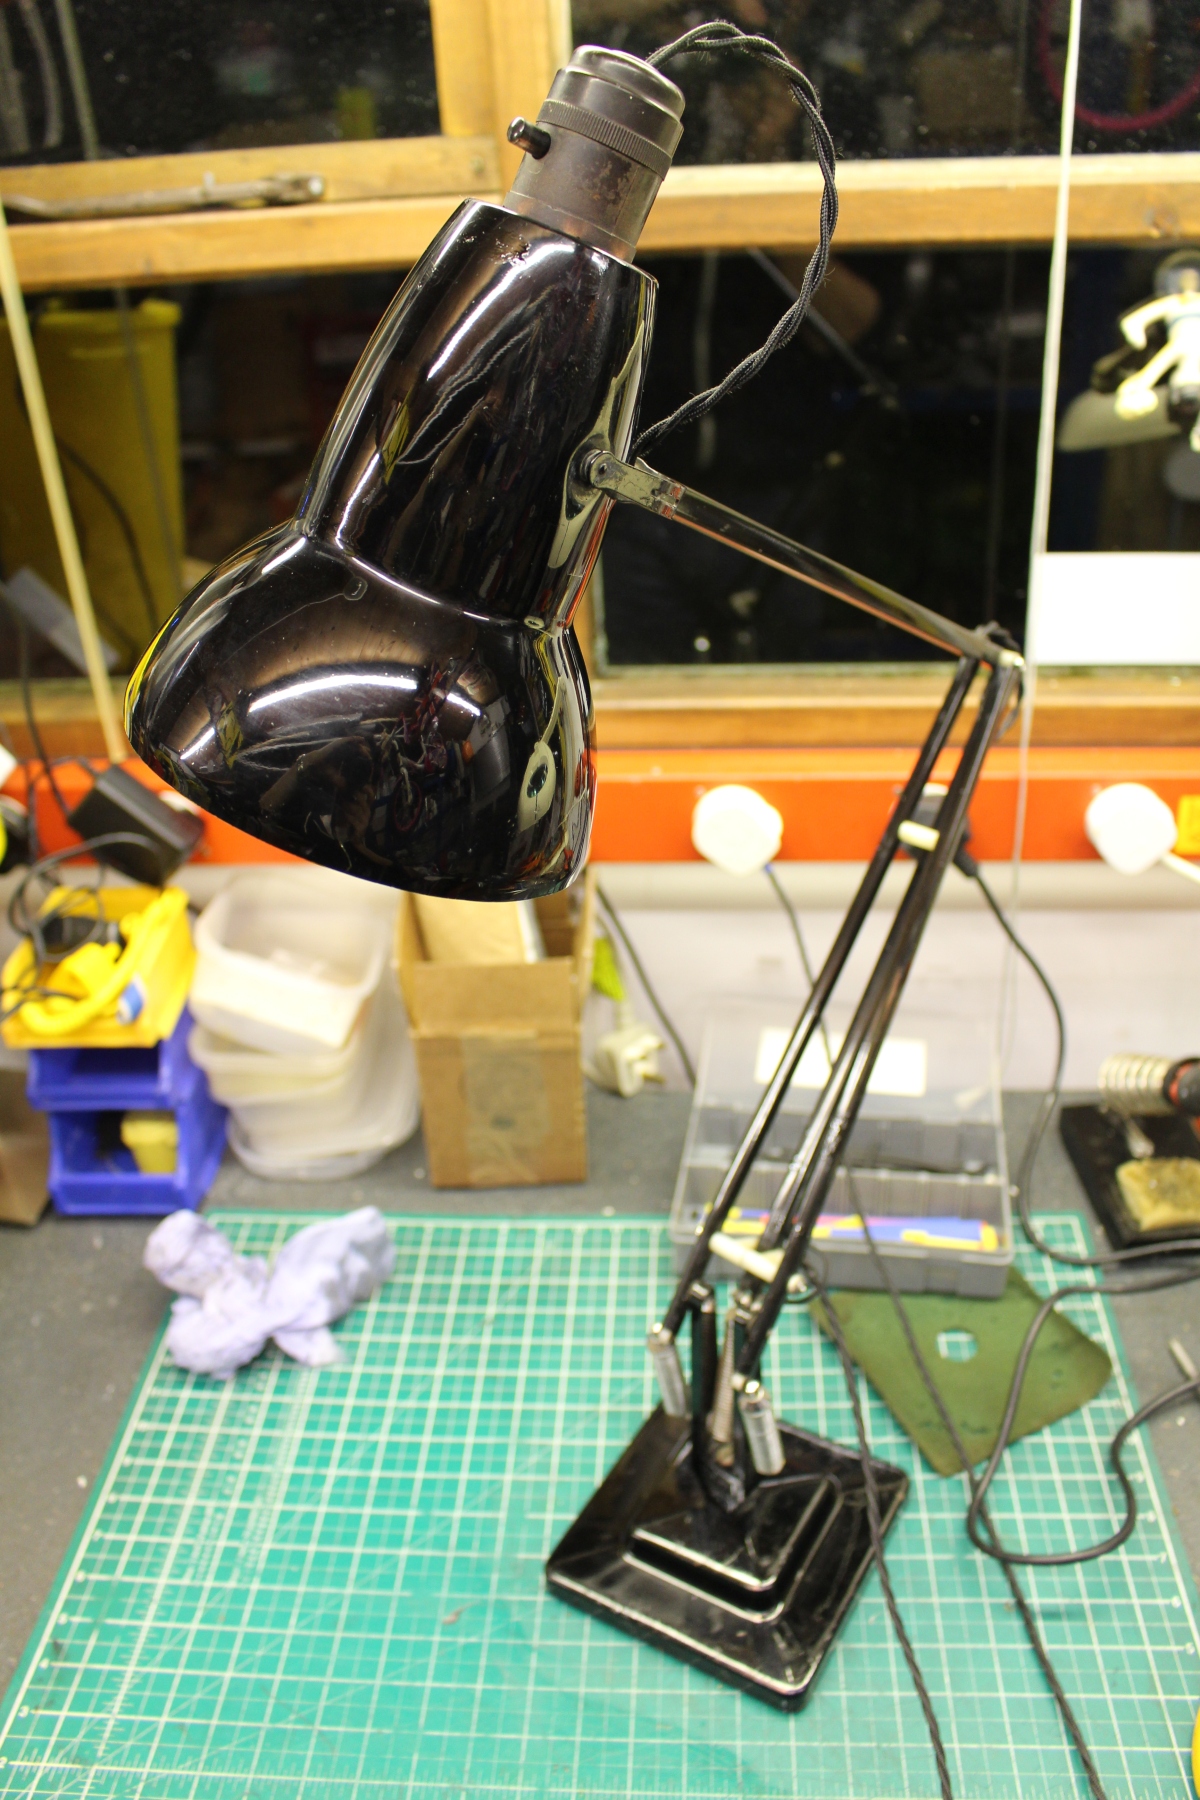
A Herbert Terry 1227 lamp gets a light make over in the workshop.

This lamp needs no introduction.  Herbert Terry Ltd first produced ‘Anglepoise’ lamps in England from 1934 and this 1227 model is instantly recognisable, with its art-deco characteristics and perfect proportions. Some of those early examples have survived to today and are now very collectable.

Make and model: Herbert Terry 1227 ‘Anglepoise’ lamp

Fault reported: Wiring requires replacement

Cost of replacement machine: £80.00 -£300.00 for an equivalent

Manufacturer support (in the UK): 8/10

Cost of parts (for this repair): £20.00

My time spent on the repair: 1.5 hours

Tools needed: Small knife, pliers, small screwdrivers, soldering iron, cutters, scissors

Sundry items: Cable, heat shrink, impact adhesive

Cleaning materials: Silicone spray, contact cleaner, wipes

Repair difficulty: 5/10 (fiddly)

Beverages: 2 teas

Biscuits: 2 chocolate digestives

Bad language: 4/10

My customer contacted me to ask if I could overhaul his family’s Anglepoise lamp and had told me that it was in daily use, but they all felt that the wiring was getting on a bit, and therefore they’d lost confidence in it. In other words, they were worried about a small fire or electrocution.

That’s the trouble with old, well-made stuff like this. Often, on the outside, it all looks fine and sturdy with a quick clean up, and it’s easy to forget that some things are as old as they are. But, one has to bear in mind that after all that time here on earth, things like plastics, rubber grommets and wire insulation break down with age and can be damn right dangerous. 

At 70 years old, this lamp was not in mint condition, but had been well looked after. It was still complete, with its original Bakelite bayonet bulb holder and switch, which is a rarity as they often crack. Over time, they get replaced with ‘B&Q special’ items, which never look right. Sadly, the original lamp holders are no longer available, but there are good alternatives out there, which will do the match well, if you know where to look. No issues with this one as it was all in very good order.

So to the brief; give it clean up, remove some rust, replace the worn-out felt base and re-wire, without over-restoring it. After all, it was wearing its age well, and a total re-spray would have removed all the ‘patina’.

Only a basic tool kit was required with this job, nothing fancy but with things like this, I tend to use a penetrating oil on all metal moving parts as rust and fatigue can make some fixings fragile. After all, I don’t want to add unnecessary cost to the job and while the oil is doing its thing, I can always have another brew, so there’s really no excuse not to do this. Only fools rush in and all that.

After I stripped all the old wire out, paying attention to the correct cable routes, I cleaned up anything previously covered up by the old cable. New modern fabric-covered plastic flex is available at a reasonable price, so that’s what I used and while there, I took the time to earth the frame of the lamp as a ‘Class One’ device. Technically, with a plastic/ Bakelite bulb holder, this isn’t required, but as I had some three cored cable, I decided to earth the metal base as a precaution. It couldn’t do any harm.

Normally I like to preserve as much as I can of the original parts, but in the case of the felt base, it was knackered. I could have just glued it back on, but that wouldn’t have done it justice. So, after a little raid of my daughter’s craft kit (which is full of off-cuts and felt) I had the perfect green felt, ready to be cut to size and glued in place. No one wants a scratchy base and once set, no one would ever know that the thing I’d just made, wasn’t a stock item. I was quite pleased with it.

A new LED bayonet 40W (equivalent), some light polishing, and a PAT (test) and this lamp was ready to be used daily, once again.

Until the next time…

Touch control lamp repair

An old lamp sees the light…

You’ve got to be in the mood for certain repair work.

A friend of ours dropped in a ‘dead lamp’ to the workshop with a message:  “Matt, can you mend it”?  I then sort of forgot about it for er, nine months.  Whoops.  I need to focus on the workshop more.

The lamp was much loved by its owner and its current lack of light was leaving her in the dark.

IMG_1732
FixItWorkshop, Worthing, May’20, Endon Touch Control Dimmable Lamp.

Make and model: Endon Touch Control Dimmable Lamp

Fault reported: Not working

Cost of replacement: £30ish

Manufacturer support:  0/10

Cost of parts: £3 approx.

Hours spent on repair: 30 minutes

Tools needed: Screwdrivers, test meter etc

Sundry items: None

Repair difficulty: 2/10

Cups of tea: 1

Biscuits: Wagon Wheel (Jammie)

These touch lamps were a bit of a novelty back in the day and seem to have fallen out of favour in recent times.  However, the owner of this one was a bit upset when suddenly one day, it wouldn’t work.

When working on anything mains operated, I always start with the basics:

  • Is the bulb working? Yes.
  • Is the mains flex OK?  Again, yes
  • Is the fuse (UK) intact? All OK

Lamps like this are pretty simple; there’s a mains wire, there’s a bulb and holder, a switch and the main lamp unit itself.  Some dimmable lamps, like this one, feature an electronic dimming module, which in this case was built into the base of the unit.

First step:  Remove the base cover

Removing the cover was fairly straightforward and only involved a few self-tapping screws, under the felt pad base.  This exposed the dimmer module, which when tested with the meter, was not outputting any current to the lamp circuit.

Second step: Dismantle the dimmer

Dimmer modules like this are not designed to be repaired and contain no user-serviceable parts (don’t get me started on that!).  But in the past, I’ve had some luck cleaning components and re-heating the odd dry joint with a soldering iron.  In this case, it was no joy.  A replacement module was needed.

Third step:  Find a new dimmer!

I can’t remember what I used to do before finding specialist electronic suppliers on eBay and alike.  Oh yes, I just remembered:  I struggled!

It didn’t take long to find a new (almost identical) dimmer module on eBay for about £3, delivered.  How do they do it for the money?

After 2 weeks of waiting, the new module arrived in the post, hand delivered by our usual friendly posty, Keith.

This slideshow requires JavaScript.

Forth step:  Fitting the new module and test

Comparing the dimmers side-by-side revealed that they were more or less the same, using the same wire colours…but in a different combination.  This meant that it wasn’t a simple ‘cut and re-join’ the new dimmer to the existing wiring.  Oh no, it meant cutting everything out and starting again.  Still, with only four wires, it didn’t take long.  With a little soldering and heat shrink, one would never know I had been tinkering.

A good job, jobbed, even if it did take me months to get ‘aroundtuit’.

Quite literally illuminating.


Magic Lamp

Rub the lamp release the genie, make three wishes (make ’em good)

IMG_20200206_210036
FixItWorkshop, Worthing, March’20, Dimmable Projector Lamp

I’d say that 8 out of 10 repairs commissioned by folk who get in touch are for sentimental reasons.  Take this unusual lamp.  It’s not worth a great deal of cash, it doesn’t use the latest luminescence technology and it doesn’t even have a makers’ mark (we think it came from Aldi or Lidl).

Yet, it had been a family favourite for years and the owners were keen to see it light their world, once more.

Make and model: Dimmable ‘projector ball’ lamp

Fault reported: Not working

Cost of replacement: £30ish

Manufacturer support:  0/10

Cost of parts: £15.30 plus £3.25 for bulb

Hours spent on repair: 1 hour

Tools needed: Spanner, screwdrivers, test meter etc

Sundry items: None

Repair difficulty: 2/10

Cups of tea: 2

Biscuits: 1 Gold Bar

Firstly, we all make mistakes and here’s one of mine!

It’s easy to fall into traps or ‘snap diagnosis’ when doing a repair and I want to share a ‘little accident’ that I had with this one.  Even an experienced repair bloke can make mistakes.

Here goes.

After checking the mains plug (all fine) and cable to the lamp for continuity and potential shorts to earth, I was convinced that the supply lead was fine.  All good so far.

Next, I checked continuity from the dimmer module to the lamp socket.  Ah ha, that’s the problem, that link in the circuit is dead.  A quick repair job, on to the next?  Not quite.

As a temporary test, I decided to by-pass the dimmer and rig a temporary wire to the lamp, to prove the wiring was OK and that the dimmer was the fault.  Upon plugging the mains plug in, the bulb nearly exploded.  Bang!  My safety circuit breakers then stopped the power to the whole workshop.  I was now in darkness, but luckily, my heart was still ticking.

I had failed to realise that the dimmer on this light was actually doing two jobs; dimming the lamp as well as stepping down from the (UK) mains 240VAC supply to a safer 12VAC operating power.  I had connected 240 Volts to a 12 Volt bulb!  What a simple mistake to make.  If I had simply inspected the dimmer more closely, I would have realised this.  The original sticker and badges on this lamp had long disappeared.  An important lesson, relearned.  Time for a cup of tea and a biscuit.

The repair.

With the power back on, it was time to see what the original dimmer was doing.  Not much as it turned out and due to the tininess of the dimmer’s components and build type, I was unable to say why it had failed.  I suspect that one of the power sink control components (maybe a Zenner diode) had failed, causing an overload to the onboard one-time blow fuse.  However, that’s just an unproven theory.  The fact was that I now needed a replacement dimmer with step-down 240/12VAC capability.

This slideshow requires JavaScript.

It turns out that only a couple of manufacturers make such a dimmer module and I chose one made by Relco as it seemed to match the original specification quite well.  It would have been tempting to convert the lamp to mains power and just fit a simple on/off switch, but I’m not keen on this as technically, the lamp would need to be re-subjected to British/ EN Standards, not something I was prepared to do.  Unless impossible otherwise, all kit leaving the workshop must be original specification or better.

With a new (correct) dimmer wired-in and replacement MR11 bulb fitted, the lamp came to life once more.  I’d also fitted a proper mains on/off switch, since the replacement dimmer did not have one.  The new switch would isolate the flow of power to the whole thing when not in use, hopefully prolonging the life of the dimmer module.

The owners of this lamp were very pleased to have it back as they had missed the lovely light patterns it projected on to their ceiling.

Dim Lumie Bedbug

Lumie bedbug glows once again.

A short repair tale about a little bedtime bug.

A friend mentioned that their son’s Lumie Bedbug lamp was intermittently working and that it was shortly going to be visiting the bin if it didn’t buck its ideas up.

Er, no I said.

IMG_20190524_142951
FixItWorkshop, Worthing, May’19, Lumie Bedbug.

The bug night light was meant to glow orange, once switched on, but it only lit up when the cable was wobbled about.

The power connection on this model is a standard USB (B) connector, the ones commonly used to charge Android phones.  If the power lead was faulty, it would be easy to find a suitable replacement.

The bug comes apart by removing the silicone outer layer and releasing the tangs holding the two halves of the bug together.  One screw holds the PCB in place and once removed, the whole thing comes to pieces.

The USB socket was a little out of shape, presumably from some rough handling.  A quick nip with a pair of pliers and it was back as it should be.

The plug was also a little out of shape, but with a bit of careful re-shaping, it fitted the socket perfectly.

This slideshow requires JavaScript.

Once reassembled, reconnected and powered up, the bug glowed without flickering.  Result.

Cost of replacement:  £50.  Cost of repair:  One tea and one custard cream, that I made myself.

Leave the light on…

A Philips outdoor wall lamp with a major case of built-in obsolescence, gets a cheap fix.

A mate of mine mentioned that his outdoor wall light had given-up-the-ghost, despite not being more than three years old.  He’d put them up around his house as part of an extension and exterior restoration project.  The trouble was that despite only being a few years old, the product now seemed to be discontinued.  This meant that, should the lamp need to be replaced, he would need to replace all of them (three in this case) to keep them matching.  Annoying quite frankly.

IMG_20181112_194358.jpg
FixItWorkshop, March’19, Philips outdoor wall light, working.

He’d read that the bulb within the Philips lamp was not replaceable, in which case a faulty lamp would render the whole thing broken, which seemed very daft to me.  Items made in such a way that prevents even the most basic of repair get me very annoyed.  Sometimes an item is developed in such a way for safety reasons but I suspect that most of the time, the motive is just pure greed.  It’s such a shame.

At my mate’s house, over a cup of tea, I removed the lamp from the wall to take back to the workshop, to see what Philips had been getting up to.

Opening up the casing was straightforward, just a few simple screws and retaining nuts holding the casing together, before finally revealing the bulb itself, under a lamp diffuser.

IMG_7609
FixItWorkshop, March’19, Philips outdoor wall light, lamp unit.

The bulb/ lamp unit itself appeared to be a custom/ bespoke disc light, that wasn’t user serviceable.  It had blown and there was evidence of scorching on a few of the LEDs, linked in series, indicating the failure of the entire circuit.

I couldn’t find any replacement disc LEDs suitable for the lamp from any of the usual sources, which I expected.  It could be that Philips can supply a replacement disc, but this was not evident on their website.

Not wanting to be beaten by a bespoke part, I thought about what else might work, within the lamp’s enclosure, to have the same effect.  I had a spare GU9 LED bulb, about the same brightness, sitting on the shelf, left over from another project which was going spare, so I set about fitting it in the space.

The generic GU9 bulb, available from most hardware shops, fitted in the existing disc mounting bracket, with a small modification and once connected to the lamp’s circuitry, worked well, albeit with a slightly warmer glow.

In case anyone else has the same problem, I made a little video of the repair.  I hope it gives others inspiration if faced with a similar problem.

Cost of replacement (with something similar): £50.00.  Cost of repair:  £1.50 for the bulb and a couple of Belgian beers for my time.