Inside The Real Repair Shop 10: Storm in a Teacup

With the cost of energy soaring, people are suggesting ways to save money. This time in the Workshop, Matt compares three ways to boil-up to make a brew, a subject close to his heart!

In readiness for a winter of discontent, I’ve already removed the thermostat’s wiring and have prepared thick jumpers for the whole family, made with the added warmth that only loft insulation can bring.  I impressed myself with this stroke of genius and wonder why no-one else has ever tried this before? Can’t imagine why.

There’s a lot of talk about ways to save money on social media at the moment. One only has to do a bit of Googling to learn what we should stop doing or unplug next to save money.  There’s an old saying though that usually stands true: Don’t sweat the small stuff. 

Anyway, where was I? Back in the summer, I had an-over-the-wall conversation with my neighbour, Liz. It started off in the usual light-hearted manner, talking about this and that, when I heard a whistle coming from Liz’s kitchen, a noise which took me back to sometime in the dim and distant past.

Liz had switched to boiling water using a gas stove kettle and reliably informed me that it was ‘cheaper and greener’ to brew-up this way, rather than use her trusty modern kettle.  I very nearly lost my balance, leaning against our diving wall as I laughed and said, “that’s a load of old cobblers” – did I use cobblers, well something like that anyway.  With a slight frown of veiled raged from Liz, we both went off to carry on our evenings, but there was a piece of me worried that I’d offended dear Liz somehow.  What to do?  I’d almost forgotten about the whole thing until it came up again in conversation recently, but this time via another friend of the family.  Rather than scoff this time, I decided to investigate in a shed-like manner to work out who was right, me or Liz.

What is the most efficient way to boil water at the moment?

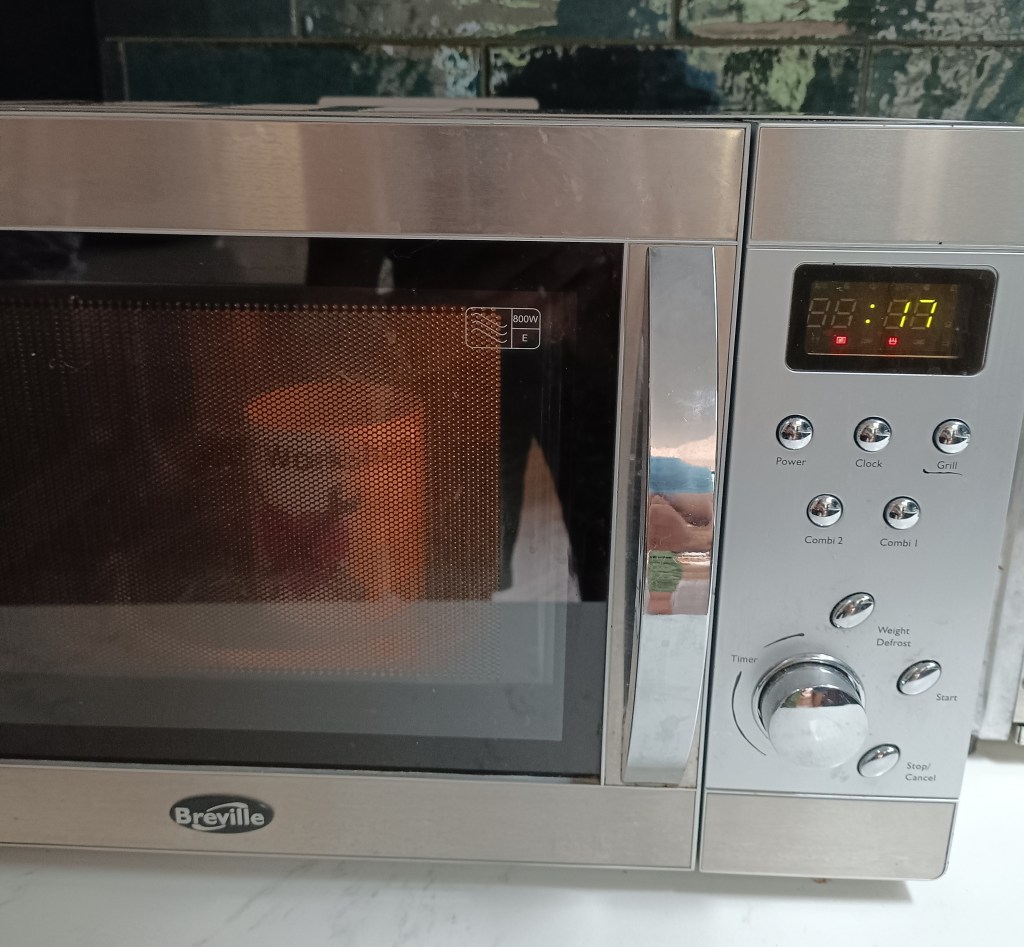
I decided to see just how much one cup (see photo) or three cups of water would take to boil using a modern 2500W electric kettle, a gas stove kettle (hob rated at 1500W) and a jug in an E rated 800W microwave.  Just for kicks.  Hasn’t everyone done this?  I used the same cup for the whole experiment.  Water was taken from the cold tap at room temperature.  I used the stopwatch on my phone and used a base rate of 29.48p/Kwh for electricity and 7.32p/kWh for gas. We’re with Eon and these rates seem to be ubiquitous at the moment. I timed how long either one cup or three cups would take to boil using each boiling vessel.  I started the test from the ‘on’ switch on the kettle, the gas ignited on the hob or the ‘on’ button on the microwave.  The test ended when the kettle switch turned off, the stove kettle first whistled and boiling bubbles were observed in the microwave.  By now, I’m sure you’re on the edge of your seats.

Everyone’s an expert these days and while I’ve done my best to make this a real-world test using a moderately scientific approach, I’m sure someone out there will drive a coach and horses through my method, but don’t bother, the results are astounding.

THE RESULTS ARE IN

Time matters

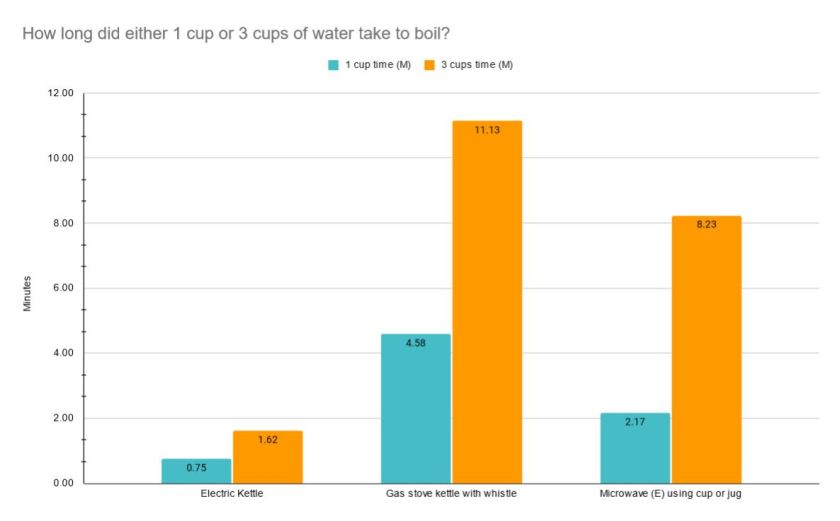
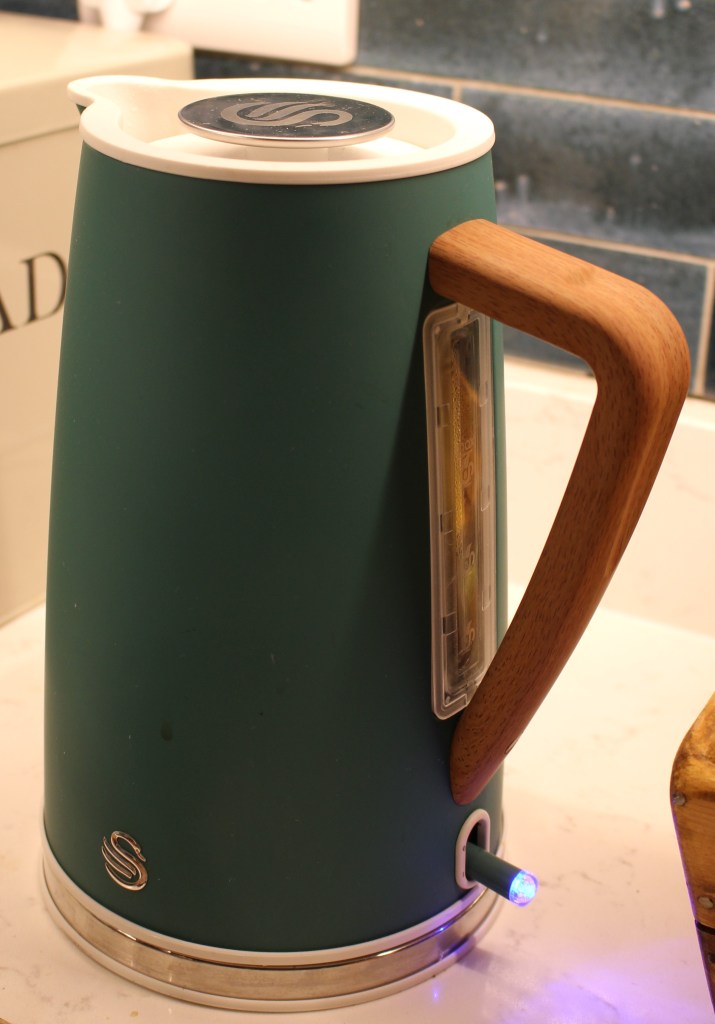
If you’re always in a rush and need your cuppa in a flash, then the only way to go is to use a modern electric disc-element kettle, like the one in the photo.  Using a microwave was second fastest, but not much faster than the very slow (by comparison) gas stove kettle.  One, nil, nil to the electric kettle then.

The real boiling issue – what did it cost?

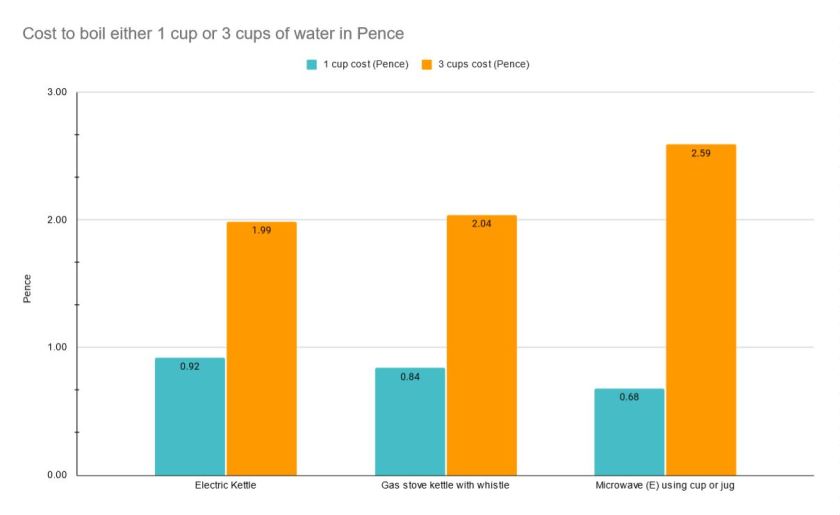
Gas is cheaper than electricity on my energy tariff, which is a similar story for many other domestic customers at the moment. The microwave proved to be the cheapest method to boil one cup of water followed by gas in this test, but the results changed dramatically when three cups were boiled – a complete reversal in fortunes in fact. Three-way tie.

Environmental impact

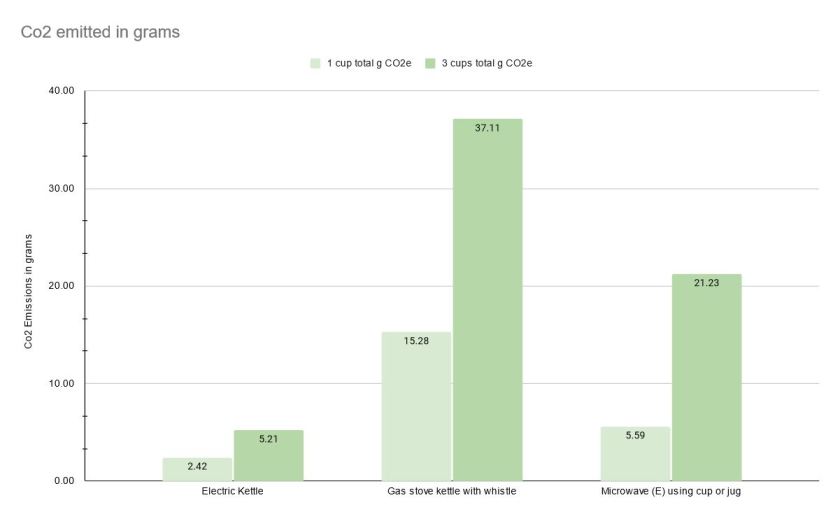
What about the CO2 emitted? Perhaps the trickiest measure to nail down, but using Defra* approved conversions, based on the kWh for both fuels, it stands to reason that the electric kettle emitted the least CO2 as it was on for the least amount of time. The electric kettle triumphs overall.

*UK Department for Environment, Food & Rural Affairs

So, in conclusion, a gas stove may be cheaper to make a brew for one (at the moment), but one must be careful to measure the water required carefully and a slight increase in the tariff could see all savings easily eroded. The microwave was the wild card entry (my mate Paul’s suggestion) and it proved that it’s a reliable and cheap way of heating, if compared to the stove – for some forms of cooking. 

The bottom line is that a modern electric kettle will do the job faster, usually cheaper and cleaner than its rivals.  Time for a brew? Go on, treat yourself.

Dinner will be served in a flash…

A Tulip A350T Electric Rice Cooker is repaired

IMG_2609
FixItWorkshop, Worthing, June’20, Tulip A350T 12Y1EI (to be exact).

I particularly enjoy receiving something to fix that I’ve never come across before.  Indeed, I’d never used an electric rice cooker, let alone heard of Tulip, the manufacturer of this example.  To be frank, I haven’t often thought about the popularity of electric rice cookers in general as an additional labour-saving device in the kitchen.  Clearly, I must be slipping.

This actual machine was a family treasure, which had moved around a bit and had originally been purchased in Holland and had since been converted from using a standard Euro plug to IEC/ kettle UK mains plug at some point.  All very interesting you say (maybe), but how did it end up in my workshop?

Make and model: Tulip A350T Electric Rice Cooker

Fault reported: Not working

Cost of replacement: £30

Manufacturer support:  0/10

Cost of parts: £2.00

Hours spent on repair: 1 hour

Tools needed: Screwdrivers, test meter, heat shrink, looped crimps etc

Sundry items: Cleaning materials

Repair difficulty: 3/10

Cups of tea: 2

Biscuits: Custard Cream X 2

After many years of reliable service, poor old ‘Tulip’ decided it had had enough of boiling up pilau rice and assorted vegetables and conked out.  When the owner tried to switch the cooker on, nothing happened, no light, no heat, no hope.

Most people would then usually have thrown in the towel, reached for their phone and within a couple of clicks, bought a new one on Amazon to be delivered the next day.

Perhaps it was the thought of poor old Tulip being crushed in the scrap metal pile at the tip which made the owner go online and find my website of strange domestic appliance tales instead of Amazon*…  But I’m glad they did.  *other online electrical retailers are available!

The machine is basically a large kettle with a removable bowl that holds whatever you wish to cook.  It has a thermostat for temperature regulation, a switch to change modes (cook/warm) and a safety cut-out mechanism, should something go wrong.  It was this safety system which had operated and caused the machine to fail-safe.

The design of the machine is quite simple, dare I say crude in places.  Within a few minutes, I had removed the base, exposing the wiring, switch, thermostat and other gubbins.

The earth bonding cable had melted which was the first alarm bell to ring.  Digging a little closer, the main issue revealed itself.  The heat-proof insulation on the ‘over heat’ one-shot thermal fuse had shorted out via a cracked piece of wiring on the metal casing of the unit.  Surprisingly, this had not overloaded the main plug fuse, but had heated the thermal fuse and had blown that instead.  Flash-bang, kaput.

The cooker’s switch, thermostat, element and other wiring checked out OK, so it was now worth fixing the failed system.

After purchasing a suitable replacement thermal fuse for a couple of quid, I set about installing this in place of the failed one, taking the time to upgrade the wiring harness with heat shrink to avoid a short again in future.  I removed the damaged earth and replaced it with fresh wire, securing it on to a better earth-bonded location and after some careful wire re-routing and fettling, the base of the machine was ready to be re-attached, ready for testing.  With the cooking bowl full of water and power applied, the ‘cook’ light lit up and the machine started to work.  Utter joy.  After a few cycles of heating and warming, I was satisfied that my work was done.

This slideshow requires JavaScript.

Even though this device wasn’t marked as such, it’s a metal bodied Class One device here in the UK and ideally required a thorough integrety test of the safety system.  Using my newly-acquired Megger PAT150 tester, I was able to prove that the machine was compliant with current UK legislation for Portable Appliance Testing.  Ricely done.


Hooray for Henry!

A Numatic Henry vacuum cleaner gets the kiss of life…

IMG_1545
FixItWorkshop, Worthing, March’20, Numatic ‘Henry’ vacuum cleaner HVA200a (to be exact).

There are times when only no-nonsense suck will do.  Other vacuum cleaners offer the moon on a stick, but rarely live up to the repeated abuse of everyday life.  Henry on the other hand is tough, no-nonsense and above all, reliable.

Reviewers of this kind of thing, seem to agree.

Make and model: Numatic International ‘Henry’ vacuum cleaner HVA200a

Fault reported: Dead/ not running

Cost of replacement: About £130, give or take

Cost of parts: £17.25

Hours spent on repair: 1

Tools needed: Cleaning tools/ cross-head screwdriver

Sundry items: Silicone spray/ cleaning rags

Repair difficulty: 2/10

Cups of tea: 1

Biscuits: 1 bourbon, I think

I have friends in trades who will only buy and use Henry ‘hoovers’ as they last, always work and are easy to use. And above all, who doesn’t like an appliance with a smiley face?

The example in the picture above had been used by a local Worthing taxi driver everyday for the last 15 years without any problems and was in pretty good nick.  The filter was clean and apart from some wear and tear scratches, still looked like the current model.

One day, Henry failed to switch on and after the owner had checked the fuse in the plug, he decided to get in touch with the workshop.

IMG_1546
FixItWorkshop, Worthing, March’20, Henry’s on switch.

The HVA200a has two speed settings, one at 600 Watts power and one at 1200 Watts power, selectable by a red switch and indicated in a red tell-tail lamp.  When plugged in, nothing was happening.

Time to perform surgery.

Opening up Henry’s casing was straightforward and top marks to the designers for creating sensible parts that fit together logically.  Henry is designed to last and be repaired.  All very pleasing.

This slideshow requires JavaScript.

With the lid removed, all electrical checks were made from the plug to the end of the flex, down to the motor.  The flex was in good condition with no snags, shorts or earth faults.  The cable winder on this model is a simple handle operating spindle and was a bit sticky.  The contacts inside the gubbins were also tarnished, so while it was all in pieces, I decided to clean all of the electrical contacts with cleaner and make sure all the sliding parts of the cable winder were clean and had a small dab of silicone spray for smoothness.

Testing for current around the circuit revealed that the speed control board was where things stopped.  The speed control board was dead and required replacing.

To prove this fact, I was able to temporarily by-pass the controller and connect the mains switch to the motor, which revealed that the motor was strong.

A quick bit of shopping with my favourite parts suppliers yielded a replacement (updated) speed control PCB for under £20, which seemed like good value to me.  After making a note of the wiring (see slideshow), the new PCB was connected up, the casing back together and Henry was ready to run, once more.

I also decided to give Henry a little polish too, just because.