Kenwood Chef A901 -a fishy story!

If your Kenwood Chef A901 starts to smell of burning, don’t despair, it can usually be saved.

I had an enquiry via this site from a fisherman who was very upset that his trusty Kenwood Chef A901 had given up the ghost.  Rather than using the Chef to make Victoria sponges, it had been used to prepare fishing bait.  It just demonstrates how versatile these machines are.

Kenwood Chef A901
FixItWorkshop, Oct’17, Kenwood Chef A901 with motor speed control fault.

Whilst it was in use, the owner witnessed a bang then the smell of burning before the machine came to a halt.  The plug was quickly pulled!

Whilst discussing the fault on the phone, I suspected that the fault was probably due to the failure of the motor speed control circuitry, which is known to fail with age.  I had carried out similar repairs to other machines, including my own (in this blog) so agreed to take a look.

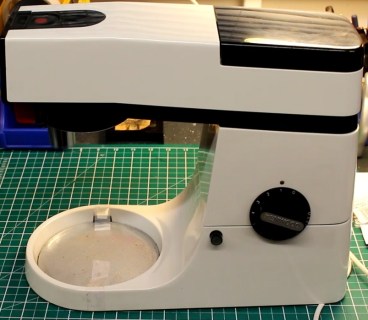
I received the machine quickly and upon inspection, the machine had obviously been cared for and considering its age, was in good condition.  The smell of burned-out components was clear, lifting it out of the box.

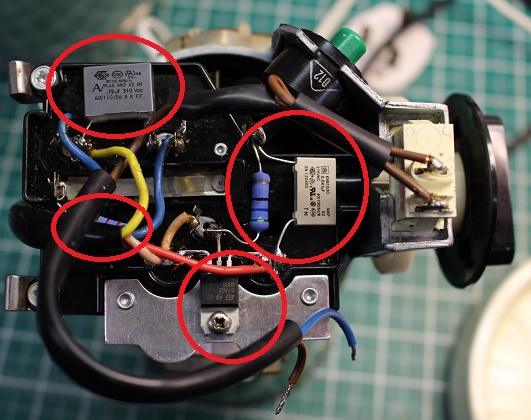
Dismantling the machine and removing the motor on the A901 is fairly straightforward, providing you allow time and make notes on where things go.  The components that need to be replaced are very accessible and anyone with moderate soldering skills would be OK with this task.

Luckily, the Chef is very well supported by long-term aftermarket suppliers and I bought an off-the-shelf spares kit at £14.10 delivered, from KAParts (www.kaparts.co.uk) via eBay, featuring upgraded components.  This kit is a little dearer, but component technology has moved on since this machine was first on the market, so fitting anything else is a false economy in my opinion.

With the old components removed and replacements fitted, the motor ran smoothly and fully reassembled, the machine is now ready to mix bait mixtures once again.  Lovely.

Cost of a new machine: Circa £300 and up.  Cost of repair:  £44.10 (kit plus my time).

Here’s a little video I made of the repair.

Enjoy.


Opening a can of worms (or not)

A little repair for my trusty Probus can opener…

Readers of this blog would have worked out by now that I’m a little bit sentimental.

A short story:

When I moved away from home, many years ago, my mum made me a ‘moving out kit’ in which contained a trusty Probus Butterfly can opener, the classic British design can opener type.  Today, it broke.  I was gutted.

You can still buy the same tool for just over £1, so it clearly doesn’t usually cost-in to repair such an item.  However, all that seemed to be wrong was a broken pivot or spindle.  The original riveted fixing had worn and eventually sheered off today when opening the cat food.

All that was needed was to re-rivet the can opener and all would be well again.  Luckily, I had some rivets lying around of the right size.  I grabbed my pop-rivet gun and 5 minutes later, it was ready to open cans once again…joy.


Duff CDA Microwave WD900DSL23

I couldn’t repair this one…

I don’t normally take on microwave repairs.  I don’t have reasonable means of testing, even if I managed to get something working.  However, a friend asked me to look at this one to see if ‘something simple’ had failed.  This particular model also fitted nicely in her kitchen on existing wall brackets and the thought of refitting all the brackets for another machine seemed daunting!

The microwave was doing something strange:  With microwave plugged in, the turntable turned slowly on its own, the display and control buttons completely unresponsive.  Disconnecting the power first, it was time to completely ignore the ‘do not remove cover’ sticker and remove the cover.  Hey, someone must have assembled it to start with?

A quick look at the control board revealed no obvious faults and all the thermistors and micro-switches seemed to work OK.  Since there was no other item controlling the components in the oven, it was off with the control panel PCB.  After basic testing of the surface components, I decided to run the soldering iron over the connections, in the hope that I might clear a dry joint.

This was not to be.  With the PCB reconnected, the oven powered up, the same thing happened, the turntable operated by itself.  The board was duff!

Sadly, this microwave is heading for the great scrapyard in the sky since control boards for these ovens are outrageously expensive with the cost of replacement far outweighing the cost of a complete machine.  This is such a great shame.

I doubt that many parts vendors sell many of these PCBs as most owners wouldn’t bother to order at the prices I’ve seen.

Still, we tried to save it.

Blocked Hoover Steam Cleaner

Hoover Steam Cleaner Repaired!

I’ll put money on the fact that many steam cleaners like this one are thrown away needlessly due to blockages which could be easily cleared using everyday items.

This Hoover S2IN1300C hand held steam cleaner appeared to switch on OK (LED lamp on), the pump ran OK, but even with a full tank of water, no steam came out of the steam nozzle.

Off with the cover and after checking the pipes for leaks and pinches, it appeared that all was well.  The pump did indeed run and the boiler appeared to get very hot.

After a fair bit of dismantling, it appeared that the nozzle was blocked by a build-up of chalk.

IMG_3923
Hoover Hand Held Steam Cleaner, July’17, repaired at the FixItWorkshop, Worthing, England.

Cost of replacement; £30-50, cost of repair – some white vinegar.

Have a look at the video…


Kenwood Chef Repair

Kenwood repair in Worthing, West Sussex

Smelly Kenwood Chef A901

img_2959-resized-smaller
FixItWorkshop, Worthing, Jan’17.  Repaired Kenwood Chef A901

This Kenwood Chef developed a nasty little problem. The failure smelled expensive and the Chef even puffed out some smoke when it began to fail, it would operate, but noisily and badly, so it to the workshop it had to go.

It was in decent overall condition and has loads of accessories, so definitely worth saving since a new one is over £300 new.

Since the speed control circuitry is a common failure on models of this age, it seemed sensible to start there.  On this unit, access wasn’t a problem and the issue was quickly diagnosed.  Both capacitors had failed (spectacularly)  and one of the resistors had become weak by about 20 Ohms or so.  Repair kits are readily available online for those who are willing to save these excellent machines, so after removing the faulty components, new items were fitted.

Another little annoying problem with the Chef, was the main drive belt.  It was intermittently rubbing the main plastic body of the unit, making a horrible sound and melting some of the casing (only cosmetic).  The motor mounting spacer had compressed on one side causing the belt to not run correctly.  This was fixed with a small washer to correct the belt’s alignment.

With a little bit of grease, WD40, Brasso, contact cleaner, repair kit and washer, the whole job took a couple of hours (including fettling time) and cost me under £8.  Definitely worth the effort considering the price of a replacement Chef.

Here’s a picture of the new components fitted in situ…

img_2958-circles
FixItWorkshop, Worthing, Jan’17.  New capacitors, resistors and triac fitted, fixed!